
Forums › Personal Discussion Zone › PDZ Users N through Z › Shree.ai Discussion Zone › 2018.05 Private Lesson Series Shree.ai
Please type your comments directly in the reply box - DO NOT copy/paste text from somewhere else into the reply boxes - this will also copy the code behind your copied text and publish that with your reply, making it impossible to read. Our apology for the inconvenience, but we don't see a convenient way of fixing this yet.
-
AuthorPosts
-
May 9, 2018 at 14:10 #18241
Jamee Small
KeymasterSession 1 of 6 – May 7, 2018We had a good first session at the pool. I was pleased with how eager you were to explore these new skills. In these notes I will place links to the standard outlines for each of our lessons as well as to articles in our library that address other topics I want to share with you.You may view the outline for the general Balance And Streamline Lessons which we worked through on Monday. I pulled out certain focal points that were most applicable to your needs and we focused on those. From the titles of the other focal points you may get an idea of what those are meant to affect.We started with the Superman drill and then transitioned to Skate Position drill, where you start to build the ideal streamline shape you will use and emphasize in the freestyle stroke. We just started working on that and will continue with it next week.The skills we worked on today – forming the frame along the spine, learning to use that frame to shift weight forward, learning to protect that frame while moving appendages – are not externally exciting, but, as you experienced, they have hidden potential to radically improve your flow through the water.As I noted, if you are content to let go of concern for more intense ‘general fitness’ training for a couple weeks, then you can spend your time in the pool using drills and careful strokes to etch these new skills and patterns into your neuromuscular circuits – this will build up the very specific fitness your neuromuscular system and joints need in order to handle higher intensity with superior form. Eventually you will be able to speed up again and run stronger signals through those neuromuscular circuits under the (positive) stress of aerobic swimming without causing the circuit to trip and revert back to old patterns. I am glad to help you plan out your activities for your personal practice time so that you can do this in a productive and enjoyable wayWHERE WE ARE HEADED
There are four essential features of the freestyle stroke we need to make sure are in place for you to experience the ‘magic’ of the stroke:-
Superman Frame
-
Long, firm Skate Position
-
‘Send Force Forward’ through the Recovery Arm Swing
-
Optimal Arm-Switch Timing
Then, smooth, rhythmic breathing is built upon these.Over the course of our lesson series we work through each of these, making sure you have the essential features in place. In our first lesson, we typically work through the first two on this list.Torpedo Frame
In our first lesson we explored how to create the ‘Superman Frame’ of the body. This frame unifies your shoulders, hips and legs into one unified unit. This frame has two main functions you need to be aware of and take advantage of :-
Water pressure pushing up and gravity pushing down can act uniformly upon your frame making it easier to stay parallel to the surface. This frame creates a surface that water can more easily support so you don’t have to expend effort pushing down in order to hold the body up.
-
This firm, unified frame can more easily transfer force through it.
You worked on keeping this frame parallel to the surface by shifting weight forward through that frame. You did this by letting the weight of the head and the weight of the arms be supported by the water, rather than hold them up.Skate Position
Then, upon this more balanced body you worked on shaping the body into its most ideal streamline shape for freestyle – the shape we call ‘Skate Position.”The Skate Position is the base position for the freestyle stroke – the stroke starts and finishes at this stable, streamline position. It is the foundation on which all other parts of the stroke depend. Skate Position delivers force forward. The better your Skate Position, the more easily you slide forward in the water.DRILLS AND FOCAL POINTS
Balance Drills
-
Standing rehearsal of Superman
-
Superman
Streamline Drills
-
Standing rehearsal for Skate
-
Superman to Skate
-
Swing
-
Swing-Switch
You may view images of these standard TI drill positions on the Freestyle Drill Resources page and you may view videos for some of these drills on the Video Tutorial page.To help you pay attention, interpret and send commands to particular parts of your body I gave you a selection of focal points in each drill.Superman Focal Points
-
Weightless Head
-
Arms On Wide Tracks
-
Hands at Target
Skate Position Focal Points
-
Weightless Head
-
Lead Arm stays on Wide Track
-
Back hand tucked deep into pocket
-
Scapula touches the air
Below are some links to articles in our library that may help you. And, I do hope you will take advantage of this discussion zone to ask me specific questions about what and how to practice. This space is meant to support you in your personal training time!SOME ADDITIONAL READING
You may review our introduction to the Balance Streamline Propulsion Pyramid. You’ll use this BSP organization to help you set priorities in your skill learning process.A central feature of our Total Immersion method is our use of Focal Points to create a super-learning situation for your brain. You may review our introduction to Focal Points.As you do your personal practice between our live sessions, you may appreciate some guidance on how to organize your efforts. You may read How To Practice.If you want even more structure and guidance for how to practices these new skills in an orderly way, you may start studying the Freestyle Fundamentals online course that has been designed specifically for those who are taking or have finished our live Freestyle lesson series. You are enrolled in this online course automatically as part of your live lesson experience.And, lastly, if you want to work out a way to do some longer swim sets though these new skills are too fresh to hold all together at once, you may read Focal Point Swimming for more guidance.June 4, 2018 at 21:13 #18584KeymasterSession 2 of 6 – June 4, 2018Let’s review the four essential features of the freestyle stroke we need to make sure are in place for you to experience the ‘magic’ of the stroke:-
Superman Frame
-
Long, firm Skate Position
-
‘Send Force Forward’ through the Recovery Arm Swing
-
Optimal Arm-Switch Timing
Then, smooth, rhythmic breathing is built upon these.In our first lesson, worked through the first two on this list. In this lesson we reviewed and completed the long, firm frame as the foundation to build our Recovery Arm.Superman and Skate Drills
-
Superman
-
Superman to Skate
Superman and Skate Focal Points
-
Tippy Toes
-
Keep arms soft (like a tree branch)
-
Back hand tucked deep into pocket
Recovery Swing
The ‘wind up’ or delivery of that force-forward requires the recovery arm to come forward in a particular manner. The recovery shoulder and arm move parallel to the spine, never pulling or pushing it. That arm presented to the air draws gravity, and it builds momentum as it swings.That force of gravity is used to send the arm and the high side of the body back down into the water, and the momentum is harnessed to slide the body forward behind the extending front arm.This is the ‘wind up’ for delivering force forward, into the water to cut a path ahead. The body falls onto this skate-blade and slides behind the arm.Overall, we want to create three main features in the Recovery swing movement:-
The shoulder joint ‘opens up’, sliding parallel to the spine, to swing freely, with the least tension or internal resistance.
-
The swing of the arm builds momentum in the forward-only direction.
-
The swing of the arm is fluid, almost weightless feeling.
There are three sections to this whole Recovery movement that we need to construct:-
The exit – how the elbow and forearm-hand will leave the water
-
The recovery swing – how the shoulder and arm move from back to forward position
-
The entry – how the arm is position to enter the water, and the pathway it follows (we’ll focus on this during our next session)
Recovery Drills
- Skate
- One-Arm Recovery Swing (a.k.a. ‘Swing Skate’) (in slow motion)
- Two-Arm Recovery Swing (a.k.a. ‘Swing Switch’)
- Superman + 4 Strokes
- Interrupted Breathing Position (a.k.a. Sweet Spot Breathing)
Swing Skate is where you hold Skate Position on one side and then practice swinging the recovery arm on the other side, in slow motion. There is no switching of the arms.Swing Switch is where you start in Skate, swing the recovery arm, then pause just a moment at entry, then switch the arms, slide into Skate, and repeat on the other side.You may view demonstrations of these drills on the Video Tutorial page. You may also see snapshots of particular moments in these drill positions on the Freestyle Drill Resources page.Exit Focal Points
-
Swing elbow wide (swing out, not up behind the back)
-
Exit The Sleeve (pull forearm and hand out of water as if extracting from a jacket sleeve)
-
No splash exit (the arm slips quietly out of the water)
Recovery Focal Points
-
Swing hand a bit wider (create equilateral triangle shape)
-
Lead with shoulder, to elbow then wrist
-
Relaxed forearm and hand (‘rag doll arm’)
-
Drag the knuckles (‘paint brush’)
-
Elbow reaches shoulder line before wrist
-
Keep fingertips in contact with surface (a.k.a. ‘dragonfly fingertips’)
-
Swing the bag forward

You may view images of these standard TI drill positions on the Freestyle Drill Resources page, you may view videos for some of these drills on the Video Tutorial page, and examine other useful focal points for Recovery and Entry on the 101 Focal Points page.
Additional Notes:
-
We also examined the critical point of pressure throughout the stroke cycle. The Catch and the Recovery arm should move smoothly and at the same rate. Think relaxed and continuous.
-
Remember to extend the Catch arm all the way to the hip before Exiting into the Recovery Swing.
-
Once you have completed the drills and focal point, repeat while exhaling drilling the drills.
July 28, 2018 at 12:43 #19210KeymasterSession 3 of 6 – July 27, 2018
The last lesson, we reviewed the previous content in the Recovery Arm. We were able to briefly touched on Entry Arm Positions. Below are those notes.
Entry Drills
- Standing rehearsal to create entry arm shape
- Swing Skate (swing to Entry Position and dip it a few times)
- 1-Arm Slot (standing, with one arm in entry position, fall forward into Skate)
Entry Focal Points
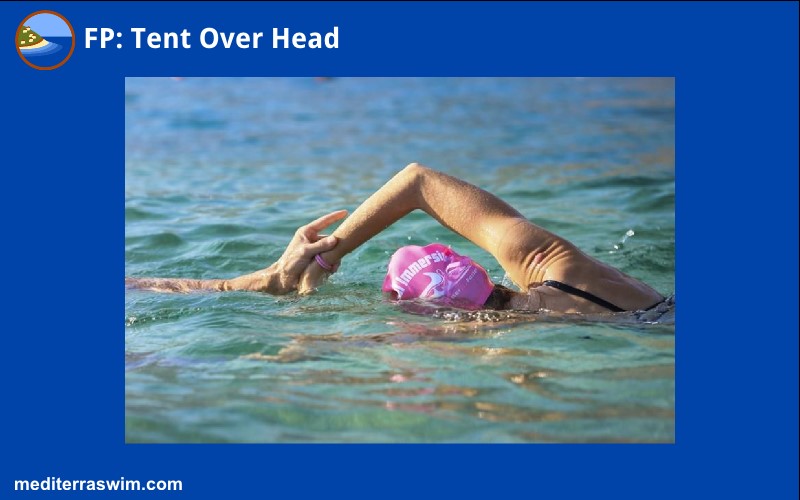
- Elbow high above ear (‘tent’)
- ‘Mail Slot’ Entry above the head, Wide on the Tracks.
- Hand entry position across from opposite (lead arm) elbow
You may examine other useful focal points for Recovery and Entry on the 101 Focal Pointspage.
July 29, 2018 at 18:05 #19218KeymasterHere are some helpful videos from Coach Mat that you may find useful in your understanding and application of the most recent skills we explored together.
Balance
Dry-Land Stroke Rehearsals
Recovery Arm Explained
August 28, 2018 at 14:15 #19596KeymasterSession 4 of 6 – August 28, 2018
Recovery Arm Review
Drills:
- Swing Skate
Focal Point:
- Swing hand a bit wider (create equilateral triangle shape)
- Relaxed forearm and hand (‘rag doll arm’)
- Drag the knuckles (until the last moment, then swing hand forward)
Entry Arm
Bringing the arm to this high elbow position is like building a wave to its peak height before the energy breaks and spills back into the water. It is so tempting to drop that elbow before it reaches its high position above and in front of the ear. Focusing on bringing the hand around will urge the elbow to drop, so let that hand drag behind until the last possible moment (that your shoulder joint comfortably allows). This will urge the elbow to climb higher as it comes forward, coming to its peak position higher than the head.
This high elbow sets up the forearm to aim straight ahead on its track, angled downward steeply into the water. Then you let gravity just pull this arm down into the water and begin extending underwater, following the Ski Jump path to the target.
Drills:
- 1-Arm Slot (standing, with one arm in entry position, fall forward into Skate)
- 2- Arm Slot (standing, with one arm in entry position, and one arm in Skate Position, fall forward and switch arms, slide into Skate)
- Swing Switch
- Whole Stroke
Focal Points:
- Elbow swings forward in front of the head as far as comfortable
- Elbow high above ear (like a tent over the head)
- Feel the stretch in the back as you reach entry position
- Feel BOTH shoulders slide toward the ears, bracing the upper spine
- Forearm aiming straight ahead on track
- Forearm angling down steeply (45 degrees)
- Hand entry position across from opposite (lead arm) elbow)
- Ski jump shape entry path – Slide down to target depth and then extend forward
- Spear wrist through your target
You may examine other useful focal points for Recovery and Entry on the 101 Focal Points page.
Arm Switch Timing
Without focusing on it directly, the drills for the Recovery Swing also set up the critical timing of the arm switch. As you were doing in the drills, your Skate side of the body remain long, firm, and the lead arm should continue extending forward, until the recovery hand arrives at the entry position. This is the best switch moment. Switch a little too early or a little too late and you lose the effect.
You may notice the feeling of acceleration on each stroke when you shaped the entry and timed the arm switch like this. This is exactly the magic we are looking for as these pieces come together!
Memorize this entry position and timing (in the picture above). There is some slight adjustment in the timing for slower or faster tempos, but this is the approximate timing you need to train into your muscle memory.
Drills:
- 1- Arm
- Swing Skate
- Swing Switch
Focal Points
- Trigger Point (Elbow high above ear, forearm facing down, hand directly across from inside of opposite elbow)
- Wrist Enter, Set the Catch
Tempo Trainer and How to Use
September 5, 2018 at 20:45 #19667KeymasterSession 5 of 6 – September 4, 2018
Arm Switch Timing (Continued…)
How To Work With Combinations
You start with paying attention to the connection of two synchronization points at a time (like AB, or BC), examining and refining them. After working with related pairs for a while, you may ‘zoom out’ to hold attention on hold three points at a time (like ABC), feeling how they all work together. In the end, you intend to have all four working in smooth synchronicity, but it will be easier to arrive at that when you work on these in pairs, rotating through the combinations.
Eventually, all the individual pieces are brought together here in the full stroke to create a smooth, powerful, synchronized, whole-body propulsive movement.
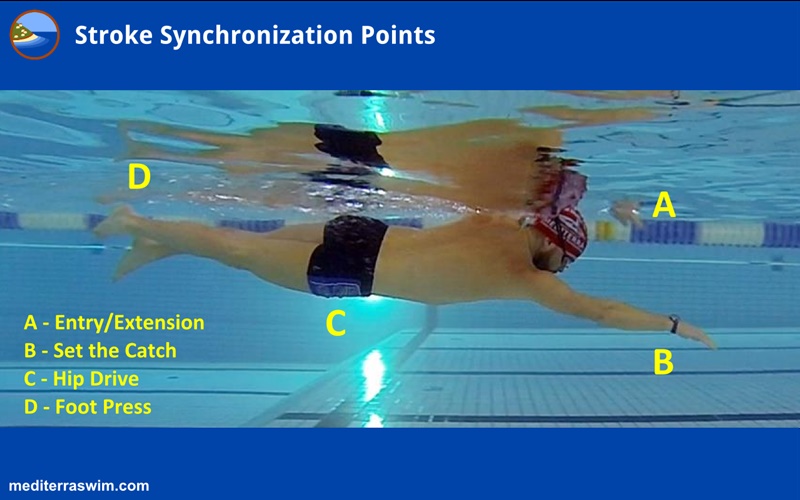
Synchronization Propulsion Combination explains more of the Arm Switch Timing we discussed that the beginning of the session.
For now, we have omitted D (Foot Press).
Using a Tempo trainer for Synchronization while still working on the stroke basic positions can quickly distract our nervous system, as you saw. While learning stroke sensations, split you time between no tempo trainer and tempo trainer. The failure point, the point at which the stroke falls apart, can show as the line from which to work. Listen to your body, it will tell you.
How The Catch/Hold Fits In
Let’s review the four essential features of the freestyle stroke we need to make sure are in place for you to experience the ‘magic’ of the stroke:
- The Torpedo Frame
- Long, firm Skate Position
- ‘Send Force Forward’ through the Recovery Arm Swing
- Optimal Arm-Switch Timing
In the second lesson we worked on feature #3 and touched on feature #4. In this lesson we will build another piece of #3 and then tie it back into #4.
In the last lesson we began to pull pieces of the stroke together – the recovery swing, entry and arm switch timing. When these come together they allow you to ‘touch the magic’ – that moment you feel some acceleration in each stroke that comes from well-shaped, well-timed movements.

To build upon the arm switch timing you started to develop (indirectly) in the previous lesson, in this lesson we examined the catch (a.k.a. the underwater pull/push as it is known in the conventional swimming world). We call it the ‘catch’ and ‘hold’ because our orientation is about holding a point in the water and sliding the body forward, past that point. Our emphasis is on the body moving forward, not on pushing water backward.
This effective forward propulsion depends on the three components each doing their part and being well-synchronized with the others:
- the Catch generates a wave of force
- the Torso Rotation transfers that wave of force from the catch side to the entry/extension side of the body
- the Entry/Extension into Skate Position delivers that wave of force into forward motion
The Catch
The better you perform the catch, the bigger the wave of force you may transmit to the other side of the body.
The quality of this wave depends on:
- The shape of your catch arm in order to get a bigger grip on the water
- The pathway that catch action follows
- The pressure applied – steadily, not too abrupt, not too weak but just right
The focal points below will help you create and improve these three features in your catch action.
Creating the wave with an arm is not enough – it must be tied into the torso rotation so that the torso is doing most of the work of holding the water, which mean it is transferring that force from the catch side to the skate side of the body. So, the lesson starts with a focus on only the catch arm and torso, and eventually adds the other side of the body, completing the full choreography.
Useful Imagery
During the lesson you may have been given one or both of these images/analogies to work with:
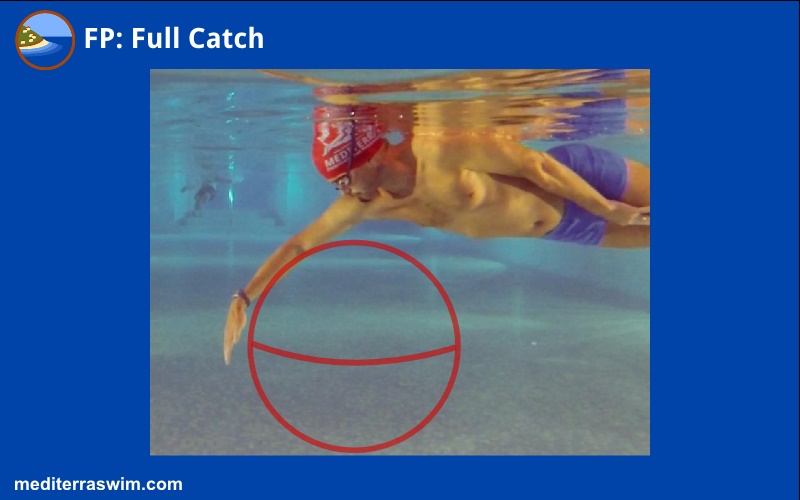
- the ‘beach ball’ of water molecules (or ‘swiss ball’, or ‘pilates ball’ if you prefer)
- the ladder under your body, parallel to the surface
Beach Ball
The beach ball of water molecules represents the pressure zone of water you create and direct with each underwater stroke. You form this pressure zone then send it under your body, especially under your hips and legs to help those ride higher in the water.
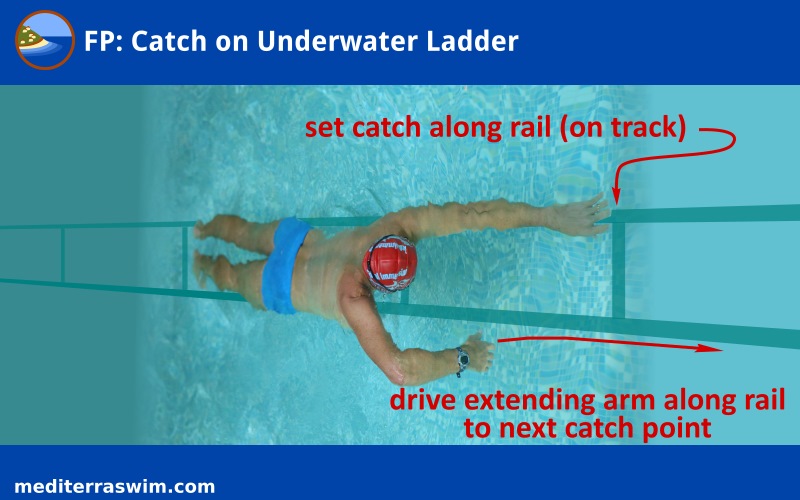
The Ladder
The ladder gives you a directional grid to set the placement and trajectory of your movements.
The two rails correspond to your two arm tracks, and your arms extend forward on that rail, and your catch holds that point on the rail; the rungs represent the point ahead where you set your catch (get a grip on the water).
The depth of the imaginary latter determines the depth of your catch, where that pressure zone is created so that your body-frame can slide over it.
The Catch Drills
- standing rehearsal with catch shape
- 1-Arm Drill (other arm tucked at the side)
- Superman to Skate (with a weighted object in lead hand)
- Swing Switch (two arms) with pause at Entry moment
- Whole Stroke
Focal Points
- Set the catch
- Hand stays on track
- Elbow slide out and upward to make shape of arm
- Touch the ball with entire forearm and palm
- Hold the ball and rotate body past it
- Press the ball straight toward the hip – hips rolls out of the way at last moment
- Press the ball straight toward the toes – send the ball of water under hip and leg
- Press on ball steadily
- Catch hand and extending hand move (on their tracks) exactly opposite to each other, at approximately the same rate of speed
- Hesitate ever so slightly after ‘Set The Catch’ in order to Load The Torso
- Pull with hip (not with shoulder)
The entry and extending arm is the main actor, while the catch arm is the supporting actor. Set a good catch and then focus upon sending force forward into your best Skate Position. The better your Entry, Extension and Skate, the farther you will slide forward on each stroke!
There are more focal points for the Catch on our 101 Focal Points page as well as some demonstration of the 1-Arm drill on the Video Tutorial page.
-
-
AuthorPosts
- You must be logged in to reply to this topic.