
Forums › Personal Discussion Zone › PDZ Users H through M › Juventila.li Discussion Zone › 2018.10 Private Lesson Series Juventila.li
Please type your comments directly in the reply box - DO NOT copy/paste text from somewhere else into the reply boxes - this will also copy the code behind your copied text and publish that with your reply, making it impossible to read. Our apology for the inconvenience, but we don't see a convenient way of fixing this yet.
-
AuthorPosts
-
September 28, 2018 at 16:51 #19806
Jamee Small
Keymaster2018/09/30 – Session 1
Hello Tila,
It was a pleasure to begin working with you today.
In this discussion topic I will leave personal notes on my observations, and place links to the standard outlines for each of our lessons. I will also place links to articles in our library that address other topics I want to share with you.
Today’s Lessons
You may view the outline for the general Balance And Streamline Lessons which we worked through today. I pulled out certain focal points that were most applicable to your needs and we focused on those. From the titles of the other focal points you may get an idea of what those are meant to affect.
We started with Torpedo drill, and then moved into Superman drill and then transitioned to Skate Position drill, where you start to build the ideal streamline shape you will use and emphasize in the freestyle stroke.
The first skills we worked on today – forming the frame along the spine, learning to use that frame to shift weight forward, learning to protect that frame while moving appendages – are not visible outside, not so exciting, but, as you experienced, they have hidden potential to radically improve your flow through the water.
If you are patient, you may spend a good portion of your time in the pool using drills and careful strokes to etch these new skills and patterns into your neuromuscular circuits. This careful work will build up the very specific fitness your neuromuscular system and joints need in order to handle more energetic swimming with good form. Eventually you will be able to speed up the movements and run stronger signals through those circuits under the (positive) stress of aerobic swimming without causing the circuit to trip and revert back to old patterns. As you consider what to do in your personal practice times I am glad to help you plan out your activities for practice so that you can do this in a productive and enjoyable way.
Below are some links to articles in our library that may help you. And, I do hope you will take advantage of this discussion zone to ask me specific questions about what and how to practice. This space is meant to support you in your personal training time!
Some Additional Reading
You may review our introduction to the Balance Streamline Propulsion Pyramid. You’ll use this BSP organization to help you set priorities in your skill learning process.
A central feature of our Total Immersion method is our use of Focal Points to create a super-learning situation for your brain. You may review our introduction to Focal Points.
As you do your personal practice between our live sessions, you may appreciate some guidance on how to organize your efforts. You may read How To Practice.
If you want even more structure and guidance for how to practices these new skills in an orderly way, you may start studying the Freestyle Fundamentals online course that has been designed specifically for those who are taking or have finished our live Freestyle lesson series. You are enrolled in this online course as part of your live lesson experience.
September 30, 2018 at 15:26 #19813Juventila Liko
ParticipantThanks so much for today!
September 30, 2018 at 20:43 #19819ParticipantHi Jamee,
I will review what you added here and also practice torpedo, superman and skate position. Anything else?
Thanks, Tila
October 1, 2018 at 13:18 #19827KeymasterThat’s it. Start here with each Drill and Focal Point. You can add complexity by adding and removing a steady exhale.
Additionally, with each effort, try to relax that head and neck to rest in the water, allowing the same relaxation to travel down the rest of the body.
If you feel your nervous system has grasped the individual focal points, you can try partnering 2 focal points at the same time. If one falls apart, then step back and try one at a time.
October 7, 2018 at 18:48 #19864Keymaster2018/10/07 – Session 2
Where We Are Headed
Let’s review the four essential features of the freestyle stroke we need to make sure are in place for you to experience the ‘magic’ of the stroke:
- The Torpedo Frame
- Long, firm Skate Position
- ‘Send Force Forward’ through the Recovery Arm Swing
- Optimal Arm-Switch Timing
Then, smooth, rhythmic breathing is built upon these.
In our first lesson, we typically work through the first two on this list. In this lesson we will focus on feature #3 and touch on feature #4.
Recovery Swing
The ‘wind up’ or delivery of that force-forward requires the recovery arm to come forward in a particular manner. The recovery shoulder and arm move parallel to the spine, never pulling or pushing it. That arm presented to the air draws gravity, and it builds momentum as it swings. That force of gravity is used to send the arm and the high side of the body back down into the water, and the momentum is harnessed to slide the body forward behind the extending front arm.
This is the ‘wind up’ for delivering force forward, into the water to cut a path ahead. The body falls onto this skate-blade and slides behind the arm.
Overall, we want to create three main features in the Recovery swing movement:
- The shoulder joint ‘opens up’, sliding parallel to the spine, to swing freely, with the least tension or internal resistance.
- The swing of the arm builds momentum in the forward-only direction.
- The swing of the arm is fluid, almost weightless feeling.
There are three sections to this whole Recovery movement that we need to construct:
- The exit – how the elbow and forearm-hand will leave the water
- The recovery swing – how the shoulder and arm move from back to forward position
- The entry – how the arm is position to enter the water, and the pathway it follows
Recovery Drills
- Standing rehearsal
- One-Arm Recovery Swing (a.k.a. ‘Swing Skate’) (in slow motion)
- Alternate Arms Recovery Swing (a.k.a. ‘Swing Switch’) (slow motion, with pauses)
- Alternate Arms Recovery Swing (slow motion, without pauses)
Swing Skate is where you hold Skate Position on one side and then practice swinging the recovery arm on the other side, in slow motion. There is no switching of the arms.
Swing Switch is where you start in Skate, swing the recovery arm, then pause just a moment at entry, then switch the arms, slide into Skate, and repeat on the other side.
In Swing Switch, once you remove pauses, you are getting closer and closer to normal-speed, whole stroke swimming. As you gradually speed up the motion of the swing, you may also gradually lift that forearm out of the water (let the hand go wider to gain clearance), up to the point where your fingernails are still brushing the surface. You may follow this progression to gradually raise the arm up while maintaining your qualities with focal points:
- Full (relaxed) forearm is submerged
- Half of forearm is submerged
- Watchband is submerged
- (soft) Fingers are submerged, dragging through the water
- Fingernails are just brushing the surface
As a useful permanent standard, you may keep your fingernails every so lightly brushing the surface during your recovery swing, all the way to entry. I like to call this ‘dragonfly fingertips’, like a dragonfly skimming the surface of a pond.
You may view demonstrations of these drills on the Video Tutorial page. You may also see snapshots of particular moments in these drill positions on the Freestyle Drill Resources page.
Exit Focal Points
Keep attention on the very moment before the elbow exits the water to begin the recovery swing. Pause there a moment, with elbow tucked against the waist, underwater, in order to override the instinct that pulls the elbow up in the air, behind your back. At the end of the underwater pull, as the elbow arrives beside the waist, that is the moment it needs to swing out wide from the side of the body rather than going high behind it. Once you set the elbow on the correct path, it will be much easier to keep it going in the right way, swinging wide beside the torso.
It is so important that you start the recovery swing in the best way, right from the exit moment. This sets the stage for the rest of the swing. If there is an error in how your arm exits the water, it will create error through the entire recovery swing. Be patient to get this exit moment down well.
- Swing elbow wide (swing out, not up behind the back)
- Elbow pulls the hand – hand is dragging behind
- Exit The Sleeve (pull forearm and hand out of water as if extracting from a jacket sleeve)
- No splash exit (the arm slips quietly out of the water)
Recovery Focal Points
You may start practicing the recovery swing slowly, like a robot, which will keep your torso deep and the recovery arm mostly underwater in drill mode. But eventually, as the precise movement pattern becomes more familiar, more comfortable, you must speed up the motion so that is fluid and fast enough to feel like the arm is truly swinging, light-weight, lifting off the torso for a moment.
- Swing hand a bit wider (create equilateral triangle shape)
- Relaxed forearm and hand (‘rag doll arm’)
- Drag the knuckles (until the last moment, then swing hand forward)
- Push the Dot forward (dot on the elbow bone)
- Keep shoulder internally rotated until last moment
- Elbow reaches shoulder line before wrist
- Keep fingertips in contact with surface (a.k.a. ‘dragonfly fingertips’)
- Swing The Bag

Entry Drills
- Standing rehearsal to create entry arm shape
- Swing Skate (swing to Entry Position and dip it a few times)
- 1-Arm Slot (standing, with one arm in entry position, fall forward into Skate)
- 2- Arm Slot (standing, with one arm in entry position, and one arm in Skate Position, fall forward and switch arms, slide into Skate)
Entry Focal Points
Bringing the arm to this high elbow position is like building a wave to its peak height before the energy breaks and spills back into the water. It is so tempting to drop that elbow before it reaches its high position above and in front of the ear. Focusing on bringing the hand around will urge the elbow to drop, so let that hand drag behind until the last possible moment (that your shoulder joint comfortably allows). This will urge the elbow to climb higher as it comes forward, coming to its peak position higher than the head.
This high elbow sets up the forearm to aim straight ahead on its track, angled downward steeply into the water. Then you let gravity just pull this arm down into the water and begin extending underwater, following the Ski Jump path to the target.
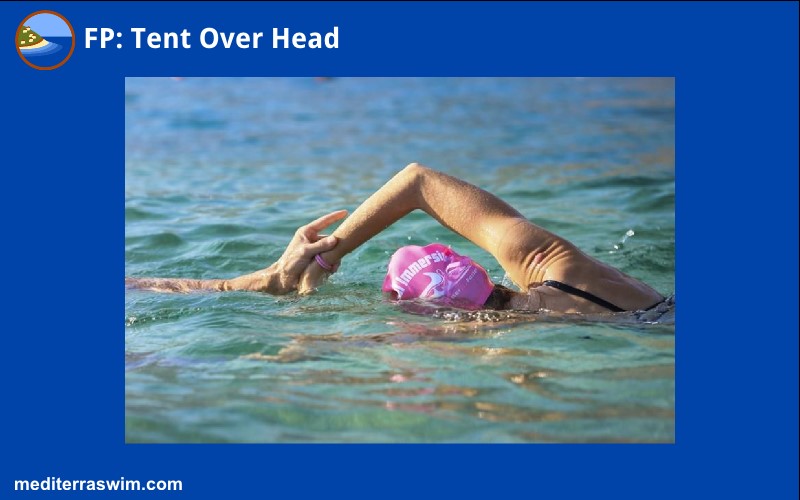
- Elbow swings forward in front of the head as far as comfortable
- Elbow high above ear (like a tent over the head)
- …(to be continued)
You may examine other useful focal points for Recovery and Entry on the 101 Focal Points page.
 October 7, 2018 at 19:17 #19867Keymaster
Swim Suits
Here are links to the two I’ve purchased off amazon. They are both 100% polyester (or PBT a polyester like material). Neither of them have bra/cup support though. These are if you want a tougher material than the lycra/nylon blend in a typical swimsuit.
TYR Women’s Alliance T-Splice Maxfit Swimsuit
Speedo Women’s Endurance and Solid Super Pro One Piece Swimsuit
I did a basic search on Amazon for “100% polyester one piece swim suit women” and found a few under $30 with bra/cup support. Make sure to read the description to make sure the material is fully polyester and to determine if there is a cup/support.
October 15, 2018 at 11:20 #19919KeymasterEntry Drills
- Standing rehearsal to create entry arm shape
- Swing Skate (swing to Entry Position and dip it a few times)
- 1-Arm Slot (standing, with one arm in entry position, fall forward into Skate)
- 2- Arm Slot (standing, with one arm in entry position, and one arm in Skate Position, fall forward and switch arms, slide into Skate)
Entry Focal Points
Bringing the arm to this high elbow position is like building a wave to its peak height before the energy breaks and spills back into the water. It is so tempting to drop that elbow before it reaches its high position above and in front of the ear. Focusing on bringing the hand around will urge the elbow to drop, so let that hand drag behind until the last possible moment (that your shoulder joint comfortably allows). This will urge the elbow to climb higher as it comes forward, coming to its peak position higher than the head.
This high elbow sets up the forearm to aim straight ahead on its track, angled downward steeply into the water. Then you let gravity just pull this arm down into the water and begin extending underwater, following the Ski Jump path to the target.
- Elbow swings forward in front of the head as far as comfortable
- Elbow high above ear (like a tent over the head)
- Feel the stretch in the back as you reach entry position
- Feel BOTH shoulders slide toward the ears, bracing the upper spine
- Forearm aiming straight ahead on track
- Forearm angling down steeply (45 degrees)
- Hand entry position across from opposite (lead arm) elbow)
- Ski jump shape entry path – Slide down to target depth and then extend forward
- Spear wrist through your target
You may examine other useful focal points for Recovery and Entry on the 101 Focal Pointspage.
Arm Switch Timing
Without focusing on it directly, the drills for the Recovery Swing also set up the critical timing of the arm switch. As you were doing in the drills, your Skate side of the body remain long, firm, and the lead arm should continue extending forward, until the recovery hand arrives at the entry position. This is the best switch moment. Switch a little too early or a little too late and you lose the effect.
You may notice the feeling of acceleration on each stroke when you shaped the entry and timed the arm switch like this. This is exactly the magic we are looking for as these pieces come together!
Memorize this entry position and timing (in the picture above). There is some slight adjustment in the timing for slower or faster tempos, but this is the approximate timing you need to train into your muscle memory.
Back Float and Interrupted Breathing
When working on the Back Float remember to think of “Head back, chest back, pelvis up.” The essential part of having a successful and enjoyable back float include the proper streamline body shape and relaxation, trusting in the water to do it’s job to keep you afloat.
First start with an open arm “t” shaped float. As this become more comfortable, reshape the body into the Interrupted Breathing position, smoothly and calmly. Feel the way the body slightly tilts to accommodate the shift in weight for balance. Relax and allow the body to be supported by the water.
Images of the Interrupted Breathing position can be found on the Freestyle Resource page under Interrupted Breathing photos.
October 21, 2018 at 18:34 #19962Keymaster2018/10/21 – Session 4 of 5
How The Catch/Hold Fits In
Let’s review the four essential features of the freestyle stroke we need to make sure are in place for you to experience the ‘magic’ of the stroke:
- The Torpedo Frame
- Long, firm Skate Position
- ‘Send Force Forward’ through the Recovery Arm Swing
- Optimal Arm-Switch Timing
In the second lesson we worked on feature #3 and touched on feature #4. In this lesson we will build another piece of #3 and then tie it back into #4.
In the last lesson we began to pull pieces of the stroke together – the recovery swing, entry and arm switch timing. When these come together they allow you to ‘touch the magic’ – that moment you feel some acceleration in each stroke that comes from well-shaped, well-timed movements.

To build upon the arm switch timing you started to develop (indirectly) in the previous lesson, in this lesson we examined the catch (a.k.a. the underwater pull/push as it is known in the conventional swimming world). We call it the ‘catch’ and ‘hold’ because our orientation is about holding a point in the water and sliding the body forward, past that point. Our emphasis is on the body moving forward, not on pushing water backward.
This effective forward propulsion depends on the three components each doing their part and being well-synchronized with the others:
- the Catch generates a wave of force
- the Torso Rotation transfers that wave of force from the catch side to the entry/extension side of the body
- the Entry/Extension into Skate Position delivers that wave of force into forward motion
The Catch
The better you perform the catch, the bigger the wave of force you may transmit to the other side of the body.
The quality of this wave depends on:
- The shape of your catch arm in order to get a bigger grip on the water
- The pathway that catch action follows
- The pressure applied – steadily, not too abrupt, not too weak but just right
The focal points below will help you create and improve these three features in your catch action.
Creating the wave with an arm is not enough – it must be tied into the torso rotation so that the torso is doing most of the work of holding the water, which mean it is transferring that force from the catch side to the skate side of the body. So, the lesson starts with a focus on only the catch arm and torso, and eventually adds the other side of the body, completing the full choreography.
Useful Imagery
During the lesson you may have been given one or both of these images/analogies to work with:
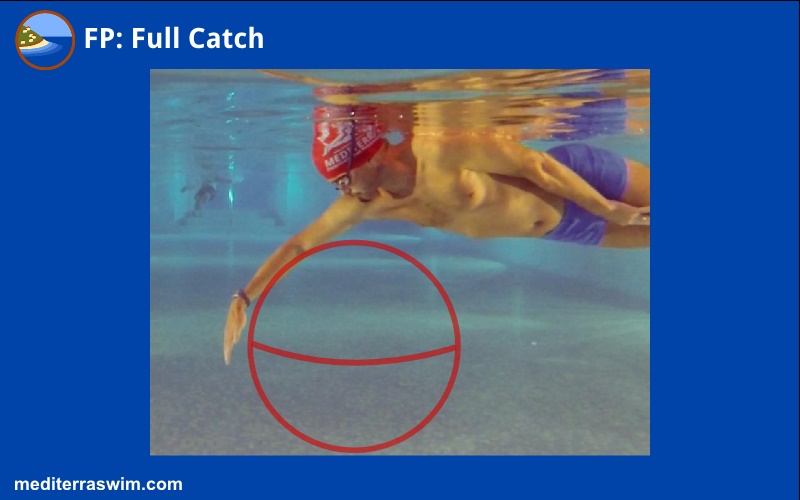
- the ‘beach ball’ of water molecules (or ‘swiss ball’, or ‘pilates ball’ if you prefer)
- the ladder under your body, parallel to the surface
Beach Ball
The beach ball of water molecules represents the pressure zone of water you create and direct with each underwater stroke. You form this pressure zone then send it under your body, especially under your hips and legs to help those ride higher in the water.
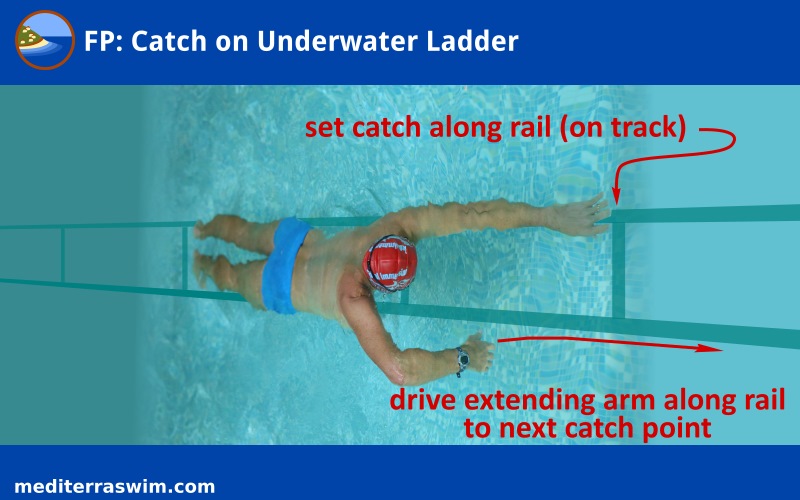
The Ladder
The ladder gives you a directional grid to set the placement and trajectory of your movements.
The two rails correspond to your two arm tracks, and your arms extend forward on that rail, and your catch holds that point on the rail; the rungs represent the point ahead where you set your catch (get a grip on the water).
The depth of the imaginary latter determines the depth of your catch, where that pressure zone is created so that your body-frame can slide over it.
The Catch Drills
- standing rehearsal with catch shape
- 1-Arm Drill (other arm tucked at the side)
- Superman to Skate (with a weighted object in lead hand)
- Swing Switch (two arms) with pause at Entry moment
- Whole Stroke
Focal Points
- Set the catch
- Hand stays on track
- Elbow slide out and upward to make shape of arm
- Touch the ball with entire forearm and palm
- Hold the ball and rotate body past it
- Press the ball straight toward the hip – hips rolls out of the way at last moment
- Press the ball straight toward the toes – send the ball of water under hip and leg
- Press on ball steadily
- Catch hand and extending hand move (on their tracks) exactly opposite to each other, at approximately the same rate of speed
- Hesitate ever so slightly after ‘Set The Catch’ in order to Load The Torso
- Pull with hip (not with shoulder)
The entry and extending arm is the main actor, while the catch arm is the supporting actor. Set a good catch and then focus upon sending force forward into your best Skate Position. The better your Entry, Extension and Skate, the farther you will slide forward on each stroke!
There are more focal points for the Catch on our 101 Focal Points page as well as some demonstration of the 1-Arm drill on the Video Tutorial page.
October 21, 2018 at 18:58 #19963ParticipantThanks Jamee. Will work on this. Focal points and photos helpa lot.
Could we do rhythmic breathing next time? Might be easier than the interrupted one for me, I think.
Have a great week.
October 23, 2018 at 18:51 #19986KeymasterHi Tila.
Yes, we can visit the rhythmic breathing pattern during our next session.
October 29, 2018 at 16:29 #20035Keymaster2018/10/28 – Session 5 of 5
Practice Set for Rhythmic Breathing
Skills To Build
- To maintain the optimal Arm Switch Timing
- To turn and return the head without disrupting that ideal stroke pattern
- To feel as little disruption to balance and streamline as possible
- To make breathing feel the same on either side
Breathing easily depends greatly on the strength of your stroke skills which support it. You want to feel your body long, straight, and firm in Skate as you turn and return the head from breathing. The turning of the head should not disrupt the position of the body, nor force the movement of the recovery arm. Use the thrust of the catch and aim your body in Skate to slide the upper body near the surface so the head is right there at the air already.
Focal Points
- Lead arm keeps extending while head turns/returns
- Lead arm stays on track while head turns/returns
- Head stays weightless (neutral) on non-breathing strokes
- Head is stays straight with spine (on ‘shishkabob’) as it turns
- Turn toward air as soon as possible, just at the start of the catch/entry
- Turn toward air a bit more aggressively than the torso turns
- Just touch the air long enough for a quick breath, then return right away
- Take just a quick sip of air
- Stretch the chin and lips toward air like a ‘hooked fish’
- Small bubbles from the nose
- Clear the airways just before breaking the surface
- Make just a partial air exchange (don’t hold breath, don’t exhale massively)
Choose 3 or 4 of the focal points above to work on today.
Then, for each focal point, work through these activities, as far as you can go successfully. Take one focal point and work through the list. Then take the next focal point and work through the list again, and so on.
Practice Set
- 4 to 6x, for each side, Superman To Skate with ‘Nod’
- 4 to 6x, for each side, Superman To Skate with ‘Split The Face’
- 4 to 6x, for each side, Superman To Skate with ‘Hooked Fish’
- 4 to 6x, for each side, 3 Strokes To Skate
- 4 to 6x for each side, 3 Stroke to Skate, 1 Stroke
When you have successfully capture a sip of air, challenge yourself with a sequence which involves a few initial strokes, a breath, followed by continual strokes. See suggestions below.
- 4 to 6x, for each side, 3 Stroke, 3-Part Breathing, 3 Strokes
- 4 to 6x, for each side, 6 Strokes with 1 turn to breath (no pauses)
- 4 to 6x, for each side, 9 strokes with 2 turns to breath along the way
- 2x length of pool, for each side, turning toward air on every 4-2-4-2 strokes
- 2x length of pool, turning toward air on every 3 strokes
October 29, 2018 at 18:15 #20036KeymasterModified Interrupted Breathing
The Modified Interrupted Breathing Position is an Interrupted Breathing Position half rotated so the body is at a 90 degree angle to the pool floor, instead of parallel in a back float, and the head is rotated towards the open shoulder.
Although not ideal, it is a way for you to experience an Interrupted breathing and continual swimming while you are still working on a Full Interrupted Breathing Position and or the Rhythmic Breathing component. Because it isn’t a standard move, we don’t have a reference image for you.
Ideally, I would recommend forgoing the Modified Interrupted Breathing Position and simply add a tight flutter kick to your Interrupted Breathing Position to help lift the lower body or to muscle through the Rhythmic breathing until it works for you.
The Modified Interrupted Breathing, once mastered, may allow you to travel continuously, but impact the smooth, effortless stroke you are trying to build.
November 26, 2018 at 13:54 #20400Keymaster2018/11/25 – Session 1 of 6
Nice work today! The pieces may still seem a little rough, but they are coming together well.
Although you didn’t start lessons with any conscious awareness of discomfort and anxiety in the body, the water is still an unfamiliar environment. In time, with continual exposure and directed activities in the water, your nervous system will relax and learn to trust the water and your body in the environment. For now this should be considered an additional skill to work on along with your stroke specific skills. I’ve included guided notes towards building greater comfort and relaxation in the water. This will release some of the tension that results in a sinking or sitting lower in the water sensation.
There is enough content below for several practices. I recommend taking one to two of the practices below into your sessions.
Let me know if you have any questions.
Balance and Relaxation Practice
The goal of this practice is to increase body awareness and systematically relax the body. Some of the difficulty in the stroke and achieving a smooth rhythmic breath is that the body is still tense and thus sinking lower than it should. Part of swimming smoothly is to feel at rest and ease in the water. Consider dedicating a certain portion of your practice to meditation to both be aware and control your level of comfort and ease in the water.
The body sends feedback through many outlets.
- Cardiovascular and Respiratory System
- Air Exchange and Management
- Muscle tension and use
- Effort of actions
- Distraction by environment
During this practice, notice what distracts you, what pulls your attention, what feels tense or uncomfortable. After noticing and acknowledging, then aim to bring focus back to the task at hand, allow the distraction to flow over you. Relax into the activity and see if you can achieve control and comfort.
Balance and Relaxation Drill Sequence
- Superman
- Superman to Skate
- Skate with 1 Stroke
- Skate with 2 Strokes
- Skate with 3 Strokes
Balance and Relaxation Focal Points
- Awareness of Heart Rate
- Ease of exhale or holding breath
- Relaxation of abdomen
- Relaxation of shoulders
- Release of Head and Neck
- Soft arms
- Leg muscles hold shape but no tension
Rhythmic Breathing, Stroke and Timing Practice
A successful Rhythmic Breath, without further impact to the stroke, requires all the components of the stroke to be in place. However, in order to build a Rhythmic Breath while actively learning and programming the stroke, we can examine a few key aspects of the stroke that proceed, follow and occur during the sneaky, Rhythmic Breath. These consist of the relaxed and straight body line, the timing of the Catch and the force sent forward on which the body will rest during the breath.
- Head and Spine Alignment
- Catch
- Recovery Entry
Here are a few drills and focal points to take into your practice. Examine what makes sneaking in that breath makes it easier or harder. What feels successful and where is fails. All will provide you with the feedback to problem solve and find
Rhythmic Breathing, Stroke and Timing Practice Drill Sequence
- Superman to Skate
- Skate with Catch
- Skate with 2 Strokes w/ catch
- 2 Strokes with Breath, Focus on Catch
- Skate with Pause at Entry
- Skate with 2 Strokes w/ Entry Focus
- 2 Strokes with Breath, Focus on Entry
- 3 Strokes to Breath
- 3 Stroke to Breath, 1 Stroke.
Rhythmic Breathing, Stroke and Timing Focal Points
- Straight Spine
- Weightless head remains looking down
- Begin rotation to breath as you Set the Catch
- Head back in Neutral before Catch hand reaches in pocket
- High Entry Elbow
- Send Force Forward with Skate to aid with Rotation
Compact Kick Practice
Ideally, during TI, we use what is called a 2 Beat Kick. The purpose of the 2 Beat Kick is for counter balance and to help with the torso rotation during the stroke. It is not essential for propulsion. Should the back half of the body still sink after the body is aligned, relaxed and holding the proper shape, we utilize a small Compact kick. Once again, not for propulsion but for a simple lift to the legs.
There are four primary components to a clean Compact Kick that has a minimal impact on the stroke.
- Straight Hips and Knees
- Relaxed Foot
- Remain Narrow in the Body
- Keep Below the Surface
Remember that should it break the surface and or create white water (bubbles and foam), then it may have a negative impact on the overall stroke. Below are drills to use to slowly incorporate and examine the Compact Kick into the pre-existing stroke sequence we have built together.
Compact Kick Practice Drill Sequence
- Superman
- Superman Skate
- Skate
- Swing Skate
- Swing Switch
- 2 Strokes
- 2 Strokes and Breath
- 3 Strokes and Breath
- 3 Stroke, Breath, 1 Stroke
Compact Kick Focal Points
- Straight Hips and Knees
- Relaxed Foot
- Remain Narrow in the Body
- Keep Below the Surface
- Weightless Head
- Superman/Skate Arm Relaxed and at Target Depth
Rhythmic Breathing
Review previous lesson’s notes for drills and focal points of the Rhythmic Breath. I would recommend holding off on the breath practice specifically, until you have first practices balance, relaxation and the timing more precisely. Then you might see an improvement during dedicated practice to Rhythmic Breathing.
When you are there, remember the two key points to the Rhythmic Breath,
- Quick Turn of the head
- Quick Return of the head to neutral
December 2, 2018 at 20:33 #20573KeymasterHello Tila.
Here are a few helpful items to consider for adventures in open water. You do have 8 months until your trip over which I hope you gain more comfort and confidence in your swimming skills. You’ll have a better idea of as you draw closer as to what you are ready to tackle on your adventure and what aides you’ll need.
Right now, these are a few option for when the time comes.
- Full Plastic Whistle – For water, you’ll want something without metal on it and has a thread to attach it to your person.
- Swim Bouy – There are several kinds and colors. I recommend something bright for others to easily spot.
- Swim Vest – These are not as good as a life jacket and shouldn’t be treated as a flotation device, however they do provide a thin thermal layer and a slight buoyancy. Look for one that is 3mm or greater for lift. I also recommend one that zips in front for easy adding and removing.
I’ll get your practice notes posted tomorrow.
December 3, 2018 at 22:27 #20590Keymaster2018/12/03 – Private Lessons 2 of 6
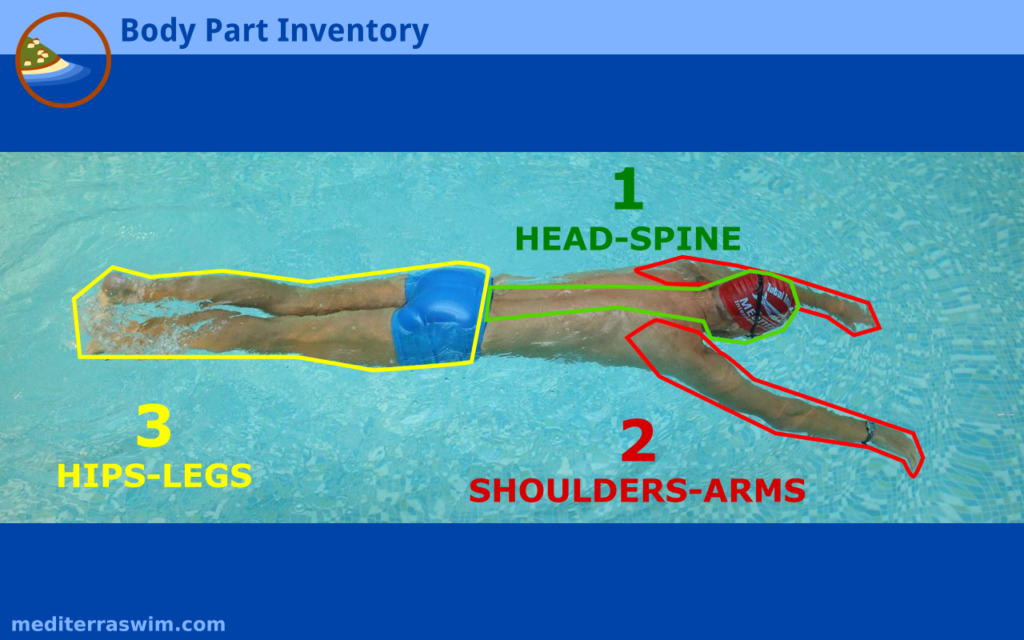
We have covered many Drills and Focal Points to develop the stroke. For the purpose of relaxation, consider sorting the body into three primary sections: Head-Spine, Shoulder-Arms, and Hips-Legs. As you work through relaxation, sort the body through these sections for easy recall. Start with one at a time, and then build to two at a time, then all three at the same time.
Remember, right now the goal is to calm down and regain control of the nervous system.
There is a lot of content here. I’ve made three practice session for your to work through and possibly repeat as needed. You may find that you’d like more than a week to work on these skills. If you’d like push back one of your session for an extra week to practice, let me know.
Practice One –
Relaxation Drills:
- Deadman’s float
- Visualize
- Superman Standing Rehearsal
- Superman
- Superman to Skate Standing Rehearsal
- Superman to Skate
- Skate to Skate Standing Rehearsal
- Skate to Skate
- Skate with 2 strokes
- Skate with 3 strokes and pauses
- Skate with 3 strokes (no pauses)
Relaxation Focal Points:
Systematically sort the Focal Points with segments of the body as in the Body Parts Inventory, Head/Neck/Spine, Shoulders/Arms/Hands, Hips/Legs. See below for Focal Points you can specify for those primary areas.
- Weightless Head
- Straight Spine
- Relaxed Neck
- Soft fingers
- Relaxed Arm
- Forearm, soft and parallel to the ground
- Hips Straight
- Legs narrow behind the body
- Straight legs, but relaxed (relax the feet, release the calves, hold the thighs)
Practice Two –
This portion is meant to isolate and refine the key stroke elements that lead up to the rhythmic breath. Aim to maintain the same level of relaxation you achieved in the first practice.
Stroke to Breath Drills:
- Superman to Skate
- Skate with Catch
- Skate with 2 Strokes
- Skate with 2 Strokes and breath on Catch
- Skate with Pause at Entry
- Skate with 2 Strokes with Entry Focus
- 2 Strokes with Breath, Focus on Entry
- 3 Strokes to Breath
- 3 Strokes to Breath, 1 Stroke
Stroke to Breath Focal Points:
- Head and Spine in Straight Alignment
- Weightless Head remains looking down
- Set the Catch and turn early
- Pull with the Hip
- High Elbow at Entry
- Push with the Dot
Remember to make each stroke count, including the stroke prior to the breath.
Practice Three –
Once the body has relaxed and the stroke is tighter, revisit Rhythmic Breathing practice. Notice any changes or effects the latest practices have had on your form.
Rhythmic Breath Drills:
- Superman to Skate with ‘Nod’
- Superman to Skate with “Split the Face”
- Superman to Skate with “Hooked Fish”
- 3 Strokes to Skate
- 3 Stroke to Skate, 1 Stroke
When you have successfully captures a sip of air, challenge yourself with a sequence which involves a few initial strokes, a breath, followed by continual strokes. See suggestions below.
Rhythmic Breathing Focal Points:
- Lead arm stays on track while head turns/returns
- Head stays weightless (neutral) on non-breathing strokes
- Head stays straight with spine (on ‘shishkabob’) as it turns
- Turn toward air as soon as possible, just at the start of the catch/entry
- Just touch the air long enough for a quick breath, then return right away
- Stretch the chin and lips towards air like a “hooked fish”
December 17, 2018 at 22:50 #20726Keymaster2018/12/16 – Lesson 3 of 6
Counter-Balanced Foot Position
While working on Skate Position, you expressed an interest in knowing what to do with your feet to help your stability in front. Though this is not a standard or necessary thing to learn at first, I felt you could benefit from and your brain could possibly handle an additional focal point for your legs. I introduced you to the Counter-Balanced Foot Position, which will give your legs a way to support the rotated torso in the front, not merely stay straight behind you.
- CBF Standing Rehearsal
- CBF Wall Hold
- CBF Hold the Wall Rock with 1 Foot
- CBF Hold the wall Rock with Alternate Feet
- CBF Superman Rock with 1 Foot
- CBF Superman Rock with Alternate Feet
- CBF to Skate 1 Foot
Personal Notes –
The Counter Balance Foot position can be confusing at first. This is an additive to your current stroke development. A small, compact kick for lifting the legs should work for now. Should you want to explore the two-beat kick further, consider the notes and videos linked above.
I recommend spending most of your time on relaxing your body and smoothing out the skills you’ve acquired thus far. A couple key things to maintain in your practice –
- Dedicate attention and focus to systematically releasing tension in the body
- Keep pauses in while doing whole stroke (Pause in Skate position with one hand in your pocket. Swing through Recovery. Pause with one arm in Skate position and the other in Entry Position. Pauses are just for a half second to a second long. Allowing the brain to think about the next movement before deliberate movements.)
- Balance above all. If the tension is too high and the body is not balanced, then all propulsion movements will take more work. It’ll be harder to send force forward and glide in the water.
That being said, during our lessons we focused on the ideal elements needed for sending force forward. Review the Sending Force Forward Outline and Practice Plan. Think of leading the Recovery Arm with the elbow, and at Entry hold as far forward as comfortable feeling the stretch of the back muscles.
December 30, 2018 at 22:23 #20780Keymaster2018/12/30 – Session 4 of 6
Warmup Routine – Play and Relaxing the Nervous System
I would recommend incorporating some play into your warm-up routine that allows you to acclimate your nervous system to the aquatic environment. During these Drills and Focal Points, you are doing detailed work with your senses, muscles and brain. Having a routine before entering into a dedicated practice can wake up and prepare your nervous system for the various things you will be asking of it during that time. A routine might include some of the Drills above. It could be breathing exercises in the water or tuning-up with the Balance and Streamline drills. Find whatever works best for you to prepare your mind and body for the intricate work ahead. If you’d care for further ideas, I can provide more suggestions.
In case you’d like to explore the activities further, these are the few we covered:
- Beach Ball“Beach Ball” Float – Use both arms to hold bent legs to chest. May lift legs one at a time, or all together. Make the movement smooth. Feel the entire body bounce, then settle into the balance point.
- Beach Ball with Arm Movements – Holding the bent legs with one arm, use the other arm to scoop the water in one direction or another rotating the body to the left or right. Play with the movement.
- Toe-Touch Balance (“Jelly Fish”) – Reaching down to touch toes, feel the feet lift off the ground. Allow the body to lift with the buoyancy of the water. Enjoy the feeling while practicing exhalation.
- “Dead Man’s Float” – Front float without any support, shape or tension in the entire body. (If at a practicing at a pool with a lifeguard, notify lifeguard before doing “Dead Man’s Float”)
- Streamline push off from wall
- Streamline push off to glide down to pool floor
- Object Retrieval – Placed, weighted objects (i.e. rock, metal washer, glass pebble, etc.) on grading stairs at staggering depths or in shallow end at a depth greater than waist height. Carefully inhale, filling the lungs with air, then exhale bubbles before lowering head into water while retrieving the object.
As the depth increases, feel how the water pushes back to lift the body of the ground. The water and the body are finding the buoyancy point. It may feel unstable until the sensation become more familiar. When the depth is great enough the arms cannot reach the object and the feet lift, additional techniques may be required. See Submersion technique instructions below.
Submersion Technique
We only want to sink if we intend to. In discomfort, the mind strongly resisting the feeling of pushing the body down beneath the water. But as you experienced in Balance Basics, when relaxed, the body wants to float. Whether standing, sitting, kneeling or crossing the legs, buoyancy tries to lift you body to its balance equilibrium. To sit on the ground of the pool, you may need to assist.
Think to “Go Down, Push Up, to Go Up, Push Down”
To Submerge
- Put hands down at sides. Submerge the head, then flap the arms like wings UP towards the surface of the water. Repeat quickly if additional depths is required.
To Rise
- Hand above the head but below the surface of the water, flap the arms down toward sides. Repeat as the body rises until the head breaches the surface.
Today we tried, “jump and sit” temporally increasing the body mass above the water with a jump then requiring gravity to press the body down past the natural buoyancy point. Push the legs out to set your bottom on the bottom of the pool. Then reach for object.
Other techniques are an option, such as swimming or diving down. For now let’s stick with the above until there is more comfortable with intentionally sinking.
Interrupted Breathing – Greater Balance and Comfort for Continual Swimming
Some of the content below might be a repeat or a review of what we’ve already covered. As eager as you are to use a Rhythmic Breath, so far the stroke is not ready for it to be incorporated without it disrupting the stroke for continually swimming. Therefore, I’m recommending reviewing and return to practice the Interrupted Breathing position. It is tough, but will ultimately allow you to work on your stroke and gain air without the impact of a Rhythmic Breath as a work in progress.
The intention behind this breathing position is to ‘interrupt’ the stroke but maintain long, balanced, streamline body that is immediately ready to resume swimming when you are. It is the position to rest that requires the least amount of effort to hold – lower heart rate, calmer breathing.
For this reason we teach it as a self-rescue or self-calming position for children, open-water swimmers and triathletes. Counter-intuitively, it works very well in rough water.
Interrupted breathing is suitable:
- when using during drills that have you pause in Skate Position
- when doing drills over a full length of the pool and stopping in the middle is disruptive to other swimmers
- when swimming whole stroke
- when in the middle of a race or rough water and you need to recover your breath and composure
Review Supine Position Notes for how to first warm-up and work on feeling relaxed in the Supine Position. Remember you have tools around you such as the lane line, the stairs, a ladder or rail to utilize as initial support without a coach there. When you feel more comfortable and relaxed in this position, then progress to shaping the body in the ideal back position for Interrupted Breathing.
If you’re up for the challenge, you could try transitioning from the Interrupted Breathing Position to Skate Position. Videos are linked below.
- Back Float to Interrupted Breathing(Sweet Spot)
- Interrupted Breathing (Sweet Spot)
- Interrupted Breathing (Sweet Spot) to Skate Position (Front Float)
- Skate Position (Front Float) to Interrupted Breathing (Sweet Spot)
- Skate Position to Interrupted Breathing to Skate Position, take one stroke
- Skate Position to Interrupted Breathing to Skate Position, take two strokes
- Repeat last, increase to 3 strokes until rotating to breath every 3 strokes, continually
Once again, note that when transitioning between front and back floats to keep the spine straight. Rotating with the torso (armpit to hip) instead of with the arms. Lead with the head, either holding your breath or exhaling from the nose, then follow with the torso. Some find thinking about lifting or dropping with the hip, to help lead the torso into the movement.
The Skate Position (Front Float) to Interrupted Breathing (Sweet Spot) transition is the trickiest to do comfortably. Avoid curling in on yourself into a fetal position once on the back. Instead, quickly straighten and arch backwards.
It may seem like a stretch now, but this will provide you with a more enjoyable, continuous swimming experience while refining the stroke technique.
Catch – Review and Personal Notes
Today, we noted the Catch was not following the ideal T.I. pattern. I suggest, reviewing the notes from previous sessions on the Catch and consider referencing the Freestyle Fundamentals Course for guided practice sessions focused on developing the Catch.
The Catch is one of the key pieces for the torso rotation and thus the Arm Switch Timing. It also aids the rotation to breath, whether that be Interrupted Breathing or Rhythmic Breathing.
Freestyle Fundamental Online Course
Included in your Private Lesson Series is access to the Freestyle Fundamentals Course on the Dojo. This course provides you with outlines practice plans for the content we have covered together. You may follow it in sequence or start at a point that you are currently working on. Either way, it is a supportive tool to guide you time in the water. Since Freestyle is still a new and fresh skill to you nervous system, I would note that spending time on the earlier content such as Balance and Streamline can still be beneficial for reinforcing the sensations and comfort you are aiming to achieve and maintaining while actively using the propulsion elements of the stroke. Consider revisiting these topics.
January 14, 2019 at 23:05 #20956Keymaster2019/01/13 – Session 3 of 6
Using a Snorkel
Snorkels can be a great way to practice continual swimming without the disruption of rhythmic or interrupted breathing. It can, however, have an impact on balance and perception. Take a look at the article, Guidance For Using a Snorkel for things to keep in mind while using this gear in your practice sessions.
Relaxations Mindfulness and Meditations
As you have experienced, although there is no discomfort in the conscious brain, there is in the subconscious. The most effective means of addressing this discomfort is increase our awareness and connection to it. From here, we can then begin to coax it out and nurture the discomfort into something we can manage consciously.
Subconscious discomfort is directly connected to our nervous system and can manifest most readily in the circulatory system and muscle tension. Let’s first start with the circulatory system, the heart and the breathing. In our session, I had you bring your hand to your chest (over the heart) and abdomen (near the diaphragm). Standing by the pool or in the pool, where ever you know you feel absolute comfort, close your eyes and listen to your resting heart rate and the deep diaphragmatic breaths. Note is rhythm, depth, and calm. For now, hold this posture for the first few activities.
Balance Basics
- Sitting, submerge mouth
- Sitting, submerge nose
- Sitting, submerge head
- Deadman float
As your awareness grows and you can sense these mechanism without direct hand contact, progress to the following activities:
- Beach Ball
- Touch Toes
- Superman Float
- Skate Position
Once you find that your heart rate and comfort with your breath in these positions is the same as when you are at resting, then it is time to slowly build the complexity of skills and aim to maintain this level of comfort. Build up to and work through our Balance and Streamline notes, maintaining the same trust and relaxation. This is slow and meticulous work. The effect, however, will slowly bring greater relaxation and therefore release to move through your swim strokes without tension.
Freestyle Technique Notes
Your actual stroke is coming along nicely. Even though we have covered all the essential pieces in the Freestyle stroke and you have practice, it is in continual practice that you will build the continuity of the movements. The more you practice through the drills or wholes stroke with the systematic focal points, you will have to apply less and less conscious effort in the movement. They will become more familiar, more effortless.
At this point, consider using the Freestyle Fundamentals course to guide your practices. Outlined in this course are many of the drills and focal points we did together. If you have questions about how to use the content, please don’t hesitate to ask. I’m here to support you and your practice.
Notes from Today
- Recovery Swing: Focal Point – Push the Dot with the Elbow. You will have greater glide if you are winding up that Recovery Swing up to Entry position. You were able to achieve this by simply leading with the elbow until it was set high above the ear, poised at entry.
January 28, 2019 at 12:04 #21052Keymaster2019/01/27 – Session 3 of 6
I have you a brief introduction – too brief I am afraid – and I regret that I don’t have photos and tutorial videos on these other strokes, since demand for learning these has been so low, but you are prompting use to put these on our next video shoot day. I’ll do my best to describe the skills and drills in writing until then.
Sections of the Breaststroke
We may divide the breaststroke into these main sections:
- The streamline body position
- The pull to breathe
- The kick and extension back into streamline
The streamline position is the base position for the whole stroke, where you will experience the most forward motion. You want to develop a strong urge to stay in that position, pull to break from it very briefly to take a breath and then kick to slide back into a quickly as possible.
Streamline
The streamline body is the ultimate moment of the stroke where you experience that most forward motion.
The spine is aligned, from tip of head to the tail. Eyes are looking straight down and the crown of the head is aimed straight ahead, down the lane in the direction of travel. The two arms are extended straight in front of the shoulder (unlike Superman Position where they are angled downward slightly), palms facing downward. Toes are pointed (comfortably) behind. The body is stretched out so that this tautness can conduct the wave of force forward, through the body into the leading edges.
The Pull and Breath
We’ll work on the full scoop/pull with forearms and elbows later. For now, practice the arm motion with small sculling (mini-strokes).
When you run out of air, stand to breath. We will walk through the causal breaststroke breathing, keeping in mind the desired end stroke will be to keep the head up for a leisure stroke.
Kick Back into Streamline
Then practice the leg kick, both in standing rehearsal and in prone streamline position, with no arm action.
The scull temporarily lifts the body, but gravity wants to scull it right back down, and you will go back in with it. As the hands return to streamline position, the head quickly tucks in, ears between the shoulders, and you kick at the same time. The kick presses back against the water in such a way that you can drive your head and arms forward into streamline, and into forward motion.
The whole aim is to slide the head and arms into streamline and receive the wave of force from the kick at the right moment so that the body slides forward more than the feet slide backward. Receive the wave into your lengthening body and ride it forward in streamline position.
The kick requires that foot and legs to be shaped in such a way as to push backward on the water. The feet need to be in strong dorsal flexion, so that the bottoms of the feet are facing rearward as much as possible at the moment you press. This means the feet need to be below the surface about 6 inches to achieve that angle. If you pull the heels too close to your hips, the bottom of the feet will be too close to the surface and facing the surface – if you kick from that position your foot will catch air and slice through the water rather than press against it. So, keep the feet a bit deeper where you can feel better water resistance.
When you pull (or cock) the knees, let the knees spread a bit, as if you were doing an air squat in the gym. This position will be a bit easier on the knees when you go to press back (to kick).
The kick legs angles outward slightly at the beginning, then the feet come back together. Don’t drive the legs out to the side widely. In the first part, you are feeling your feet press back against the water (as if you were jumping off the ground when standing up). In the second part, it may feel like you are squeezing water between the inner surface of your lower legs, as they pull back together into streamline.
Drills:
We worked through a series of drills to examine each part:
- Streamline (just push off the wall)
- Standing rehearsal of Mini-Pull (sculling)
- Streamline plus Mini-Pull (with just the forearms)
- Standing rehearsal of Kick
- Hold the wall and practice kicking
- Streamline plus Kick
Then we put the three parts together, follow this mantra to follow in slow motion:
- Streamline, Kick
- Glide in streamline for a couple second before pulling
- (from streamline) pull
Streamline Focal Points:
- Pause for Streamline Glide
- Engage Lower Abdomen (Tippy-toes’)
- Eyes directed down, chin tucked
- Hands at target depth
- Press chest forward as the kick concludes into glide
Sculling Focal Points:
- Press down and out with forearms
- Keep elbows straight but soft
- Soft return of hands to Streamline
Kick Focal Points:
- Dorsal Flex foot on the “up and outward” motion
- Soft point to foot on the “together” motion and glide
- Low angle hip bend when knees are bent
You may like to pull up some slow-motion videos on YouTube to see examples of this full sequence…
- Streamline
- Scoop (catch)
- Poke head above to breathe
- Pull knees, then keep legs poised to kick
- Dive head between shoulders
- Kick body in to full streamline extension
-
AuthorPosts
- You must be logged in to reply to this topic.