
Forums › Swim Courses › Pool Comfort › 2019 December Pool Comfort at MJCC
Please type your comments directly in the reply box - DO NOT copy/paste text from somewhere else into the reply boxes - this will also copy the code behind your copied text and publish that with your reply, making it impossible to read. Our apology for the inconvenience, but we don't see a convenient way of fixing this yet.
-
AuthorPosts
-
December 1, 2019 at 16:24 #28387
Jamee Small
Keymaster19/12/01 – Pool Comfort Session 1 of 4
It was a pleasure meeting and working with you today. Well done! I was impressed with your starting place and your curiosity in the process.
In our first lesson we explored the initial building blocks for aquatic activities, Air Management and Balance. Each activity we do will aim to…
- Build dialogue between you and your holistic body
- Relax the Mind and Body
- Shape Body Structure
- Incorporate Air Management Skills
As we progress your list of passive and active details and skills will grow. To best incorporate these skills and not overwhelm the system, we use drills and focal points. I will ask you to hold one focal point at a time until it becomes more familiar and comfortable. Eventually it will become easier to hold and balance two, eventually three at the same time. In the meantime, you may like to organize your body into sections.
- Head and Spine
- Shoulders and Arms
- Hops and Legs
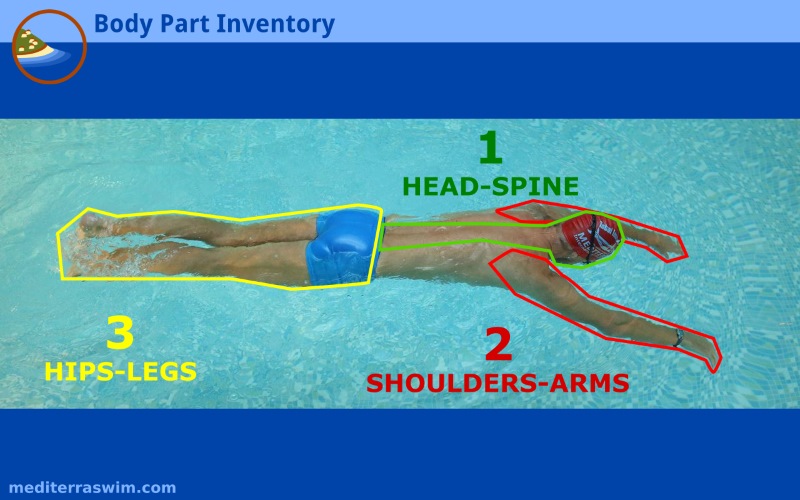
For example – You can use this organization while working through drills and focal points by first consider learning to hear your Head and Neck and what it’s doing, where is it and how to does it feel; then relax it fully; followed by noting the ideal shape and structure you want to hold it in for that activity; then incorporate the air management.
There is a lot of feedback in the pool environment. It can easily distract and even overwhelm the nervous system from the activities at hand. To help isolate and alleviate some of the pressures, consider using Support Structures as outlined in How to Use Support Structures until you feel more confident with the skills and activities.
Air Management
You breath all day, every day until your last day. Most the time you have easy access to air and use it without thinking. When you are in the water, your air management can be the first thing that incites discomfort. Understanding what it actually feels like to have no air, all the air, build up of CO2, switching between the formers can help you better adjust to the various sensation you experience throughout activities.
You can exhale via the mouth or nose. If your goal is to someday swim a stroke, I recommend using a nasal exhale. It allows you more control and protects against water running up.
Start with Air Management at the wall. If needed, use support structure and work towards no support. During all other drills and activities, you will interchangeably hold your breath and exhale, incorporating both sensations.
Breathing Drills
- Diaphragmatic Breathing (Dryland)
- Holding Breath
- Exhale (via mouth)
- Exhale (via nose)
- Extended Breath Hold
- Extended Breath (With mouth open)
- Submerged Exhale
Breathing Foal Points
- While focusing on air management, pay attention to the body’s feedback. Take not of any tension and where, feeling of decreased lung capacity, stability, hold on supports, reaction times, etc. When something comes ups, try to sit with the sensation instead of fighting, controlling or reacting to it. Just listen
You can also practice in the comfort of your own home with a bowl of water. Though when you’re in the pool there will be more feedback to the whole system.
Balance Basics and Superman Float
Balance refers to keeping the body parallel to the surface, in the ‘neutral corridor’, or the ‘neutral zone’ between gravity pushing down and water pressure pushing up. This is the corridor where you can swim along without having to waste energy fighting against those two natural forces. To read further on balance and how it effects movement in the water, you may read The Torpedo Frame.
Even as you explore other shapes on the water, your body will seek to find this neutral space. You can play with it, try not to resist as the body bobs around finding balance.
Balance Drills
- Toe Touch Video
- Balance Ball Video
- Balance Ball with Arm Propulsions
- Dead Man’s Float
*Make sure to notify the Lifeguard before attempting the Dead Man’s Float exercise, so they don’t mistake it for an emergency.
Balance Focal Points
- Feel water lifting and supporting
- Hold shape when body wobbles and bobs
- Relax head and neck
- Repeat with Exhale
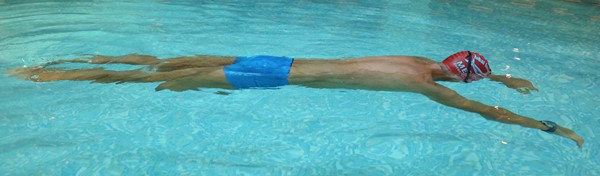
Superman Drills
Superman Focal Points
- Weightless Head (Relaxed neck and shoulders, eyes looking straight down)
- Straight Spine (lifted pelvis, straight hips and knees, face parallel to ground)
- Tippy Toes Stretch (engage abdomen between the belly button and groin, like a belt)
- Hands down at Target Depth (create that counter balance)
- Tree Branch Arms (hold a comfortable shape, but not tense)
- Narrow Tail (Legs close together within the body line)
- Light Flutter kick (for lift not propulsion)
To help you pay attention, interpret and send commands to particular parts of your body you were given a selection of focal points in each drill. Aim for one Focal Point at a time. When they become individually comfortable, then try two at a time. These Focal Points and further explanations of them are under 101 Focal Points.
If you’d like a smooth transition from front float to standing, see Front Float Recovery.
I do hope you will take advantage of this discussion zone to ask me specific questions about what and how to practice. This space is meant to support you in your personal training time.
December 7, 2019 at 15:56 #28587Bruce Hegna
ParticipantHi Jamee-
The ‘Front Float Recover’ video wouldn’t load– it said it was private.
See you tomorrow-
Bruce
December 9, 2019 at 15:13 #28723KeymasterHi Bruce.
Sorry for the delay, the notice didn’t come in until last night. Here is a link for the Front Float Recovery.
December 9, 2019 at 18:25 #28728Keymaster19/12/08 – Pool Comfort Session 2 of 4
Great work, Bruce. Thank you for exploring the Back Float together. Especially your trust and bravery with the little submersion at the end.
We walked through how to explore practice on your own and briefly discussed how to have a partner assist. If you decide on bringing a partner along to your sessions, and still have questions, please feel free to ask.
Air Management Continued
Clear the Airway. Let’s use a little technique from our aquatic cousins.
As the face is turning toward the air, right at the moment the nose and mouth are about to break the surface, you compress the diaphragm to send a blast of air out the nose and mouth to push water away from those openings.
This will help the brain feel more comfortable immediately taking an inhale. The compression of the diaphragm will prime the lungs to immediately start pulling air back in without you having to forcefully do it.
Air Management Support
- Two Hands on the Wall, face down
- One hand on the wall, face down
- One hand on the wall, squat to submerge head
- Hands free, squat to submerge head (raise hands above the head to help remain under water)
Air Management Drills
- Clear the Airway
- Side Bubbles
- Extended Breath (With mouth open)
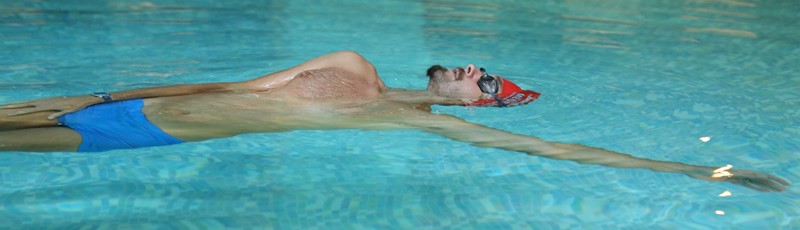
Supine Position (Back Float)
The Supine Position is usually the most vulnerable postures. It is also one of the most useful and potentially life saving positions to have in your tool box of swim skills. Much like you experience in the Prone Position, the more you relax and create a long narrow vessel the body will lift and balance in the water better.
Once you experience calm and relaxation repeatedly, take a moment to observe how your body feels while its floating. What does the water feel like as it surrounds and supports you. Just make simple observations and relax in the knowledge that both your body and the water are supporting you.
Supine Position Support
Using a pool noodle can help you stay a float while focusing on both shape and relaxation while fully supported. Below is a progression of working with and slowly off the noodle to solo float.
- Noodle under back of knees and lower back
- Noodle under back of knees and neck
- Noodle under back of knees
- No noodle, hand on lane line/ladder/wall
- No support structure, gentle flutter to keep legs lifted
*If you have the option, use a thin pool noddles over thick pool noodles.
Supine Position Drill
- Shoulders deep, “head back, chest back, pelvis up”
- Supine Position Recovery
- Briefly dip the head and hold breath while head submerges. Hold Breath. Clear the airways at the head resurfaces.
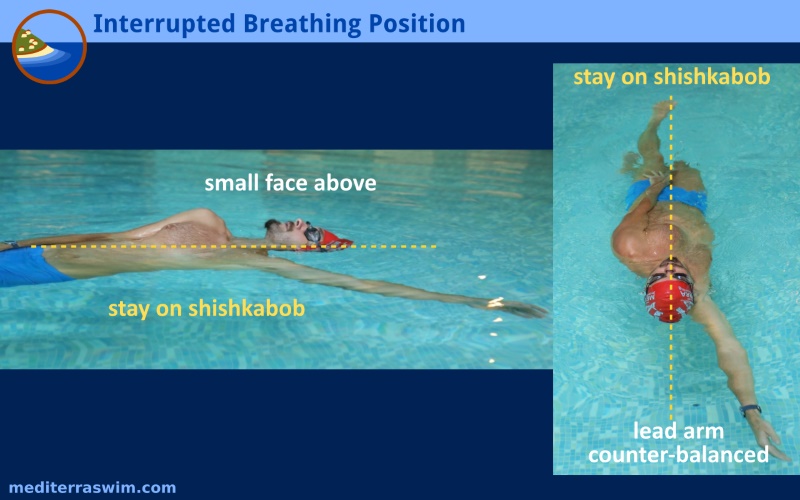
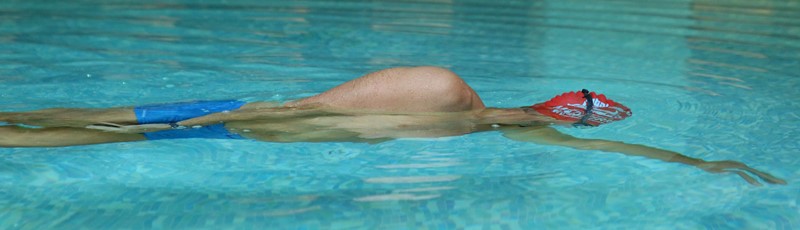
When you feel more comfortable with Supine Position without a support, you may explore the Interrupted Breathing Position, where one arm is in your “pocket,” the other is above the head and under the water, and the body is slightly rotated to balance.
Supine Focal Points
- Relax the head and neck (as if laying it on a pillow)
- Long, straight spine
- Engage lower abdomen (as if on tippy toes)
- Chest and Shoulders straight but relaxed (avoid arching up or curving in)
- Pelvis up (press hips towards the ceiling)
- Hips straight
- Legs straight and narrow behind the body
- Take calming, Diaphragmatic Breath
Shoulders and Neck Dryland Relaxation:
To practice tuning in and relaxing the neck and shoulders, I recommend incorporating a mindful moment throughout your day when not in the water. Periodically, when sitting at your desk or drafting table, washing the dishes, or standing in line pause to think about your neck and shoulders. How tight are they? Are the riding a little high? Then, try to soften them to a relaxed height. Still engage the muscles enough to hold the head up and the neck straight, but otherwise, they should be relaxed and soft.
Let me know what you observe and think.
December 16, 2019 at 14:16 #28994Keymaster19/12/15 – Pool Comfort 3 of 4
Hello Bruce.
You did marvelously in our last lesson. As you found there are many little pieces and details to pay attention to. I encourage you focus on just one thing at a time until you feel better attuned to that skill. Eventually, the individual features will become more familiar and you will need to apply less attention. It will become easier and easier to hold more than one focal point at a time.
During our session, there was a poignant moment when you correlated your posture and composure in everyday life and how it might affect your experience in the water. I encourage you to spend time observing and contemplating this feeling, both in and out of the water. Comfort in the water is more than positions and movements. It requires us to observe and communicate with the person as a whole. This may be a safe time and place to explore and discuss these observations. I look forward to hearing what you notice and feel in our next session.
Support Structure
- Lane line
For the purposes of Lesson 3’s skills, the lane line is the ideal support structure. It’ll sit just below the surface and provides less stability than the wall, ladder or stairs. The micro movements of the lane line will be a better proximation of what it’s like without the support. Alternatively, you could use a pool noodle to increase this same sensation while still providing limited support.
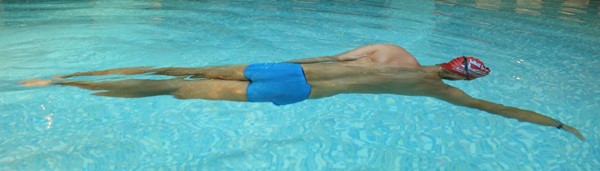
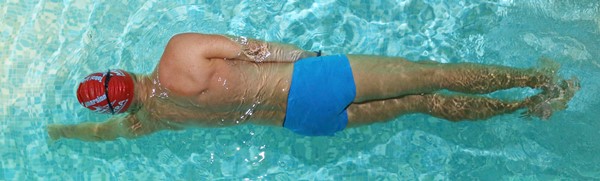
Streamline Position
When in the Superman position, the body is parallel to the ground, equally distributing the body weight across the water. If you tried to turn or flip over from this position, you’d have the entire body to turn all at once and arms crossing the body, making the transition chaotic. Instead, by moving the body into a Streamline position, rotating the torso, the frame opens. This gives the body a prime position to transition between front and back with the least amount of disruption and strain.
The Streamline position also provides you with an ideal frame to paddle forward, smoothly. From this shape, you can build propulsionary movements and skills. For the purpose of this lesson, you will use this frame to transition from front floats to back floats to breath.
Streamline Drills
Streamline Focal Points
- Weightless head
- Straight ‘shishkabob’ spine
- Tippy toes (thighs straight behind torso, engage lower abdomen)
- Arm wide on track, wrist lines up with shoulder
- Hand at ideal depth (neutral back)
- Keep forearms and hands soft (like a tree branch)
- Head stays anchored (it doesn’t turn with the torso)
- Back hand tucked deep into pocket (keep arm underwater)
- Lift open side armpit and hip (as one unit)
- Low Rotation Angle
- Light flutter of the feet (if necessary to prolong time in drill
See Freestyle Drill Resources for more description on the Streamline under SKATE Position.
Interrupted Breathing Position
There are any number of ways to switch between back to front. Not all are smooth, calm or controlled. The Interrupted Breathing position allows the swimmer to maintain balance and streamline while transitioning between positions. It’s a great tool to have in your tool box, freeing you up to explore back or front skills while knowing you have a rehearsed means to get to air and safety.
The drills below progress from starting on the back and transitioning to the front Streamline position. Eventually work up to switching from front Streamline to back Interrupted Breathing position to ultimately switching back and forth between the two without delay.
Before working on front Streamline to back, I encourage you to rehearse Air Management as it pertains to turning the head. Aim to remain calm until the head clears to the air. Once you have a better sense of the sensation and sequence, then progress to practicing front to back on the lane line until you remove the support structure all together. The key to a smooth front to back transition is to avoid curling into yourself (a fetus position) when flipping to the back. Otherwise the body will collapse and submerge.

Interrupted Breathing Drills
- Back Float to Interrupted Breathing Position
- Interrupted Breathing – Start on the Back
- Interrupted Breathing to Skate – Start on the Back
- Skate to Interrupted Breathing – Start on Front
- Skate to Interrupted Breathing to Skate, Alternate View Skate to Interrupted Breathing to Skate
Interrupted Breathing Focal Points
- Turn towards open side (‘through the window’)
- Head rotates first
- Nose exhale before head rotates under
- Rotate with the Hip
- Relax head and neck once in neutral
See Freestyle Drill Resources for more description on the Interrupted Breathing Position.
Air Management
There is often a moment when turning where the head is submerged. It’s usually less than an inch between the face and the air. The body will eventually come to balance and the face will break the surface. Remaining calm and controlled at this moment will make it possible. Below is a progression to build up to this skill. Take your time. Be mindful. If you need more time on the previous skill before moving to the next complexity, repeat until you feel more comfortable.
Air Management Drill
Starting at the lane line, use the drills below to first practice turning the head to the air, with quick and easy access. Then repeat, this time forcing the head to remain submerged until it faces the ceiling, remaining in position and calm for a couple second before allowing the head to break the surface.
- Right hand on lane line and Right foot on ground, Left hand in pocket and Left leg floating behind the body
- Left hand on lane line and left foot on ground, Right hand in pocket and Right leg floating behind the body
- Repeat each side, but with both legs floating behind
- Wean off lane line to fully floating, slight flutter kick to keep legs a float
Air Management Focal Points
- Clear the airway
- Straight ‘shishkabob’ spine
- Exhale until head surfaces
- Hold breath until head surfaces
- Keep the body open and straight (avoid fetus position)
December 23, 2019 at 19:29 #29129Keymaster19/12/23 – Pool Comfort 4 of 4
Well done, Bruce. You worked diligently and in four session, made beautiful progress.
Our final session in this series was a combining of skills – Rotating between front and back, breathing and recovering.
Building a Routine for Success
A change in location, activities around you, number of people, temperature, time of day, health, life outside the pool, etc. can make your experience in the pool different each time. To help mitigate these factors, building a routine into your practice can help you get into the right mind frame and tune into you body.
- Pre-Swim Meditation. Your time in the pool is for you. So set aside all the things that occupy your attention with a brief mediation. Whether it be in the parking lot, locker room, pool side or on the steps, take a minute to calmly breath and center your mind on the task ahead of you. Breathing exercises are great here. Listening to the pool activity and allowing your everyday thoughts just run past you. It’s your time now.
- Warm-up Routine. While you are still acclimating to submersive environment, it’s important to warm-up the nervous system to the aquatic elements such as the relationship between gravity and buoyancy, balance between oxygen and carbon dioxide, and physics of propulsion. Pick whatever activities you enjoy the most. Play and explore. From this space, start your practice session.
- Mindful Practice. Listening to the body, mind and nervous system will enable you to make thoughtful and in depth decisions during your practice session. It’ll tell you if you need to spend longer on an activity, if you need to take a step back, when to progress, or take the challenge further. Listen for its signals.
- End on a high note. In the case that a practice session was more challenging or difficult, make sure to save some time at the end to do something you enjoy. Always reinforcing this as a positive experience. You’ll be far more likely to came back and try again.
Combined Skills
Warm up at the Lane line using the following cues.
- Clear the airway
- Rotate head on the ‘shishkabob’ spine
- Rest head on pillow
- Exhale until head surfaces
- Hold breath until head surfaces
- Quick sip of air, via mouth
- Adjust to comfortable floating position until read to rotate back to front
When you feel all the pieces coordinate well, then return to Front Streamline position to Back Interrupted Breathing position. See previous lessons videos for demo.
The next step is to switch back and forth from back to front and front to back seamlessly.
Finally, we combined the skills by jumping and falling into the water. You can recreate this sensation by jumping off the pool ground in the shallow end or falling from the stairs. (Safely, of course, free from obstacles or the wall.)
After falling in the water follow this sequence.
- Hold breath or exhale
- Come to balance (front or back)
- Flip to breathing position and breath
- Assess location and determine course/plan or direction
- Rotate back to streamline position
- Swim, using existing stroke, to navigate to the side of the pool.
- Repeat 3-6 until reaching desired destination
Co-Regulating
If your practice without a coach is difficult at times and don’t have a friend to join you, you could consider using a therapeutic tool called co-regulating.
The human body is built for relationship. We are still discovering the breadth and depth of how relationships impact the holistic person. One of which, we see in children looking to an adult as to how they should respond in a given situation and this can determine their level of comfort with what is happening. It’s like the saying, “feeding off of each other.” When you are with a safe person you trust, that person can create a space in which you can freely explore and process your whole person. We aim to create that space during our sessions together. But what do you do when you don’t have a coach or friend present during your practice sessions?
When you are on your own, you can still recall and invoke the relaxation you feel with a safe person. Here’s a way to try…
- Think of a person you feel comfortable and relaxed with, someone who makes you feel safe and helps you calm stress and anxiety when you are with them. This might be your coach, a significant other, a dear friend, or even a pet.
- Take a moment and imagine this person sitting with you, recall a moment with them and what it felt like. Hold that feeling. Observe how your breathing and heart rate is effected.
- Doing a simple activity you are already comfortable with, hold that feeling at the same time.
- If you can, try building to more complex activities while still holding that person with you.
Bringing a person into this space will add a layer of comfort and freedom to observe and explore your whole being in the water. It can also apply during other moments of stress or anxiety. Give it a shot and see if you like it.
Remember you can use this forum to ask questions, leave comments and thoughts, or even use it for tracking your own notes.
Happy practicing!
-
AuthorPosts
- You must be logged in to reply to this topic.