
Forums › Personal Discussion Zone › PDZ Users N through Z › Sue.se Discussion Zone › 2021 10 Pool Comfort
Please type your comments directly in the reply box - DO NOT copy/paste text from somewhere else into the reply boxes - this will also copy the code behind your copied text and publish that with your reply, making it impossible to read. Our apology for the inconvenience, but we don't see a convenient way of fixing this yet.
-
AuthorPosts
-
November 18, 2021 at 15:17 #32249
Jamee Small
KeymasterCurrently our Pool Comfort and New Swimmer Course is under construction. Normally our notes are not so lengthy. If you don’t want to read the explanations at this time, scroll down to the Lesson Reviews and Practice Plans of each topic for notes to take into your solo practice sessions.
2021/10/06 Lesson 1: Introduction to Adult Aquatic Play, Air Management and Balance Basic
Introduction to Pool Comfort/New Swimmer
Welcome to Pool Comfort!
In our first lesson we explored the initial building blocks for aquatic activities, Air Management, Balance and Play. Each activity we do will aim to…
- Build dialogue between you and your holistic body
- Define your proprioception in the aquatic environment
- Relax the Mind and Body
- Shape Body Structure
- Incorporate Air Management Skills
As we progress your list of passive and active details and skills will grow. To best incorporate these skills and not overwhelm the system, we use drills and cues. I will give you a drill (a shape or activity for the body) and ask you to hold one cue (a skill, a body part, sensation, or movement) at a time until it becomes more familiar and comfortable. Eventually it will become easier to hold and balance two cues, eventually three at the same time, and so on. In the meantime, you may like to organize your body into sections.
- Head and Spine
- Shoulders and Arms
- Hips and Legs
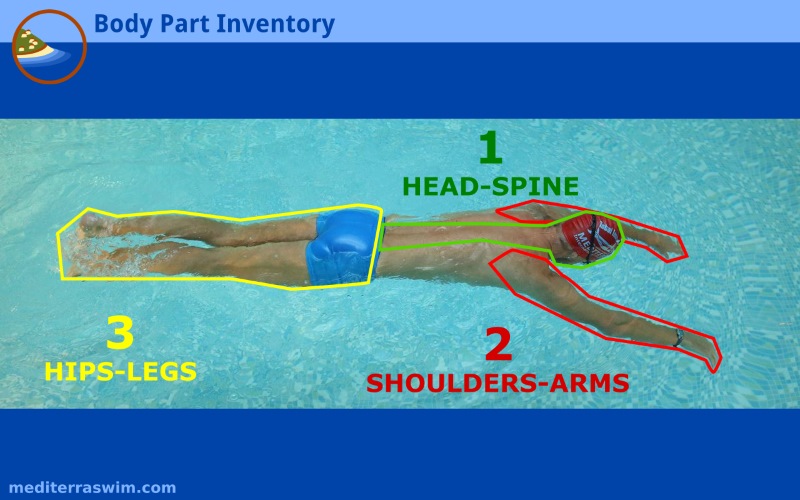
For example – You can use this organization while working through drills and cues by first consider learning to hear your Head and Neck and what it’s doing, where is it and how to does it feel; then relax it fully; followed by noting the ideal shape and structure you want to hold it in for that activity; then incorporate the air management.
There is a lot of feedback in the pool environment. It can easily distract and even overwhelm the nervous system from the activities at hand. To help isolate and alleviate some of the pressures, you may consider using Support Structures as outlined in How to Use Support Structures until you feel more confident with the skills and activities.
Introduction to Air Management
You breath all day, every day, from the first day until your last day. Unless their is a change in physical condition or environment, our access to air and ability to breath is unconscious. Once a change in ability or environment is introduced where oxygen access is potentially compromised, like in the water, your nervous system will make breathing your top priority. We see this even in the best of swimmers in how their head tilts up in a stroke or the reaching and lift of the head during a breath to get closer to air. It’s a natural instinct. But allowing it to go unexamined and work outside of our control, can compromise our comfort, ease and efficiency in the water.
To allow the body to relax and be free to position in the body in the ideal shape, you must first understand how air management works in the water, listen to the natural warning signs the body communicates, and rehearse an ideal rhythm to your air exchange.
There are two main gases that your exercising body needs to deal with. It needs to take in oxygen from the air and deliver it to your cells. And it needs to take carbon dioxide away from the cells and expel some of it from the body. But it is not that simple. The brain is carefully tracking the levels of these two gases in the blood and a certain balance is required between them to trigger the proper responses in the body. The two gases work together in a feedback system inside the body in a process known as the Bohr Effect.
When most people think of breathing distress, they may assume it is a result of insufficient oxygen – hypoxia – like what many high altitude mountain climbers experience when working long hours in thin air. And, it may also be commonly understood that the body needs to get rid of a build up of carbon dioxide or the muscles will start to feel sluggish and slow down. However, just as exercise distress can be triggered by too little oxygen or too much carbon dioxide, it can also be triggered by too little carbon dioxide in the system. That deficiency can be caused by breathing too frequently and too shallow – what is more commonly known as hyperventilation. In this mode of breathing you are you are giving off too much carbon dioxide too quickly (Fried, 1999, p. 26).
To keep relatively comfortable in athletic exertion, the body needs to keep the oxygen-carbon dioxide ratio in a certain range – not too much and not too little – and it does this best by using the proper breathing mode for that activity. To read more in depth on this topic and get some book recommendations see our article on “Could you be Hyperventilating?”
In the Air Management Lesson you will explore not only the means by which to breath in the water (nose and mouth), the platform from which to breath (thoracic, upper chest breathing or diaphragmatic breathing), but also the ideal ratio of exchange (oxygen to carbon dioxide).
Lesson and Practice for Air Management
You may choose to exhale through the mouth or nose, which ever feels most comfortable. However, if your are building up to an active swim stroke, we recommend starting with the nasal exhale as this will be the ideal form of expulsion during swimming. A nasal exhale allows you more control and protects against water running up. During all other drills and activities, you will interchangeably hold your breath and exhale, incorporating both sensations.
Air Management Drills:
- Diaphragmatic Breathing (Dryland)
- Holding Breath Rehearsal
- Holding Breath (Face Down or Head Submerged)
- Steady Exhale via mouth Rehearsal
- Steady Exhale via mouth (Face Down or Head Submerged)
- Steady Exhale via nose Rehearsal
- Steady Exhale via nose (Face Down or Head Submerged)
- Extended Breath Hold
- Extended Breath (with mouth open)
- Submerged Exhale
Air Management Cues:
- Listen for the Body’s Feedback. Where in the body, when (how long do you last) and how (with tension, discomfort, stress in a certain area, or thought) does your body communicate your comfort or lack of comfort during the drill?
- Fast and Forceful Exhale
- Slow and Gentle Exhale
- Medium level of Force, Exhale
- Aim for 6-12 seconds of control
Practice for Air Management
Repeat the above drills and cues, exploring your body’s response and comfort with each kind of breathing. This is a curiosity exercise and an introduction for the nervous system to the aquatic environment.
Added Activities:
If Air Management in the entire pool environment is overwhelming, practice the following at home.
- Grab a towel and bowl of water in an area of your home you don’t mind getting some water on the floor. Practice your breathing exercises while seated, placing your face in the bowl to hold or exhale.
- In the shower, allow the raining water to hit your face. While here do the following activities. First try holding your breath and feel how the water hits the face (the temperature, the pressure, the rhythm, the skins sensations, etc.). Next Exhale out the nose, removing the face from the water to inhale and return to exhale out the nose. Next, with the mouth open, breath in and out the mouth while water hits the face. Some water will enter the mouth, but you can freely breath in an upright position.
- Over a sink or bowl, with a cup of water, sip and trap some water in your mouth. Hold the water, while breathing in and out or talking. Try gently leaning forward or turning the head on its’ side to feel how the water moves positions. You are able to keep the water without it going down the throat. Avoid leaning back in this activity, it will go down. Let gravity keep it where you want it.
- Before getting in the water, sit on the side of the pool with your feet in the water or on the stairs and practice diaphragmatic breathing. Listen to the water, feel your breath and allow yourself to find a calming association between breathing and the water.
*Note: If during your other lessons you find the air exchange and drill overwhelming to combine, practice breathing separately at first. When doing the later drills, you may hold your breath until you feel more comfortable with that activity. Once at ease, then incorporate the air exchange to that skill.
Introduction to Balance Basics/Build the Frame
Balance refers to keeping the body parallel to the surface, in the ‘neutral corridor’, or the ‘neutral zone’ between gravity pushing down and water pressure pushing up. This is the corridor where you can swim along without having to waste energy fighting against those two natural forces. We recommend reading further on balance and how it effects movement in the water, in Intro to Build the Frame.
Even as you explore other shapes on the water, your body will seek to find this neutral space. You can play with it, try not to resist as the body bobs around finding balance.
Lesson for Balance Basics/Build the Frame
This lesson will be the foundation in which all other swim strokes are built, which encompasses lengthening, balance and streamline skills.
If you’d like a smooth transition from front float to standing, Front Float Recovery here is a possible solution.
Build the Frame Drills:
- Standing rehearsal of Balance Position (aka Superman)
- Weightless Head in Deadman Float
- Balance Position Glide
Build the Frame Cues:
To help you pay attention, interpret and send commands to particular parts of your body your instructor gave you a selection of cues in each drill. There are more cues on the lists below than you were given in your lesson, as the instructor chose a few to get you going, without overwhelming with too many details. You may be able to figure out the meaning of the others you were not originally exposed to and try them if you’re feeling curious.
- Cues from Torpedo and…
- Weightless Head
- Tippy Toes (thighs straight behind torso, toes pointed gently)
- Arms On Wide Tracks
- Arm Straight (no bend at elbows)
- Hands at Target
- Let arms hang heavy
- Shoulder blades (scapula) slide outward and forward (but not strained)
- Keep forearms soft (like a tree branch)
- Keep fingers soft
Practice for Build the Frame
Skills to Develop
- To maintain a neutral head position
- Hold long, straight, firm frame
- Keep arms connected to torso through the scapula
You want to feel your head and upper body fully resting on the support of the water. You want to feel your spine in neutral (good posture), from head to tail, including the legs streaming straight behind. You want to feel as if your body, from head to ankles, is one long, firm fuselage.
Choose 4 or 5 of the cues from the lesson to work on today.
Then, for each cue, work through these activities, as far as you can go successfully. Take one cue and work through the list. Then take the next cue and work through the list again, and so on.
- 5x Balance Position (time of comfortable breath hold) examining one section of the body at a time.
- 5x Balance Position (time of comfortable exhale) examining one section of the body at a time.
Introduction for Adult Aquatic Play
The science is out, the books have been written, the evidence shows that we learn best when we play – kids and adults. Tying the motor skills in with our nervous system allows the Right side of our brain to take over writing a new program into our entire body, allowing for a deep connection to the mind, body and environment. Although the Left side of our brain is great for those details, outlines and bullet points it alone simply can’t hear all the points are body needs to listen to for a full connection in the water.
When you see a confident child playing in the water, they throw themselves at an activity. At times, you might think they are struggling as they work their way to their goal or target. Unless they are in actual distress, their wriggling little bodies are building their nervous system’s proprioception in the water. This is where they learn their body’s relationship between body density/mass, gravity and buoyancy. They learn how to manipulate the physics in the water for their goal. And ultimately learn their limits, gain a healthy respect of its challenges, and build skillful movements.
It’s time to get out of our comfort zones as adult and learn how to play again in the water. Play not only helps build up our perception in the water, but it also serves as a great introduction for the nervous system in the water and a reset for when we get overwhelmed, stressed, frustrated or bogged down. While you are learning to get comfortable in the water, we highly recommend dedicating some of your time to the practice of play.
Lesson for Adult Aquatic Play
- Toe Touch Video
- Balance Ball Video
- Balance Ball with Arm Propulsion
- Dead Man’s Float
*Make sure to notify the Lifeguard before attempting the Dead Man’s Float exercise, so they don’t mistake it for an emergency.
- Play catch with a friend. Allow yourself to reach, fall over, dunk under, lose your footing. Make it messy, then make it tidy.
- Pick up Weighted Objects from Steps (Try it keeping feet on the ground. Try it while floating.)
Practice for Adult Aquatic Play
A good athlete will have a warm-up and cool-down to every workout. It is good practice to have one for your nervous system too! During your Adult Aquatic Play Practice session, you will build an Intro Routine and End Routine to incorporate into your regular solo practice. As you continue learning and growing your water skills, you may find new activities to add or interchange into this list.
1. Create an Intro Routine with play or a calming activity. This is a gentle way to introduce the nervous system into the new environment and bring the right hemisphere of the brain into action before jumping into technique left hemisphere training. This can be 3-5 minutes long or more, depends on how at ease and in the zone you feel that day.
2. Create an End Routine with play or a calm activity. The power of positive reinforcement will go a long way into helping you associate the water with a positive experience instead of a tiring or stressful place. So give yourself a reward. Make a little time for care and reflection. End on a high note. You could choose to do something pleasant in the water from the list below, or take an extra long shower, a soak in the hot tub, a treat or a cup of tea at the end of each practice. You’ve done a great job in the water today, let’s invite those vibes into the rest of your day.
Choose one or more from the following:
- A play activities
- A diaphragmatic breathing activities
- A floating or balance activities
Make a combination that you like the best
November 18, 2021 at 15:20 #32252Keymaster21/10/21 Lesson 2: Front Glide and Introduction to Back Float
Intro to Front Glide
Now that the body can be self-supported in a stationary Balanced Position in it’s neutral buoyancy point, we add some momentum for a glide. During this activity, we aim to keep the body in alignment, the spine straight, the neck relaxed and the body lifted through a streamline shape and counter-balance arms. If the spine is aligned, then when force is applied we can move in a straight trajectory.
The force applied should be gentle and smooth at first. As you gain more comfort and confidence, you can curiously explore different levels of force and directions.
If you’d like to face the deep end, we recommend first putting a ground marker (a weighted object) at a depth you are comfortable standing to mark a visual when to stop and stand so you don’t travel farther than you intend.
Front Glide Lesson
Aim to maintain the same level of relaxation you gained in the Balance Position. Start by systematically creating the ideal shape, engage the abdomen by lengthening the spine and then relaxing the head.
Front Glide Drills:
- Balance Position Rehearsal
- Balance Position
- Ground Push-Off
- Wall Push-Off
Front Glide Cues
- Arms at Target Depth
- Weightless Head
- Lengthen the Spine (Engage lower abdomen with ‘Tippy-Toes’)
- Narrow, Torpedo Fin Legs
- Feel Water Move Across the Skin
- Feel the Momentum Lift the Body
Intro to Back Float (with Support)
The Supine Position is usually the most vulnerable postures. It is also one of the most useful and potentially life saving positions to have in your tool box of swim skills. Much like you experience in the Balance Position, the more you relax and create a long narrow vessel the body will lift and balance in the water better.
Once you experience calm and relaxation repeatedly, take a moment to observe how your body feels while its floating. What does the water feel like as it surrounds and supports you. Just make simple observations and relax in the knowledge that both your body and the water are supporting you.
To gently enter the back float position, whether with or without support, follow the mantra “Head Back, Chest Back, Pelvis-Up.”
The goal is to find the same neutral zone for the body’s alignment to rest in the water. If the body tucks in on itself in a fetal position, the body will sink. If the body tenses and bows back like a bride, the head will submerge and legs sink. Much like the Balance Position, it is a delicate balance of relaxing certain parts (i.e. the neck and arms) and engaging others (i.e. the lower abdomen).
Remember your strategic breathing technique on the back: Quick sip in through the mouth and a long exhale out the nose. This will decrease the opportunity for disrupted water from going up the nose.
Back Float Lesson
Using a pool noodle can help you stay a float while focusing on both shape and relaxation and be fully supported. Below is a progression of working with and slowly off the noodle to solo float.
- Noodle under back of knees and lower back and neck.
- Noodle under neck and lower back
- Noodle under lower back
- No noodle, hand on lane line/ladder/wall
- No support structure, gentle flutter to keep legs lifted
*If you have the option, use a thin pool noodles over thick pool noodles.
Back Position Drill
- Shoulders deep, “head back, chest back, pelvis up”
- Supine Position Recovery
- Briefly dip the head and hold breath while head submerges. Hold Breath. Clear the airways at the head resurfaces.
Back Position Cues
- Head Back, Chest Back, Pelvis Up
- Relax the head on a “Pillow” of water
- Release arms to float in a “Y” above the head
- Lengthen the spine (with “Tippy Toes”)
- Lift pelvis towards the ceiling
- Add a gentle flutter kick if the legs sink
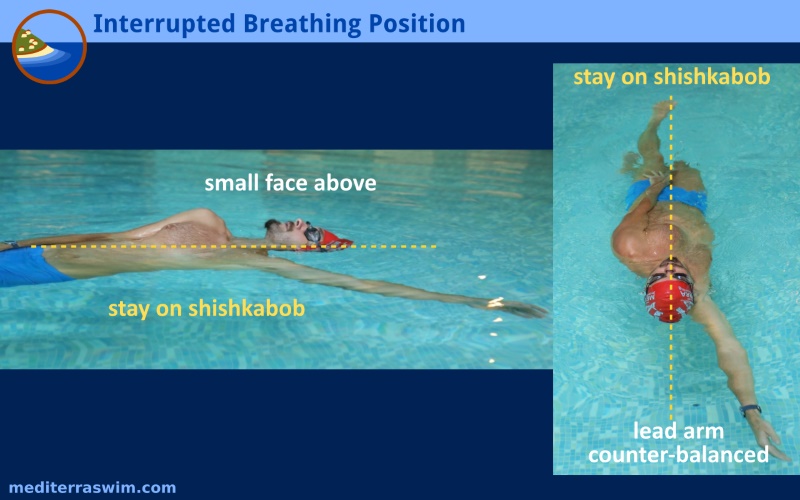
When you feel more comfortable with Supine Position without a support, you may explore the Interrupted Breathing Position, where one arm is in your “pocket,” the other is above the head and under the water, and the body is slightly rotated to balance.
Supine Focal Points
- Relax the head and neck (as if laying it on a pillow)
- Long, straight spine
- Engage lower abdomen (as if on tippy toes)
- Chest and Shoulders straight but relaxed (avoid arching up or curving in)
- Pelvis up (press hips towards the ceiling)
- Hips straight
- Legs straight and narrow behind the body
- Take calming, Diaphragmatic Breath
November 18, 2021 at 15:23 #32253Keymaster21/10/13 Lesson NotesSince today we explored more of our previous skills, I decided not to post a new topic on the forum for you just yet. Instead I have a few notes to help support your solo practice time so you can gain some ground in the new skills.You are doing marvelously. During our first session, you progressively became more relaxed with each activity as we worked through them slowly and mindfully together. This will also be the key to your success during solo practice.First, you mentioned feeling self conscious for struggling at this time in your life. I’m here to say that your nervous system is timeless and it doesn’t care who you are or how old you are. In fact, your discomfort in the water is an indication of a strong survival instinct. We are land mammals. Unless we have some familiarity, skill or stupid bravery then we naturally fear the water. As you should if you can’t touch, breath or swim. Your tension tells me that your nervous system is dedicated to keeping you alive. Excellent. However, it knows how to panic but doesn’t have the actual aquatic skills that would keep you alive. To overcome the sympathetic nervous system (the fight, flight, or freeze response) controlling your experience in the water, we need to carefully construct a trusting relationship with that nervous system.As a functioning, capable adult we can rely on your ability to follow motor skill instructions, like put your hand there and foot there. Following those instructions is easy. Listening to the body’s responses to those actions and then learning to delicately pull back, hold or push through is the tricky part. That’s where we aim for the following skills over swim skill.1. Pick an activity you will feel comfortable and successful with. Repeat for confidence.2. With the same activity add one layer of complexity (example: exhaling during, removing one support or touch point, adjusting the direction or angle, ect. Anything that changes the perception, balance or juggling of the activity). Listen for the body’s response.3. Evaluate Response, Determine if you need to take a micro step back, hold for a little longer and sit with the discomfort and/or Repeat until this becomes the new comfort line.Only proceed to another layer of complexity when you feel comfortable with the most recent activity.Not making any progress? change activities to reset the system. Then come back to the activity when you feel relaxed and recentered.In the Balance Position here are all the micro steps to take alone and build up to an unsupported glide.1. Two hands on support, hold breath. Pick one Leg off the ground. Repeat on both sides2. Two hands on support, exhale. Pick one leg off the ground. Repeat on both sides3. Two hands on support, hold breath. Pick both legs off the ground.4. Two hands on support. exhale. Pick both legs off the ground.5. Hover two hands above support, hold breath. Pick both legs off the ground.6. Hover two hands above support, exhale. Pick booth legs off the ground.7. Two hands on support, hold breath. Pick both legs off the ground, inch hold to just the fingertips on support8. Two hands on support, exhale. Pick both legs off the ground, inch hold to just the fingertips on support9. Two hands on support. hold breath. Pick both legs off the ground. Inch hold to just the fingertips, then gently push backwards off the support.10. Two hands on support. exhale. Pick both legs off the ground. Inch hold to just the fingertips, then gently push backwards off the support.11. Facing the support but within reach, hold breath. Head down, arms in position pick up both legs for a float12. Facing the support but within reach, exhale. Head down, arms in position pick up both legs for a float13. Facing the support with a few inches away, hold breath. Head down, arms in position pick up both legs for a float.14. Facing the support with a few inches away, exhale. Head down, arms in position pick up both legs for a float.(repeat, increasing the distance of separation between you and the support while facing it.Repeat 11-14 but with the support in peripheral view/side viewRepeat 11-14 facing away from the SupportRepeat 11-14 facing the deep end of the poolThe next set of micro skills would be to introduce instability to then bring the body back into balance position, such as a push off from a wall, bobbing to land in balance, gliding with the diving brick. etc.Even if you don’t make it all the way through all the steps, it doesn’t mean you’re stuck there. With each milestone, it opens up doors for other and new activities we can introduce for you to work on simultaneously. They then begin to layer upon each other as your proprioception is built. I’ll introduce you to those other activities in our sessions to come.During a session, the coach is watching your movements and determining what your system might be ready to take on, without too big of a leap. Usually in the body language or by the swimmers comments there is an indication on which is causing discomfort, so we take a micro step or two back to a line you might feel more successful at. Then incrementally work up until you might be ready for a bigger step again. When you do your solo practice, you are now learning to listen and then gently coach that nervou system to trust you with greater and greater complexity. Sometimes it might be willing to take a big step, sometimes it needs more patience and time with smaller steps. With each mindful and caring step, you are teaching your nervous system that you are listening and responding to its needs, while inviting it to try new things.From the number list above, pick a starting point anywhere along it where you think you’ll feel comfortable. Give that activity 3-4 tries. Then go up a micro step. You don’t have to follow each step. For example: If you find that exhaling is easy for you to do in each activity, just skip ahead to do each activity with an exhale. When your body starts to respond with discomfort, stop, listen, observe, evaluate, and assess whether to take a micro step back, perhaps hold the position/activity longer and sit with the discomfort, or repeat until it becomes comfortable. Only proceed to the next activity when you have reached an acceptable level of comfort (to you) with the current one. If you find yourself getting stuck, frustrated, etc. then change to something else for a few minutes to reset (example: picking objects off the steps, bobs, sitting with a brick and watching/listening underwater, talking to Terri for a bit, etc.).With your body awareness through your yoga practice, I surmise you are pretty good at listening to your body on dryland. Together we can build up that ability in the water too. You are an intelligent, capable woman, Sue. With some patience and mindful care, that nervous system will catch up to you.Please let me know if you have any questions or find yourself stuck in the solo practice session. I’m here to support you during that time too.Until next week!Take care.November 18, 2021 at 15:24 #32255Keymaster21/11/10 Lesson Notes
Now that you intellectually understand the Balance Position, it’s time introduce some imbalance. The idea is to transition from chaos to calm in our bodies. Although the nervous system may still be speaking to you with a megaphone, the aim is to listen while not allowing it to command the body. If you’re interested in how this relationship works, I recommend the book “The Body Keeps the Score” by Bessel van der Kolk.
The time it takes to calm that sympathetic nervous system to feel free and relaxed in the water is different for everyone. The key is hearing that discomfort however it manifests for you, and sitting with it or holding it. Like a kid that might by acting up out of stress, fear or anxiety, they may act out physically, vocally or in withdrawal. So they don’t hurt themselves we might remove dangerous things from their immediate environment, transport the to a safer environment and or try to hold them and comfort them while they express their feelings. A traumatized nervous system requires the same patience, gentleness and care we would give to a distressed child.
That being said, we even introduce “chaos” in a gentle way. We don’t want to shock you or push you too far, but incrementally introducing support, skills and balance in companion to the imbalance.
It’s time to get curious and explore a variety of activities through play that allow your body to become imbalanced in a controlled way. Gradually you’ll decrease the level of support and increase the level of instability. Each time, concluding by bringing the body to a neutral and stabile position, whether this is standing or floating in the Balance Position.
Review:
Start any of the activities with the form of support that feels most comfortable. Then progressively move up the support structure chain until you are doing the activity without a support.
Support:
- Two hands rails
- One hand on rail
- One hand on step
- Hand hovering above step
- Lane Line with finger hold
- Pool noodle with two hands, then one hand, then finger touch
- Hold one of the above, then release hold completely
Activities:
- Front Float, wiggle hips
- Front Float, wiggle hips and legs
- Front Float, wiggle hips, legs and arms
- Bobs, sitting bottom on the bottom
- Beach Ball Float, one arm gentle propulsion to move the body back and forth
- Using a ball, “rolly polly” twirls and bounce
*If you are able to ween off support you might try a gentle jump up and dip down, like a bob. This time let the feet lift off and not settle down immediately. Then either stand or float.
Cues Activities:
- Systematically relax up the body, one body part at a time. (ex. feet. then calves, etc. End at head, neck, and face.)
- Try variations of holding your breath or slowly exhaling your breath
- Eyes open or eyes closed
- Take a break and stand up to roll your shoulders, stretch your neck (gently, never to a uncomfortable range). Wiggle out the tension.
Additional activities:
At home in your big bath, enjoy the warm and comfort of good soak. At some point, safely lean back and allow the head and back to float. Here, breath diaphragmatically. Deep calming breaths at first. Then return to a normal breath. In this space, be curious. Feel the temperature of the water. Feel where and how it touches the skin. Feel where the body floats and where it sits lower. Maybe gentle move your fingers or arm, wiggle toes or move a leg, feel how the water moves over and with the movement. In this curious space, we’re building up the sensory input between the body and positive, safe association.
In the shower, practice turning your head under the showering water droplets. Here follow a similar sensory observation. Then try to breath out through the nose and in through the mouth. You’ll get a little water in your mouth, but you can still breath in, spitting the water out when you close the mouth to exhale.
You can also follow a mindful and meditative practice at the pool. Since you might be sitting still for a bit, I might recommend trying this in the Warm Pool. Sit or squat comfortably, shoulder deep. Breath deeply. Try moving your tension body parts one at a time, then systematically relaxing thing. When you feel relaxed, try spaying side to side as if to start a rhythmic dance. Be curious. When you feel connected and relaxed, try a little head or face submersion. If this feels good, pick up on foot at a time, step or glide around. Lean forward, lean back. If you’re still feeling relaxed, you can try a supported front float.
November 18, 2021 at 16:39 #32257Keymaster21/11/17 Lesson Notes
During our session today we explored new options for sensation.
- Drill: Gliding while supported, Cue: Feeling the water over the skin
- Drill: Pushing off to support, Cue: Feeling the water over skin
- Drill: Pushing off with support off to side, Cue: Feeling the water over skin
- Drill: Upright bobs, Cue: 1. Feel when the body’s momentum slows, 2. Feel when the body lifts up
- Drill: Leaning to the side, Cue: Use the leaning side arm to push up and correct
- Drill: Recover to standing (with support), Cue: 1. Tuck the legs first, 2. Press arms down to right the torso
Then we took a break to retrieve objects at varying depths and support. Adding in the challenge of using gravity and body position to more easily grasp the object without support.
Now, the point of all these activities is to continue finding way for your mind, body and nervous system to explore and learn the environment around you. Since the nervous system has such a loud voice, we’re giving it something else to listen to in the body. Such as how the water feels on the skin, when you feel the body push down, when you feel the body lift up, etc. We explore some mechanical reactions like if you push your arm one way, what direction does it take the body.
You, as an intelligent and capable person, are intellectually able to understand this, but the body either doesn’t trust it’s environment or might a trust within yourself. Therefore, we explore in a careful and controlled way, building up the trust and confidence.
During our next session, we’re going to try something new, for you to self explore and determine your perimeters for growth.
November 24, 2021 at 19:32 #32260Keymaster21/11/24 Lesson Notes
Well done today, Sue! I really enjoyed your inspired session today.
I’m sorry we don’t have videos of the Recreational Breaststroke at this time, but I hope these notes will help you recall a sequence of exploration and development in the skill.
*A thinner pool noddle will lift and support less weight in the water. If ridding, then the feet might touch more to the ground. Under the arms, the face may sit a little closer to the water, as the pool noddle supports less. A thicker pool noodle will lift and support more of the weight in the water. If ridding, then the feet will lift off the ground more. Under the arm, it will lift the body higher in the water. Pick according to your need and comfort.
Recreational Breaststroke Arm Motion
Palms down, stretched in front. Swing the hands out as if scooping two melons into your arms and bring them towards your body. Light drawing a circle or a heart. When the fingers meet together in front of the chest, then shoot the hands forward together, like an arrow.
*Keep the arms sweeping in front of the body. Avoid pulling the arms past you, behind the back.
Drill:
- Riding the noddle like a horse. Allow feet to lift off the ground, aim for less contact with the ground each time. As the arm’s sweep in front, feel them pull the body forward
- Ride the noodle like a swing. This requires a little more control and steady movement or you arm sweep can pull you off the noodle.
- No noddle. Lean forward. Allow the legs to kick up behind you briefly as you glide forward
Recreational Breaststroke Kick
The kick mantra is “up, out, together and glide.” Starting with the legs straight out, knees together, bend the knees up into a partial seated position. Then fan the bottom of your feet toward the back wall behind you, push the bottom of the feet back and out. At the legs begin to straight, swing them together, landing straight together. It is from the pushing out, back and then together that you get the little push forward.
Drills:
- Sitting on the steps where you can view your leg motion, practice the leg sequence
- Using the steps or rail for support, practice leg sequence facing down. Aim for a little push forward as the legs kick out and back together.
- Pool noodle under the armpits, rehearse kick across a distance.
Combining Skills
The Breaststroke arms and kick overlap one another. Sweep the warms. As they shoot forward, like an arrow, then you kick. Start slow and with pauses, kind of robotic, at first. You can use a pool noddle under your armpits for support at first, while you work on this choreography.
I found this video on youtube, the swimmer starts with his head in the water. But at the end, he lifts it up to take a few strokes. Watch the timing of a relaxed breaststroke here.
Back Float Recovery
Here is a link to the Back Float Recovery. This motion takes a little bit of core strength to pull off. Alternatively, you could practice flipping from your Back Float to a Front Float to then use a Front Float Recovery Drill.
Practice at the stairs while you explore which recovery option works best for you.
December 8, 2021 at 18:34 #32277Keymaster21/12/08 Lesson Notes
Great work on your solo swim sessions. Your hard work is showing.
Today we examined the breaststroke arms and kick again for your recreational breaststroke, along with an elementary backstroke.
Breaststroke Arms
The greatest contact with the water will be from your palms and forearms. As you scoop the water into your torso, you should feel the water pressure on these areas of your arm. There were a couple visuals you can use to help the shape and motion.
- Roll over melons and scoop them to your chest
- Gathering a laundry into a bunch to your torso to carry
- Shaping an upside down heart, then part in the middle
The scoop back should remain in front of the body, try to avoid extending behind the back. Scooping back gives you the push forward, the gather to the torso will lift the torso.
Breaststroke Kick
Begin practice on the stairs to see the motion. Then try on your front at the stairs. To feel if your kick is effective you’ll feel your palms press into the supporting stairs. Build up to a front float, arms out in front and down to practice the kick without support (a few feet from the stairs).
This motion we used another mantra to help.
- “Up, out, together, glide”
Elementary Backstroke (a.k.a. the water skipper)
This stroke is a fan favorite. You get to lay on your back and breath freely. The legs and arm move at the same rate and similar motion. A couple fun mantras for this stroked.
- “Up, out, together, glide.”
- “Chicken, airplane, soldier, glide.”
- “Ready, set, go, glide.”
You’ll find the one you like the best.
Kick
This kick is the same as out breaststroke kick, with the exception of not bending at the hips but at the knees. Keep the pelvis and the back straight, pushed up towards the ceiling. The water will better support you and the body will slide more efficiently. If the booty bends, then we run into the risk of curling into a fetal position and the body dips lower into the water.
December 16, 2021 at 15:23 #32283Keymaster21/12/16 Lesson Notes
Wow, Sue! You have been working so hard and caring for yourself so well. It really shows in the water. Bravo to your bravery.
Recreational Breaststroke Continued:
The next element, free from support structures, is to create a gentle tilt forward. The formal stroke is done horizontal with the head in, creating a pulsing or rocking back and forth motion with the body. With an upright breaststroke, to maintain the tilt and halt the rocking motion, we count shorter, more compact arm movements. In this tilt it is easy to create a lordosis in the lower back causing strain or discomfort. To avoid this, engage the abs and keep the pelvis inline with the spine.
- Start with “falling forward” tilt and scoop the arms to keep the torso up right. You can keep the toes in contact with the ground.
- Progresses to the same arm movements and positions to extending the legs straight behind you, with just the tippy toes touching.
- One leg at a time, as you scoop the arms back, bend the knee towards the chest. Straighten the leg as you shoot the arms back out straight.
- Repeat on the other side. *this can also be rehearsed on dryland.
- Keeping the arm motion, now pull both knees up briefly as you the arms back. Then straighten both legs back out behind you, toes making contact with the ground) as you shoot the arms back out straight in front.
- Final motion to add, as you straighten the legs bring them together. The “squeezing” or collecting the water between the legs is what projects you forward.
Eventually this coordination will feel more and more comfortable that you may feel ready to try without the toes coming back in contact with the floor.
Crawl Stroke
I loved your experimenting with the forward crawl stroke. What a huge leap forward.
Suggestions: If you’d like to make it feel a little smoother and set you up for better travel, keep one arm (the lead arm) out in front at all times. You are simply replacing one arm with the other. Instead of swimming with the top of your head and shoulders, you now have an arm leading the way. It’ll also be out in front for you to reach for a surface or know when you’ve reached your destination.
Back Float
I encourage you to keep working your back position comfort. Let me know if you need any additional input to helping this processes.
-
AuthorPosts
- You must be logged in to reply to this topic.