
Forums › Library › Swim Course Instructions › 2 Beat Kick Introduction
Please type your comments directly in the reply box - DO NOT copy/paste text from somewhere else into the reply boxes - this will also copy the code behind your copied text and publish that with your reply, making it impossible to read. Our apology for the inconvenience, but we don't see a convenient way of fixing this yet.
Tagged: 2 beat kick, kicking, leg skills
-
AuthorPosts
-
January 1, 2018 at 16:53 #16612
Admin Mediterra
KeymasterThe Purpose Of The 2 Beat Kick
The 2 Beat Kick is meant to assist torso rotation, to make more powerful the transfer of force from one side of the body to the other. The 2BK creates a unified, full-body propulsion system. The legs become part of one smooth, integrated propulsive action, from toes which press on one side to the extending wrist on the other side. It is quite thrilling to feel this flow through the whole body! And, it fits long-distance swimming so much better.
The main difference between the common flutter kick (either a so-called 6-Beat or 4-Beat Kick) and the 2-Beat Kick is that the flutter kick is meant to provide linear thrust – the legs are kicking in such a way to push straight back against the water in order to push the body forward. In contrast, the 2 Beat Kick is providing rotational thrust – the legs are fairly straight and the motion comes mostly from a turning of the foot or ankle in an arcing motion. This turn of the ankle corresponds to a turn in the hips, and that is how this rotational kick of the foot assists the torso rotation. It may be likened to a corkscrew action. If they legs are formed into a kick for linear thrust, they will not be able to cooperate with the torso rotation in this way. The flutter kick requires a significant amount of disconnect between the lower body and the upper body at the waist so that the hips can respond to the kick pattern while the shoulders respond to the arm-stroke pattern – these two sections of the body are then on different rhythms.
So let this sink in: The 2BK has a completely different purpose than the 4BK/6BK, and because of this it makes no sense to use it as a direct forward-propelling action. When a swimmer switches to a 4BK or 6BK she is not merely changing the rhythm, she is also changing the way force is applied and transferred through the body. 4BK/6BK are not the same kick simply applied at a higher tempo. They are two different kicks for two different purposes.
Learning The 2BK
Hopefully, you have studied the introduction to Counter-Balanced Foot Position. Once you learn how to do that, and the purpose for it, learning the 2 Beat Kick will come easily, and be even more effective because you understand what the legs are doing for you between kick action.
In the Counter-Balanced Foot Position, all that is left to do is to take the Skate side foot, which is already poised in the ‘ready to kick’ position, and let it press in an arcing motion, as the ankle rotates outward, the toes on this Skate side foot turn from ‘pigeon toes in’ to ‘toes out’ position. We call this the ‘Crescent Moons’ pattern because of the path the toes follow while turning outward or inward.
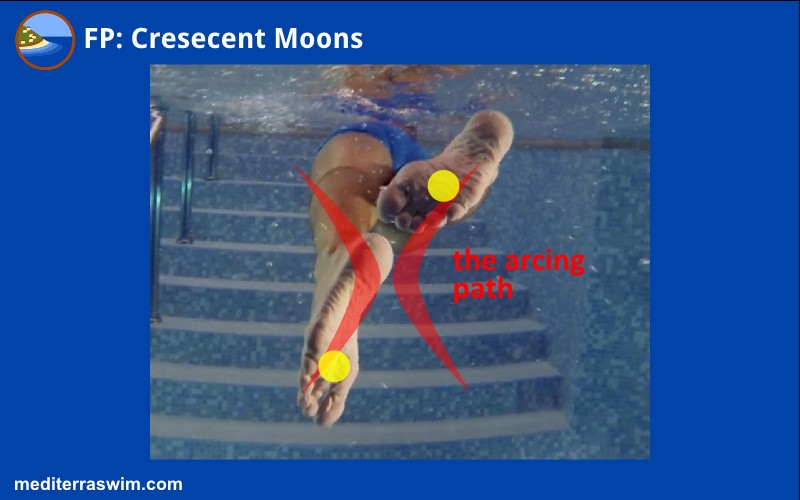
In this image you can see the right foot is poised in the ‘ready to kick’ position, and the other foot is held in the ‘finished-the-kick’ position. The feet lock into these positions between kicks and do not move. When the arms in front are ready to switch, when the torso is ready to turn, the ankles of each foot will rotate and the toes will arc, and the feet will slip into the exact opposite position. To make it an actual kick, just press with the Skate side foot (the upper foot) as it arcs downward.
On the other foot (non-Skate side), at this same moment, only turns the ankle inward – or rather, turn the toes inward – to pigeon toe position. Do not apply any backward pressure when this foot moves – just let it twist and drift into its poised ‘ready to kick’ position. Do not make a ‘scissor’ like action with each foot applying force in opposite directions. Do not bring the feet back together in the middle after kicking. Keep them locked into this position.
For Practice
At this point it will be helpful to view the 2 Beat Kick drills on the Video Tutorials page.
On land, in standing positions, practice the connection of ankle rotation to hip rotation, on just one side at a time.
In the water, in drill positions, practice the connection of ankle rotation to hip rotation, on just one side at a time.
In the water, once it feels familiar to the nervous system to make one ankle-hip move together, then try alternating switching from left to right to left to right – go slow and make very smooth, fluid movements. Do not be abrupt or jerky.
You may work toward whole stroke integration with this progression of drills:
- Superman Position
- Spear Skate
- Skate With One Switch (work just one side at a time, repetitively)
- Swing Switch
- Whole Stroke
Further Refinements
At the beginning of learning a 2BK, most humans tend to move their legs in a scissor-like counter-force way – one leg/foot pressing downward and one leg/foot pressing upward. This may be the way to make a nice 4BK/6BK but this is not the way to make a nice 2BK. However, you may likely need to begin working on the 2BK connection with such a scissors-like kick at first – getting the rhythm is the most important first step. You’ll just need to learn to stop the scissors in the next step of your refinement.
Ultimately, you will want a 2BK that has only the (Skate side) upper foot applying a downward pressure, while the other foot (non-Skate side) is holding its place in a long-body line. As the left Skate side foot presses, the body will rotate onto right-side streamline. The right leg will gently twist upward into poised position, ready to kick on the next switch. Meanwhile, the feet in this CBF position will be helping the body stay more stable and legs more parallel to the surface. At the appointed time of the next kick, on the Skate side, there is a slight flex in the knee and a slight lift of the heel – all keeping hidden behind the envelope of the torso – no part of the knee or heels sticking outside that envelope – then ‘flick’ of the foot in that downward arc, at the precise moment to finish the body rotation.
There is no scissors, counter-force kick happening. Only one foot is pressing, while the other is ‘resting’ so-to-speak. They take turns – one pressing, while the other holds the streamline.
In order of priority, work on these skills toward refinement:
- Master Counter-Balanced Foot Position on each switch
- Learn to keep legs close together, for a compact switch of positions
- Refine the timing of the leg switch to correspond more closely to your entry and extension
- Fine tune the amount of pressure on each kick to be proportional to the intensity of your strokes
-
AuthorPosts
- You must be logged in to reply to this topic.