
Forums › Library › Swim Course Instructions › Catch and Hold Lesson
Please type your comments directly in the reply box - DO NOT copy/paste text from somewhere else into the reply boxes - this will also copy the code behind your copied text and publish that with your reply, making it impossible to read. Our apology for the inconvenience, but we don't see a convenient way of fixing this yet.
Tagged: catch, drills, focal points, freestyle fundamentals, propulsion, synchronization
-
AuthorPosts
-
November 29, 2018 at 09:48 #20478
Admin Mediterra
KeymasterIn traditional swimming the underwater part of the freestyle stroke is called the pull (or pull/push) phase because in that tradition, the emphasis of the whole stroke is about pulling on the water to move the body forward. We call it the ‘catch’ and ‘hold’ phase because our orientation is about holding a point in the water and sliding the body forward, past that point. Our emphasis is on the body moving forward, not on pushing water backward. In this view, the main emphasis of the stroke is to Send Force Forward through the Skate side of the body, while the catch is in a supporting role.
In our lessons series you have learned the Four Essential Features of the freestyle stroke, and the catch/hold is not one of them, because new swimmers, even without instruction on this, are usually pulling on the water in a way that is (at first) adequate to serve the rest of the stroke features they are learning. We want to be careful to not overload new students with too many new things in this lesson series. We may teach the catch/hold as a bonus lesson if the students seem ready for it. It is not necessary at first, but it does provide a wonderful enhancement to those four features of the stroke.
How The Catch/Hold Fits In
As noted above, the catch and hold does not work well apart from its coordination with other parts of the stroke. When the catch is connected to the torso rotation, the force of that catch can be transferred into the torso. When the torso is connected to the entry and extension arm, that force can be transferred into that side of the body, producing better forward motion. All three need to be tied together in a smooth choreography, and when they are, you feel a wonderful acceleration in each stroke.
In the Recovery Arm Swing lesson you developed that optimal Arm Switch Timing – this timing is necessary in order to transfer that force from the catch side to the entry/extension side of the body, through the torso rotation. If the timing of the arm switch timing is too late or too early, then less of that force can be transferred from one side to the other.

Three Components
This effective forward propulsion depends on the three components each doing their part and being well-synchronized with the others:
- the Catch generates a wave of force
- the Torso Rotation transfers that wave of force from the catch side to the entry/extension side of the body
- the Entry/Extension into Skate Position receives and delivers that wave of force into forward motion
In the Catch and Hold Lesson you are developing these connections, learning to generate and transmit that wave of force.
Skills for Catch and Hold
The better you perform the catch and hold, the bigger the wave of force you may transmit to the other side of the body.
The quality of this wave depends on:
- The shape of your catch arm in order to get a bigger grip on the water
- Loading the torso muscles, more than shoulder muscles
- The pathway that catch action follows
- The pressure applied – steadily through the motion, not too abrupt, and not too weak but just right
The focal points below will help you create and improve these three features in your catch action.
Creating the wave with an arm is not enough – it must be tied into the torso rotation so that the torso is doing most of the work of holding the water, which mean it is transferring that force from the catch side to the skate side of the body. So, the lesson starts with a focus on only the catch arm and torso, and eventually adds the other side of the body, completing the full choreography.
In this lesson you will work through a series of drills to help you:
- Build better catch shape to generate more resistant force
- Empower the catch/hold with the torso rotation, so that the torso muscles do more of the work
- Improve the catch pathway – straight back so the body slides straight forward
- Improve the smooth, steady sense of pressure through the whole motion
Useful Imagery For Catch
During the lesson you will likely be given these images/analogies to work with:
- the ‘beach ball’ of water molecules (or ‘swiss ball’, or ‘pilates ball’ if you prefer)
- the underwater aluminum ladder, under your body, parallel to the surface
The Beach Ball
The beach ball of water molecules represents the pressure zone of water you create and direct with each underwater stroke. When you initially form the catch shape, you are gathering water molecules – or more specifically, you are creating a ‘traffic jam’ or ‘pressure zone’ of water molecules against your arm, and this pressure zone which offers resistance to your arm. You form this pressure zone of water, and by pressing on it, you leverage your body forward through the rotation.
Another way of viewing it, is that you press and send this ball of water under your body, and your body rides over the top. More specifically, you create a layer of pressurized water and slide your hip and leg over the top, helping them stay up near the surface.
The Ladder
The ladder gives you a directional grid, it gives you fixed locations in the water, to set the position and trajectory of your movements.
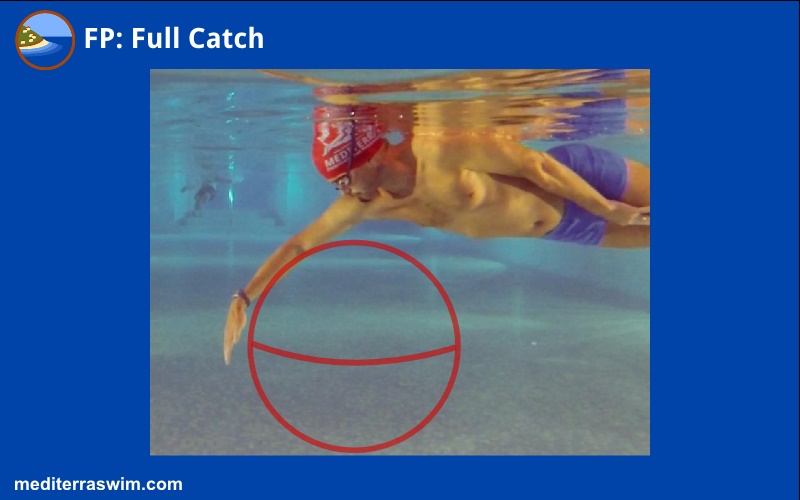
The two rails correspond to your two arm tracks. Your lead arm extends forward on that rail, while your catch hand holds a fixed point – a rung – on the rail. The rungs represent the point ahead where you set your catch (get a grip on the water).
The depth of this imaginary latter is set at the depth of your catch, in the layer of water just below your body. That is where you want to get a grip on the beach ball. That is where you want to create the pressure zone of water that the frame of your body can slide over.
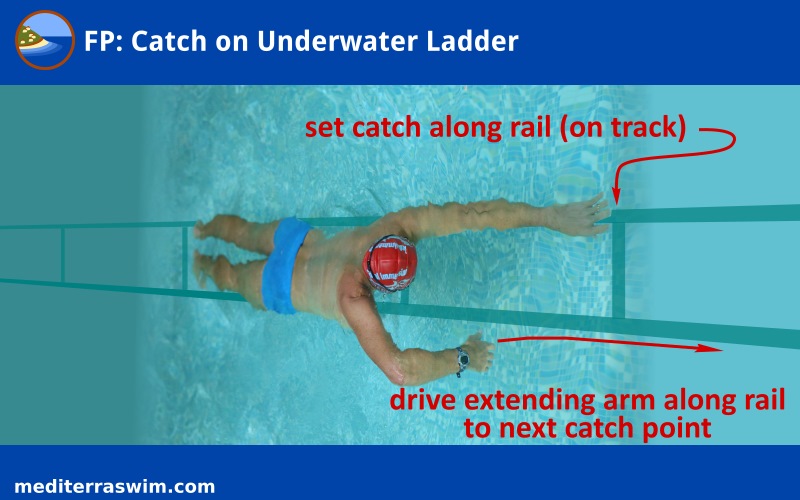
Imagine if there really was a ladder in the water underneath you. Imagine reaching ahead, getting a grip on a rung, and then pulling on it in order to slide your whole body forward past that rung. Your pulling hand would be fixed – it would not slide to the side or up/down. It would stay at the same depth, on the same track, while the body rotated around it, smoothly sliding forward, up the ladder, with your lead arm reaching for the next rung. Likewise, your body would not be sliding to the side or up/down, but stay parallel to the surface and to the ladder, simply sliding forward in the opposite direction of your pull.
The Catch Drills
- standing rehearsal with catch shape
- 1-Arm Drill (other arm tucked at the side)
- Superman to Skate (with a weighted object in lead hand)
- Swing Switch (two arms) with pause at Entry moment
- Whole Stroke
Focal Points
- Set the catch
- Hand stays on track
- Elbow slide out and upward to make shape of arm
- Touch the ball with entire forearm and palm
- Hold the ball and rotate body past it
- Press the ball straight toward the hip – hips rolls out of the way at last moment
- Press the ball straight toward the toes – send the ball of water under hip and leg
- Press on ball steadily
- Catch hand and extending hand move (on their tracks) exactly opposite to each other, at approximately the same rate of speed
- Hesitate ever so slightly after ‘Set The Catch’ in order to Load The Torso
- Pull with hip (not with shoulder)
The entry and extending arm is the main actor, while the catch arm is the supporting actor. Set a good catch and then focus upon sending force forward into your best Skate Position. The better your Entry, Extension and Skate, the farther you will slide forward on each stroke!
There are more focal points for the Catch on our 101 Focal Points page as well as some demonstration of the 1-Arm drill on the Video Tutorial page.
-
AuthorPosts
- You must be logged in to reply to this topic.