
Forums › Swim Courses › Pool Comfort › Kelly.jw Discussion Zone
Please type your comments directly in the reply box - DO NOT copy/paste text from somewhere else into the reply boxes - this will also copy the code behind your copied text and publish that with your reply, making it impossible to read. Our apology for the inconvenience, but we don't see a convenient way of fixing this yet.
-
AuthorPosts
-
December 11, 2017 at 23:26 #16142
Jamee Small
KeymasterFirst Session – December 11th
Great work in our first session. I appreciated you eagerness and willingness to try something new.
To help us pay attention, interpret and send commands to particular parts of our body we used a selection of focal points in each drill. In our method we use drills and focal points to build skills. The drills put our body into position to practice an isolated part of the body. Focal points are those code words we use for showing what part of your body or movement pattern to direct your attention to. With the focal point you both pay attention to the signals coming from that part of the body and you send commands to that part of the body. Over time you will become better aware of where your body is in the water, what it is doing and how to adjust in order to take control of your movements in the water.
During your practice time, you will use focal points as your key discipline is to hold your attention on the chosen focal point. If you notice that other features of the stroke are not working as you want them to, you note these then put them aside and resume focus on the chosen focal point.
Below are the drills and focal points we covered in our first session.
~~
We first worked on re-familiarizing with your air exchanged skills. Even though you have intermittently experienced successful air exchange in the past, any change can trigger anxiety. Different environments, distractions, new teachers, a rough day, etc. What we want to do is lay down new tools and skills and slowly nurture your mind and body to reach for those tools and skills whenever you find yourself in an uncertain situation. Then we reinforce it over and over again until it is second nature. This gives you back control in the water.
It should be noted that you already have what we call a ‘reset button,’ a position or action that allows you to realign your mind and body to feel more comfortable. For you this was to float on your stomach. If you find that you can’t get control of expelling air, use your reset button. However, you can also take the route we did today which included a slow walk up to full inhale and exhale at varying depths/lengths.
Air Exchange Drill:
- Standing, face looking straight ahead (wall or side of pool)
- Standing, face looking down at ground
- Standing, 2 hands on the wall, face looking down at ground rotating head side to side with face in water in between breaths (exhale water until face is completely clear from water and begin exhaling before face returns to water)
- Standing, retrieving objects at varying depths/duration
Air Exchange Focal Points:
First while humming –
- Dip chin in water
- Lower closed mouth in water
- Lower closed mouth pause then submerge nose (don’t stop humming/exhaling air)
- Lower closed mouth pause then submerge entire head
*Repeat Focal Points without Humming. Blowing air out of the nose before lowering into water and continue blowing air until mouth is completely clear from the water
*Increase the difficulty by adjusting time. Incrimmentally increase the time you exhale water (1 second, 2 seconds, 3 seconds+ etc.)
Here are a few links about Breathing and air exchange from our library and blog posts.
- Breathing Outside the Pool (mainly talks about improving breathing during strokes but focuses on out of water exercises to consider)
- Breathing Breakthrough (testimonials of out of water breathing exercises)
- Breathing Better … On Land (Tips and Focal Points to practice)
We then explored how to create the frame of the body, the frame which water can support you in a balanced position and keeping this frame parallel to the surface. Balance means having your body parallel to the surface of the water, resting on the ‘neutral line’. This neutral line is just below the surface where the force of gravity pushing down and the force of water pressure pushing up meet and support your body entirely. Everyone will have a neutral line that is a bit higher or lower than others because of each person’s unique body composition. Even if you think you are a ‘sinker’ you still have a neutral line in the water somewhere, and you still need to learn how to ‘sink evenly’ keeping your body parallel to the surface. Like an iceberg, most of our body wants to rest beneath the surface of the water with only about 10% touching the air. The sensation we aim for it to feel the water pressing up on our face, our arms, our core (like a massage table) while we rest at our natural buoyancy depth.

Balance and Streamline Drills
- Superman
Focal Points:
- Weightless Head
- Shish kabob Spine
- Arms on Tracks
- Hands at Target (Level)
At first, you need to work on one point of the body at a time, and later on you can blend focal points and maintain attention and control on two or three points at one time. But be patient for that ability to come.
As you do your practice between our live sessions, I recommend that you be patient in your personal practice times to work with simple activities (the drill sequence we listed above) and gain some familiarity with the skills before jumping straight to something more.
If you have any questions between now and Wednesday, please feel free to leave them in the forum below.
Well done, today.
December 11, 2017 at 23:28 #16017KeymasterDecember 13, 2017 at 18:03 #16168KeymasterThe key maintaining momentum is to have practice opportunities (whether in the water or dry-land exercises) and to get yourself in the mindset before each practice or session. You can “get in the mindset” a few ways.- Choose your day for practice/sessions wisely. If you know it is going to be emotionally or physically taxing, then try not to have something else as emotionally or physically taxing in the same day.
- Set your goal a head of time. What are you going to accomplish. I.e. focus on bubbles (1st doing them comfortably, 2nd pushing duration, 3rd testing the depth at which you can do them) until you reach a level of comfort you are happy with that day or practice Superman position with the various Focal Points we tried.
- Mentally prepare. In between practices do some breathing exercises. On the day you chose to practice, get excited! Think of all you’re going to try and what you are going accomplish. Try and avoid nervous expectations or thoughts of failure or discomfort. Think about the new tasks and doing your best. Testing yourself. Exploring and accepting what happens.
Since we have a week between session. Share your thoughts here on the forum…what you felt worked and what still didn’t click.Best of luck.December 20, 2017 at 23:41 #16463KeymasterSecond Session – December 20th
We’re on our way, Kelly! I appreciate the eagerness and analytics you bring to each practice. Today was proof of your efforts starting to come together. Below are the notes from our session today.
We reviewed creating the frame of the body, the frame which water can support so you don’t have to expend effort pushing down in order to hold the body up (Superman Position). Then we worked on keeping this frame parallel to the surface (Focal Points to lift the frame). Then we worked on shaping the body into its most ideal streamline shape in Skate. Finally we started to explored a Supine Position to prepare for our next session.
Next week we will build on this Skate arm to eventually transition into an Interrupted Breathing Position. Allowing you the opportunity to rest and get air wherever you find yourself in the water.
During your practice, remember to give yourself grace and time. If you jump in and hit a road block, take a step back to one Focal Point at a time and climb back up to the full exercise as you feel comfortable. Keep up the great work!
Balance and Streamline
Drills:
- Superman
- Superman to Skate
Focal Points:
- Weightless Head
- Arms Wide on Track
- Hand at Target (Hand below nose and chest)
Back Position
- Supine Superman (Back Position)
Focal Points:
- Head Back (Forehead in the water, chin up, mouth and nose out)
- Arms Above Head (Play with the width apart, like a ‘Snow Angel’ until you feel the perfect resting place)
- Long Torso or ‘Tippy Toes’ (Stretch the core, feel the pelvis lift, small arch to the back)
When getting in and out of the Supine Superman Position, remember to blow bubbles out the nose until the mouth and nose clear the surface. Should you feel the body start to sink, where the head might go under, start to exhale air out the nose.
December 28, 2017 at 13:59 #16580KeymasterThird Session – December 27th
This last session was very enlightening. We learned so many things about how your brain works and your personal process. We now know that anytime one variable changes, the brain has to reset. As you work, these can alter your measure of success and practice observations. Knowing this about yourself, can help you best process the information and plan as you approach a practice time.
Below I have included points on how to practice, how best to measure success for yourself, an practice plan, and the points we covered in our last session. If you have any questions, please feel free to leave them here. As we continue forward, I’ll start a new forum to draft a separate plan.
How to Practice
- Visualize – In visualization you are not moving your body at all, you are just using your brain to image yourself moving through a part of the stroke of the whole thing. If you are not familiar with this, you may read What is Visualization? Visualization can be just a minute or two. You can do it just like you do intervals of drills.
- Rehearsal – A rehearsal is done standing on the deck or in shallow water. You are standing up, working under gravity rather than laying in the water where you have to float and hold balance. In this position you can only work on some parts of the upper body or some rotation movements.
- Drill (Then Drill with Focal Point) -Drills have you laying in the water. They can be nearly stationary in the water, to moving slowly, to moving just part of the body, to whole stroke. If you are not familiar with them, then you may read:
Drills can be very short – just 3 or 4 seconds
Repeat 2-3 as needed with each Focal Point.
How to Measure Success
A few tips for you on What Is Success as we define it in the context of the pool. It is important to be able to walk away from the pool with something positive so that we are encouraged to return. This can be as simple as taking less time to get comfortable in the first drill, fewer times of getting water up the nose, or being able to feel the affects of a particular Focal Point on your Balance and Shape.
Suggested Practice:
- Drill 1 + Focal Point 1
- Drill 1 + Focal Point 2
- Drill 1 + Focal Point 3
- Drill 2 + Focal Point 1…
- Drill 2 + Focal Point 2
- Etc…
Begin again when you add in a new variable such as a new environment (different pool, different temperature), a different depth than you’ve done before, etc.
Drills:
- Superman
- Superman to Skate
- Supine Pose
- Supine Pose to Interrupted Breathing (IB)
- Skate rotate to Interrupted Breathing (IB)
Focal Points:
- Weightless Head
- Eyes Looking Straight Down
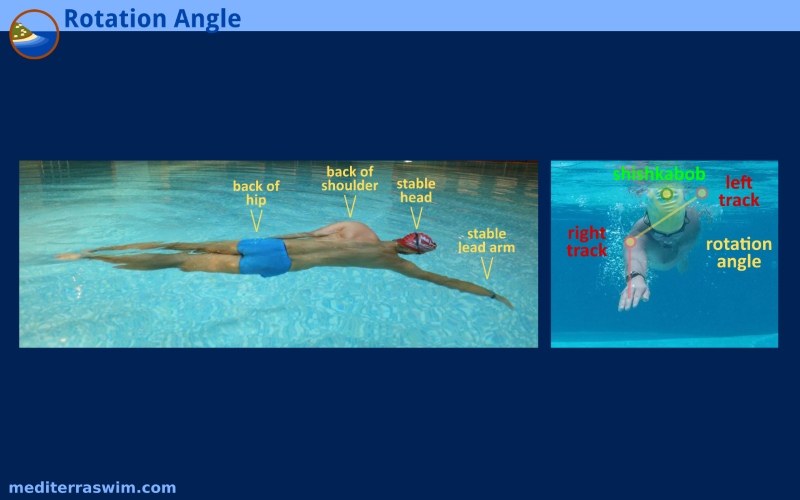
- Straight ‘Shish Kabob’ Spine
- ‘Tippy Toes’ (Stretch the Torso)
- Hands on Track
- Hands at Target
For further explanation on what the Focal Points look at, try 101 Focal Points.
Interrupted Breathing
During our last session we briefly started to add the transition in between Skate Position to Interrupted Breathing Position (IB). It’ll take a little while longer to get comfortable with this position and transition. However, your notes are below should you choose to explore more.
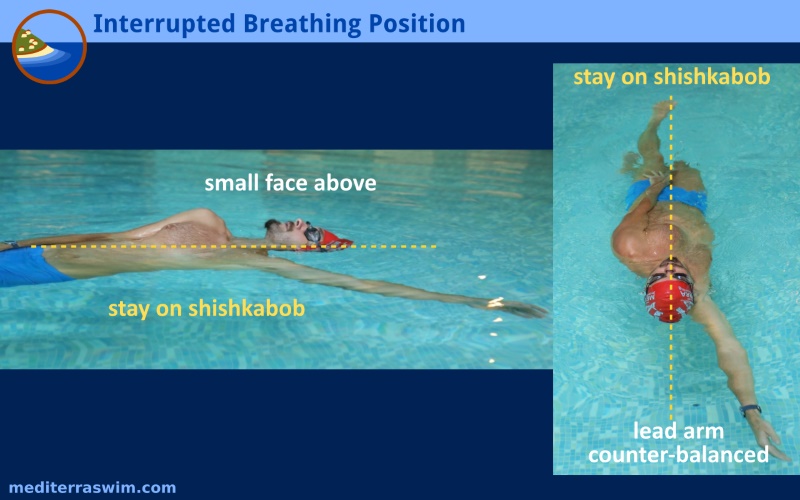
You start in Skate Position, check that your head is weightless on the neutral line, then slowly rotate your torso-and-head as a unit away from your lead arm. Gently blow bubbles from your nose and continue blowing bubbles until your nose and mouth emerge from the water, face-up (as seen in the image above).
The key to this is to keep your head completely submerged until the last moment. DO NOT LIFT YOUR HEAD UP out of the water to reach the air. Wait for water to lift your torso-and-head unit to the surface.
You may use your legs to help rotate the body.
When finished breathing, rotate back in the direction you came from. Come back into your best Skate Position. The other hand should be remain in the pocket until then.
What to Aim For
- Maintain complete loyalty to head position. Keep it on the Shish Kabob while turning, and while in Interrupted Breathing Position.
- Turn into a slightly rotated position on your back. One breast will be touching the air. This is the backstroke Skate Position.
- After turning face-up, realize it may take a half-second more for the torso-and-head unit to rise to the surface.
- Keep the smallest face above the surface. Most of the head should be underwater.
- Keep chin up and forehead down. The water should touch the top of your goggles.
- The lead arm should reach out and down deep as far as comfortable. The arm counter-balances your rotated position.
- Breath deeply in this position to recovery.
What to Avoid
- Don’t tilt the head before, during or after you turn to face-up position.
- Don’t turn the head faster than the torso rotation. Turn them as a unit.
- Don’t let the lead arm come up to the surface all the way. It needs to stay deep to anchor your body in rotated position.
- Don’t forget to keep bubbling out of the nose, or water will go up it!
- Don’t forget to start bubbling from the nose as you start to turn back to Skate Position.
-
AuthorPosts
- You must be logged in to reply to this topic.