
How Can We Help?
Lesson for Integrated Breathing
Lesson for Integrate Breathing
When we are following a standard freestyle lesson series, in the first two or three lessons we build the Four Essential Features of the freestyle stroke, and then come to Integrate Breathing, which depends on those features.
Below is the outline of the skills, drills and cues, with links to video demonstrations of the drills. The following lists of activities and the lists of cues may contain more items than you experienced in your lesson. The instructor will watch the time and your pace of learning and choose a certain sequence of activities and the few most relevant cues for you to work with.
Integrate Breathing
Skills For Integrated Breathing
1. Position of Head and Lead Arm
2. Timing of Turn
3. Air Management (exhale/inhale)
Drills
These drills are listed, starting with easiest, in order of increasing complexity:
• Standing rehearsal, Turning the Head with arms moving from Balance Position To Streamline Position
• Balance Position to Streamline with Nod
• Balance Position to Streamline with Split The Face
• Balance Position to Streamline with Hooked Fish
• 3 Strokes To Streamline, with Turn to Breath
• 3 Strokes, 3-Part Breathing, 1 Stroke
• Whole Strokes with 3-Part Breathing
• Multiple strokes – breathing every 4 strokes (breathe to one side on each length)
• Multiple strokes – alternate Interrupted Breathing and Rhythmic Breathing
• Multiple strokes – breathing every 3 strokes (alternate breathing sides)
We may also do some Air Management drills to help with exhale and inhale:
• Standing rehearsal – Bubbles from nose
• Standing rehearsal – Clear The Airways
• Standing rehearsal – Quick Sip of Air
In each drill we may use three stages for developing the head position, starting below the surface and gradually working to a ‘sneaky breathing’ position with half the head still in the water…
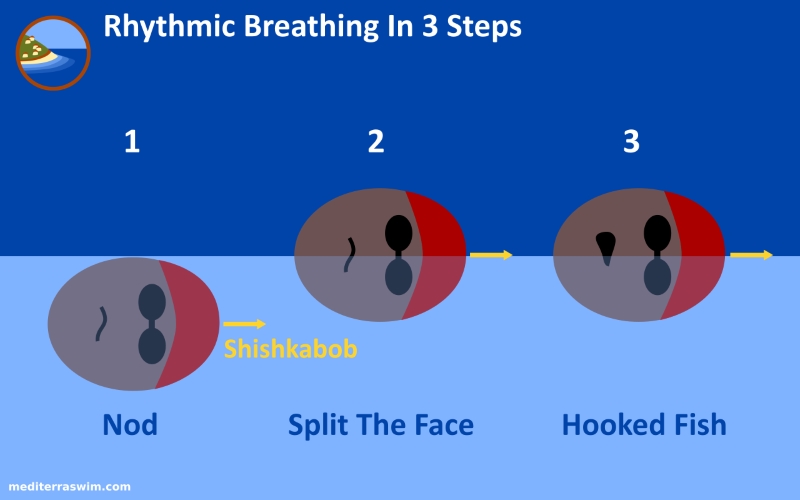
First, Nod to the side, both goggles underwater, looking directly at the wall, then quickly turning back to face-down position.
Next, Split The Face, and keep the shishkabob underwater pointing straight ahead. One goggle underwater and one goggle above water. The mouth is half in, half out of the water.
Next, reach the cheek and the lips up to the air. Kiss the air with the lips. You may not attempt to breathe during the first tries of this just to make sure you can touch the air. Then, when you feel more confident that air is there, you may attempt a quick sip of air.
Cues For Position
• Keep head in line with spine
• Tip of the head is underwater
• Turn head on spine axis (shishkabob spine)
• Head remains flat (on pillow) while turned toward air
• Keep extending lead arm while turning/returning the head
• Cheek up, forehead down (you don’t breathe with both goggles out of the water)
• Tilt head down further than you think (your sense of ‘flat’ may not be truly flat)
Cues For Timing Of Turn
• Turn head right with start of the catch
• Turn head right with start of entry (turn away from entry arm)
• Turn a bit faster than torso is turning (but not whiplash)
• Touch the air just long enough for a quick inhale
• Return the head to face-down immediately
• Return the head before recovery arm comes over head
Cues For Air Management
• Steady bubbles from the nose
• Burst of air as mouth touches air, to clear the airway of water
• Emphasize the exhale – body needs to rid of CO2, not need more O2
• Squeeze out with abdominal muscles
• Partial, frequent air exchange (rather than massive, complete empty/fill)
• Quick sip of air