
How Can We Help?
Lesson for 2 Beat Leg Press
We recommend developing the 2-beat press skills in the following order….
Step 1: Quiet Legs
The first step is to train the lower body to be connected to the upper body and form one long, straight, firm frame or fuselage (referring to the fuselage of a sleek sea kayak, jet plane or submarine). Hopefully, you developed this skill in the Freestyle Fundamentals stage of your training.
Step 2: Counter-Balance Leg Position
We’ve recently started referring to this as the counter-balanced ‘leg position’ rather than the ‘foot position’ to take attention off of the feet and onto the legs as a whole.
We sometimes introduce this skill in the Freestyle Fundamentals course, if a swimmer appears ready for it then. Otherwise we leave it for this course.
We first want to train the legs to find their counter-balancing position while the body is in streamline position. This is the start and the finish position for each leg press. This is the position the legs are locked into while the front of the body is locked into streamline position. This is why you want to develop this skill before the movement part – the legs need to know where they belong so they can find that position immediately on each switch.
As you can see in the side view in the photo below, the streamline side leg is straight and reaching up while that side of the body is down (they are counter positioned to each other). Meanwhile, the recovery side of the body is up, while the leg on that side is straight and pointed down. This counter-balanced position makes it feel like the legs are almost (but not quite) twisted around each other.
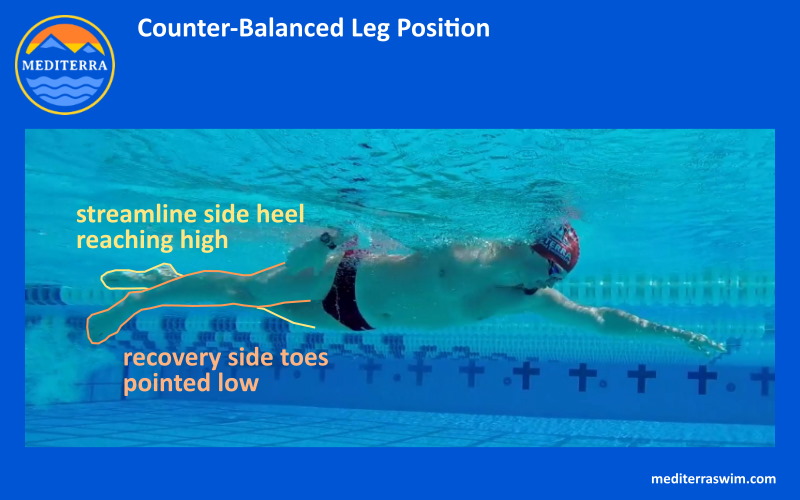
Looking at the rear view you can see how this places the streamline side foot higher than the recovery side foot. The feet are angled opposite to the torso’s angle. In your brain it will feel like the feet are ‘stacked’ on top of one another vertically, when in fact they are slightly apart and angled like this. However, you can’t see your own feet this way!
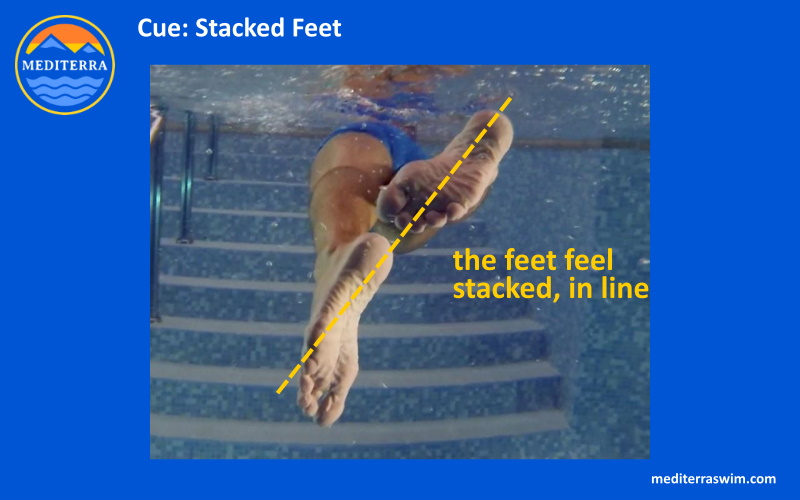
As you become more refined in this leg position, you can make it even better by rotating the streamline side foot inward, in what we might call ‘pigeon toe’ position. This turn of the ankle places a little torque inside the hip joint on that same side and supports the rotated position of the hips. The recovery side foot remains comfortably pointed. The upper thighs should be lightly touching each other. The knees should be close but not touching each other. The legs should remain close and almost wrapped around each other, maintaining an extremely low profile, hidden behind the torso.
The legs will have a tendency to spread apart when the brain detects instability in your upper body – the legs spread to stabilize. The stronger you are in the fundamental skills, the more stable your upper body will be in streamline position and the less your legs will be pulled away from this slender counter-balance position.
This is the position your legs will hold while your body is in streamline, and there should be no additional motion of the legs whatsoever until the torso rotates and the streamline side leg presses to assist it. When the upper body locks into its streamline position, the legs lock into their counter-balanced position and stay there. When the legs switch they go directly into the opposite counter-balanced position.
If you insist upon bringing the feet back together between switches, you’ll notice the legs sway from side to side on each stroke. The legs in CBP absorb the rotational force of the torso and keep the legs sliding straight behind. The parallel legs magnify it and sway in reaction.
Step 3: The Press and Switch
If the legs are in the counter-balanced position, the upper one is poised for the press motion. The streamline side leg is poised up, and awaits the entry of the arm on the other side of the body. The other leg is underneath and pointed, ready to counter the press. As the torso begins to rotate, the entry arm starts to slide into the water in response to that rotation, and the leg begins to press downward. The whole body rotates around the axis of the spine. The leg pressing down against the resistance of water creates leverage which supports and enhances the power of the torso rotation, making it stronger. That rotational force is transferred into the entering and extending arm and propels the body into the streamline position and slides forward in the water. When the rotation, entry and press of the leg are all synchronized this creates a tangibly (pleasing) smooth flow of force through the body and it adds to the sense of acceleration in that moment.
In the basic sense, the streamline side leg is pressing downward and the recovery side leg will drift upward to it’s next CBP. The idea of ‘drift’ is important because this is not a two-legged action, and there is definitely no ‘scissor-like’ action of both legs moving away from each other by muscle activation. Instead, one leg is actively pressing down and the other leg is passively sliding up in response. (If you reach out with both straight arms in front of you right now, then reach farther ahead with the right arm, you’ll notice the left arm pulls back passively, without you having to pull back on it consciously – the reaching of the right arm causes the left arm to retract through the rotation of the torso).
In the more refined sense, the streamline leg is arcing with some pressure downward and the recovery side is arcing passively upward. Because the hips are rotating as part of the torso unit, the hip socket is rotating and the leg is rotating with it and the foot is rotating with it. Notice in the photo below how the feet are turned inward slightly. And notice the arcs drawn over it – that is the approximate pathway the feet trace when switching from one side to the other.
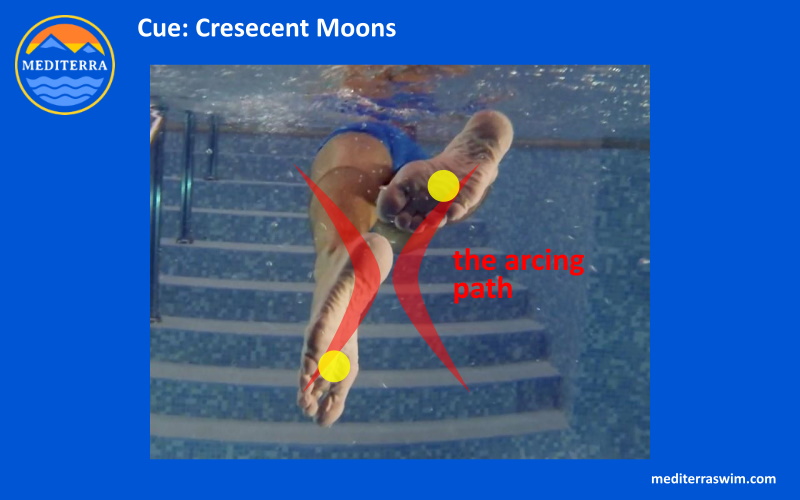
The movement is 3-dimensional – while the leg is pressing down it is also rotating and when the legs are held close to each other, this creates an arcing pathway, which we affectionately call ‘crescent moons’. This pathway can be accentuated by conscious thinking of turning inward into a ‘pigeon toe’ on the upward drifting pressing foot, or flicking the big toe outward of the downward pressing foot.
At this step the main objective is to just get the basic motion and the basic timing. The press of the leg is generally downward and it happens just after the torso starts to rotate in order to assist and enhance it. Up to this point we may advise that you keep the leg straight and fairly stiff. Just get used to pressing the straight leg in order to lever the rotating torso. Notice the general effect of moving the leg mass in how that helps shift the torso mass.
Lastly, try to avoid pulling any air down into the water on each press. This means the leg has been reaching too high and trying too hard to push downward. Those bubbles create voids in the water and actually decrease water pressure and make the action less effective.
Step 4: Make More Pressure
Now we want to work on getting more refinement and pressure under that press. You do this by allowing a slight flex in the knee (but definitely not a bend) and an outward flick of the toes. You manipulate these two features to create a bit more pressure (water resistance) against the lower leg and top of the foot. The more pressure you feel the more leverage there is.
At this point the temptation is to kick or snap the leg to get more pressure by faster motion. This is a misleading shortcut that gives the false impression of being effective when it is not. Instead, use the minor flex of the lower leg and the curve of its path to create more pressure without increasing the rate of movement too much. The flex and curve is a little like sculling with the hands to feel a grip on the water.
You may also start to notice that the flow of force from the leg press into the torso is not instantaneous like a bolt of lightning. It is slower, like a wave flowing toward the shore. When you press with the leg there is a lag, and it takes a few microseconds for that wave to flow up the leg and into the torso and across to the other side and into that extending lead arm. You have to be patient for that flow to finish its journey – so the longer you can extend that press of the foot (making it more steady and less ‘snappy’) the more it will add to your forward propulsion.
Step 5: Refine The Timing
There may still be a lot of details we can improve and refine in the previous steps. But at some point you’ll be swimming at different tempos (different stroke rates), at when the tempo changes enough you’ll notice that the timing of the leg press seems like it needs to change a little too. Yes, it likely does!
The general idea is to have the 2-beat leg press happen with the torso rotation, but at extremely slow tempos (when rotation is happening more slowly) you’ll notice that you have a big window there where the timing could be a little earlier or a little later – which is best? You may find that at slower tempos, you’ll time that press a little later, to assist with the finish of your extension of the lead arm into streamline.
At extremely fast tempos (what is ‘fast’ for you) you’ll notice that you’ll have a hard time getting your torso to rotate that fast. You’ll be looking for a way to get it moving sooner, faster. The leg press can help with this. On this extreme you may find that at faster tempos you’ll time that press a little sooner, almost as if the press of the leg is helping the torso start to turn.
This takes a lot of awareness and a lot of experimentation to find the best timing for your stroke tempo and your level of skill. As you become more skillful, and your abilities to handle extremely slow and extremely fast tempos expands, you’ll be refining the timing of the leg press further.
Cues For Counter-Balanced Leg Position
- Keep knees straight
- Lift streamline side hamstring
- Point recovery side leg
- Comfortably point the toes
- Stack the feet
- Pigeon Toe (on streamline side foot)
- Upper thighs touching
- Legs twisted around each other
Cues For 2-Beat Press
- Crescent Moons
- Press – Don’t snap
- Flex – don’t bend knee
- Steady press, feel pressure
- One smooth switch, no extra motion between
Drills For 2-Beat Press
- Standing rehearsal – leg swing
- Torpedo (or Hug) Position – alternating leg press
- Balance Position – one leg press and release
- Balance Position – one leg press with opposite arm reach
- Balance Position – alternating leg press
- Balance Position – alternating leg press and arm reach
- Balance to Streamline with CBP
- Streamline Right with CBP, then 1 switch to Streamline Left with CBP
- …Then with Two Switches
- …Then with Three Switches
- Stroke > Streamline and Glide > Stroke > Streamline and Glide
- 3 Whole Strokes then glide in Streamline with CBP
- Whole stroke, emphasize CBP on one side
- Whole stroke, emphasize CBP on each side
- Whole stroke, emphasize press on one side
- Whole stroke, emphasize press on each side