One Arm Swimming Drill
One Arm Drill
The one-arm drill is useful for a variety of skill projects and focal points, including recovery, entry extension, stability, 2-beat kick, and breathing timing.

The one-arm drill is useful for a variety of skill projects and focal points, including recovery, entry extension, stability, 2-beat kick, and breathing timing.
Below is a demonstration of various rehearsals one can do to practice best entry arm position in freestyle…
A series of rehearsals to help you find a better entry arm position.
Below is a tutorial on how we want to ‘engage the core’ of the body in the freestyle stroke…
Learn how to engage the core and support the extension (lengthening) of the body line.

Below are some tutorials on correcting and preventing over-rotation in freestyle…
Learn how to prevent over-rotation by reaching forward with the shoulder.
Learn how to prevent over-rotation by controlling the path of the elbow.
Here are links to various freestyle stroke demonstrations with Coach Mat over the years…
Interrupted breathing is a technique you can use while working on other aspects of your stroke with drills or whole stroke. If you would like to focus on this breathing technique directly you may select 2 or 3 cues from the lessons and select a few of the activities listed below. We recommend that you work on turning into Interrupted Breathing on both sides, giving special attention to the side that feels weaker.
For all of the following activities practice an equal number of times to the LEFT and to the RIGHT.
Push off into Balance Position, then switch to Streamline, then roll to Interrupted Breathing.
Push off into Balance Position, then into Streamline, then roll to Interrupted Breathing, take 3 breaths, then roll back to Streamline.
Take three stroke, then roll to Interrupted Breathing.
Take three strokes, roll to Interrupted Breathing, take 2 breaths, then roll back to Streamline.
Take three strokes, roll to Interrupted Breathing, roll back to Streamline, then take 3 more strokes.
Swim a half length of the pool, and along the way, roll to Interrupted Breathing on the same side, twice.
Swim a half length of the pool, and along the way, roll to Interrupted Breathing, once on each side.
Swim a full length of the pool, and along the way, roll to Interrupted Breathing as needed, on the same side.
Swim a full length of the pool, and along the way, roll to Interrupted Breathing as needed, alternating sides.
In the first freestyle fundamental lesson we work on Building The Frame. This lesson will help you establish the first of our Four Essential Features of the freestyle stroke which encompass lengthening, balance and streamline skills.
And, here is the outline of the drills and attention cues, with links to video demonstrations of the drills. The following lists of activities and the lists of cues may contain more items than you experienced in your lesson. The instructor will watch the time and your pace of learning and choose a certain sequence of activities and the few most relevant cues for you to work with.
You may also consider using short swimmer fins to allow you to practice Scapula Slide Position with your legs more supported and the flow of water along your body. This flow of water may provide you with more feedback about how well you are maintaining form and a low-turbulence streamline position.
To help you pay attention, interpret and send commands to particular parts of your body your instructor gave you a selection of cues in each drill. There are more cues on the lists below than you were given in your lesson, as the instructor chose a few to get you going, without overwhelming with too many details. You may be able to figure out the meaning of the others you were not originally exposed to.
You want to feel your head and upper body fully resting on the support of the water. You want to feel your spine in neutral (good posture), from head to tail, including the legs streaming straight behind. You want to feel as if your body, from head to ankles, is one long, firm fuselage. You want to maintain this sensation as you take strokes.
Choose 2 or 3 of the cues from the lesson to work on today.
Then, for each cue, work through these activities, as far as you can go successfully. Take one cue and work through the list. Then take the next cue and work through the list again, and so on.
It is a great feeling to work through an entire lesson series to achieve a new level of skill and fitness. But what does one do after this?
Below are suggestions for how you may continue developing your new swimming skills.
Not likely. But you will become a better swimmer this week than you were last week, and over time with this mindset you will become masterful. Don’t lose sight of how far you’ve come.
True masters of any art realize the fundamentals can be developed to deeper and deeper levels. But, even a new swimmer should experience a sense of ease and find their habits forming around these skills to the extent that they become your preferred way of being and moving in the water. You should experience your body sliding through the water better, and feeling like the same work requires less effort than it used to – perhaps quite dramatically so.
The stronger these fundamental skills become the easier it will be to develop advanced skills – like the Catch and the 2-Beat Press, synchronization of the entire body, and control over stroke length and stroke tempo.
Your quality objective in this course is to feel in control of your experience in the water – you feel more balanced, more aligned, more streamlined, and to feel that less movement is required to move forward. You know what to do to make those happen.
When you start to feel those sensations regularly, and feel capable of putting yourself into that state in each practice, then you may be ready to work on those advanced stroke skills. At that point you may seek out some private lessons, take one of our advanced live or online courses. Or you may learn from the patterns and principles embedded in each of our training courses, and study our Self Coaching 101 course and become your own best coach.
The Freestyle Fundamentals course is meant to guide your integration of the fundamental skills for freestyle. You may want to extend your time in certain sections of the course. You may want to go back through the entire course, step by step, again. No doubt, those who do notice and learn much more than they did the first time going through it.
It is your mastery path. Take as long as you like, and go over the practices as much as you need to. Some skills might come quickly, while others take more time for your body to feel, improve and automate.
The stronger your fundamental skills, the easier it will be to develop the advanced skills, because they depend on them. However, working on your advanced skills can deepen your appreciation for the fundamental skills too, and show you where your strengths and weaknesses are.
It will only take a lesson or two of introduction to the advanced skills to help you know whether you are ready for the challenge of those or to keep working on fundamentals. It might be interesting and informative to work on advanced skills for a while and then go back to the fundamental skills with renewed appreciation and motivation to do more work there.
You might also want to apply your skills, as they are now, to work on a specific fitness challenge. Perhaps you want to become capable of swimming continuously a certain distance and you are eager to do that. That could be good also.
In our approach to training technique training is never separated from fitness training – all repetitive motion is training your body to move that way, and the more loading you place on those motions the more deeply that movement pattern will be wired into the brain. So, if you want your best movement patterns to show up in your distance swimming, you need to require those in all of your swimming.
If you follow any of our training plans for a distance achievement goal it will ALWAYS have technique standards built into every practice activity, and your progress in distance and intensity will be moderated by how well you can maintain your best movement patterns.
You want to feel your Streamline side of the body stretched, straight and stable, while your swing the recovery arm fluidly, without a sense of being rushed to do it because of instability. The more that you use the muscles in your torso to stabilize, the less you need your legs to move around to stabilize.
Choose 2 or 3 of the cues from the lesson to work on today.
Then, for each cue, work through these activities, as far as you can go successfully. Take one cue and work through the list. Then take the next cue and work through the list again, and so on.
You may follow this progression in Streamline Switch Without Pauses to gradually raise the arm up above the surface (while fingers keep contact) while maintaining the qualities with cues:
As a useful permanent standard, you may keep your fingernails every so lightly brushing the surface during your recovery swing, all the way to entry. I like to call this ‘dragonfly fingertips’, like a dragonfly skimming the surface of a pond.
The main skill is to have the body rotation empower the entry and extension of the arm on one side and empower the catch and hold on the other side at the same time. The well-timed body rotation will smoothly transfer power from the catch side to the streamline side and result in more satisfying sense of acceleration on each stroke.
The entry/extension arm will slide into the water and forward to its target as an expression of the body’s rotation. The catch arm will get a grip on the water and hold it, while the body rotates around that hold point and forward. All together, the catch will hold the water while the body rotation transfers the force it generates into the streamlining body on the other side.
You develop these connections by practicing the connection of one arm to the rotation. Then you some practice the connection of the rotation to the catch and hold. Then you practice connecting all three at once.
Note: we don’t teach the details of the Catch and Hold until Freestyle Advanced. The underwater catch (pulling) action you have currently is likely adequate for your purposes right now. We don’t want you to get distracted by that part of the stroke yet, because there are more important skills to establish first.
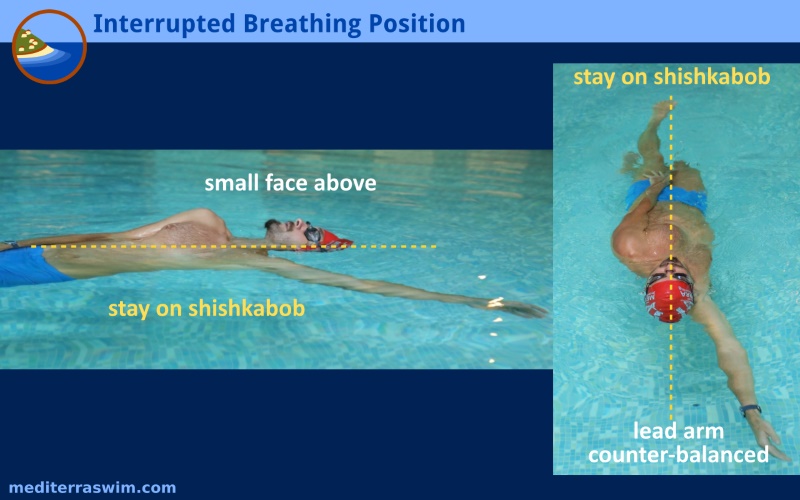
Once you have learned Streamline Position, we may next introduce you to Interrupted Breathing (a.k.a. Sweet Spot Breathing). Interrupted Breathing is a way of turning to breathe from Streamline Position, while keeping a low-effort position in the water.
The intention behind this breathing position is to ‘interrupt’ the stroke but maintain long, balanced, streamline body, parallel to the surface, that is immediately ready to resume swimming when you are. It is the rest position that requires the least amount of effort to hold – lower heart rate, calmer breathing.
For this reason we teach it as a highly useful, if not essential self-rescue or self-calming position for children and adults, open-water swimmers and triathletes. Counter-intuitively, it works very well in rough water because you are staying down in the water, moving with the surface of the water as it moves, rather than going vertical and trying to lift your head above it, fighting its motion.
Interrupted Breathing is suitable:
You are encouraged to practice this breathing position and use it frequently because the better you can do this the easier it will be to develop Rhythmic Breathing – the skills for each overlap a great deal.
***