by Admin Mediterra | Sep 25, 2020 | Fundamental Skills
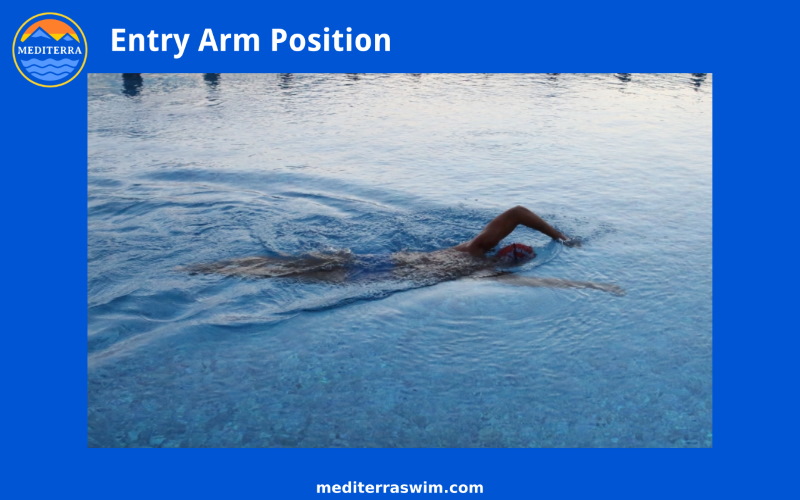
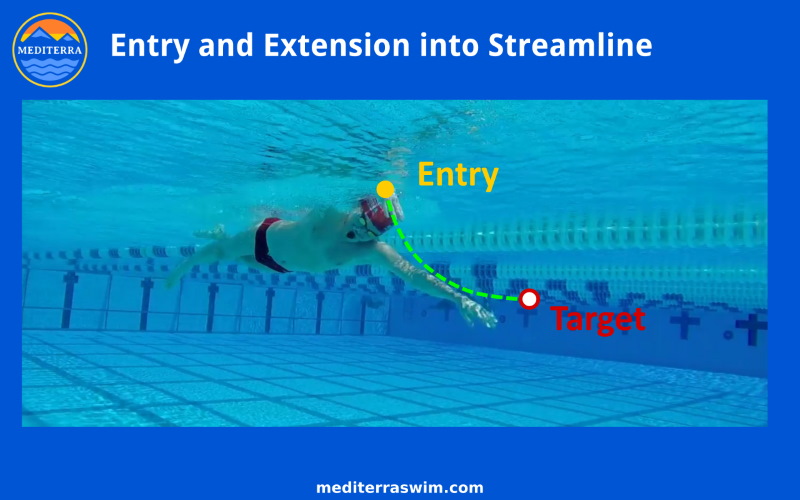
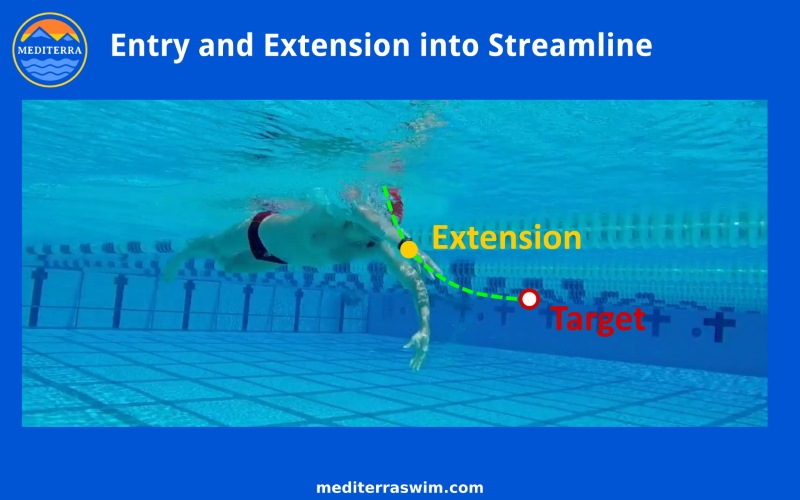
The entry and extension into streamline is how you deliver force into forward motion. The hand enters at a certain location, near the head, in front of the shoulder. It drives down into the water steeply, like traveling down the start of an Olympic ski jump. Then the arm begins to extend underwater, and its path levels out as it reaches target depth, straight in front of that shoulder. Then the arm continues to extend and reach, piercing the target, which brings your body into its best Streamline Position. Your body is lengthening and becoming more streamline with each microsecond. In this way, you receive the three forces from the recovery arm momentum, from gravity, and from the catch and convert all that into acceleration.
Below is an outline for how we form the entry and extension, and you will find some additional focal points and diagrams on the 101 Cues for Freestyle page under the Entry And Extension section.
The entry has a certain timing, a particular pathway and a certain smooth speed to make it most effective. The better your Entry and Extension into your best Streamline Position, the more that force is transferred into forward motion.
Let us reiterate this again so that it sinks in: The whole emphasis of the stroke is to Send Force Forward through the Recovery + Entry + Extension into Streamline. Everything else, including the catch, supports this primary action of sending the vessel of your body forward. This is the finish of the freestyle stroke. Treat this section of the stroke cycle as the important moment everything else has been preparing for.
Instructions
The forearm begins to enter close to the head, in front of the shoulder, with a steep angle, as if driving downward… at first. You are only going to start at a steep angle, but it will not stay this way.
Remember, the goal is to Send Force Forward, the arm must be underwater as it extends toward the target. This requires an early entry position and a steep entry angle so that the arm can harness the rotational force of the torso into parting water molecules in front of the body.
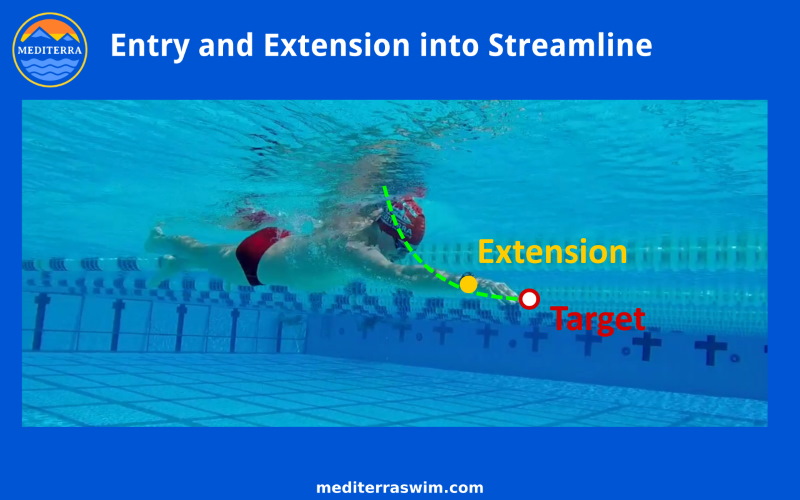
The arm drives down, on a curving path, to target depth and then levels out as it aims to pierce the target. The hand should come to a depth just below the lowest point of the body line. Notice that the emphasis of the lead arm is to stretch forward, not downward.
Notice how long and straight the body is on the streamline side. The swimmer is fully extended and continuing to emphasize the reach. He is not ‘twisting’ into an over-rotated position in order to reach. The side of the body is lengthening, as if he was going to pierce the target with his wrist.
Drills Useful For Entry Practice
- Standing rehearsal to create entry arm shape
- Recovery Swing, One Arm (swing to Entry Position and dip it a few times)
- 1-Arm Slot To Streamline (standing, with one arm in entry position, fall forward into Skate)
- 2- Arm Slot To Streamline (standing, with one arm in entry position, and one arm in Streamline Position, fall forward and switch arms, slide into Streamline)
Cues for Entry
- Elbow high above ear
- Elbow swings forward as far as comfortable
- Feel the stretch in the back as you reach entry position
- Forearm aiming straight ahead on track
- Forearm angling down (45 degree, like ski jump)
- Hand entry position across from opposite (lead arm) elbow)
Cues for Extension Pathway
- ‘Ski jump’ shape entry path
- Slide down to target depth and forward
- Spear wrist through your target
by Admin Mediterra | Sep 24, 2020 | Synchronization
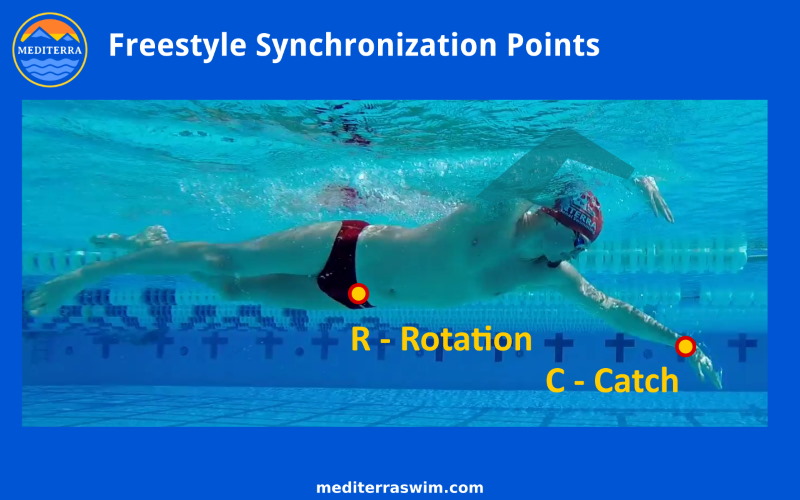
The Catch (C) and the Rotation (R) (sometimes represented by the Hip), are not often connected in the typical swimmer. This is where one of the biggest power leaks can be plugged.
Again, the rotation – with shoulders and hips tied together into one unit – may be represented by the hip.
Ideally, you will set the catch (initiate the start of the catch) at the moment the hip is beginning to turn. On the same side of the body, the hip will begin rotating upward, and the catch will begin pressing backward. But these can only happen together when the Entry is located and timed first. Remember that the rotation will always wait for the Entry. So if the catch must wait for the torso to turn, that means it must also wait for the Entry to start – then all three will happen together.
If E and C are synchronized first, then and only then can you work on the C and R synchronization. EC must be in place first.
The easiest way to isolate the connection of the Catch and the Rotation is to do a One-Arm Swimming Drill. This drill takes the other arm out of play, so as you move through the stroke cycle with only one arm, you will be forced to use rotation to empower the catch. It should make sense to your body to do it this way when you have only one arm, and it will be obvious how helpful it is to have the torso rotation create the main power of the catch. But the moment you put the other arm back into the choreography, you may notice that your catch no longer automatically connects to the rotation – often it will start pulling way before the torso starts turning! When the catch starts pulling before the rotation, this means that arm must pull with small shoulder muscles the whole way – the small shoulder muscles will tire so much more quickly than the torso muscles will!
You can test the timing of your EC arm switches by doing recovery and entry drills to make sure your entry hand reaches the entry position as the trigger for the catch to begin.
Instructions
The goal is empower most of the catch by the rotation. In other words, you want to shift more of the catch load to the torso (to the side and back of the body) and lighten the load on the smaller shoulder muscles. The sensation you are aiming for is to feel the pressure you apply coming from that side and back of your torso, where you do not feel acutely strained in any small muscles of the shoulder. It will feel easier to maintain a powerful hold on the water when you can hold with the whole side of your body.
Beware: Just because the catch and rotation are happening at the same time does not automatically mean that the loading has been shifted to the torso. You need to feel that you are holding mostly with the slide of the shoulder toward your hip – this will engage your lat muscles which you can feel easily. If you feel more loading in the small pulling muscles around the shoulder and little or no loading on the back and side of your torso, then you have not transferred enough of the load to the torso.
This is easier to notice and improve at slower tempos. Start slowly to tune up this pattern then gradually increase tempo to normal rates as the pattern gets familiar to your nervous system.
It may be helpful to imagine an elastic band connecting your (catch side) wrist to your hip. As the hip rotates upward, it pulls the wrist backward through this imaginary elastic band.
Keep the rate of the hip turn about the same as the rate the catch/hold is pulling back on the water. Do not pull abruptly on the water. Nor should you try to rotate abruptly. You can be powerful, but apply that power gradually, and smoothly.
These two moving parts of the body should feel instantaneously connected in the same unified action, on this side of the body.
Try disconnecting CR and count strokes, then connect CR and count strokes. You should notice a clear difference in SPL between the two.
