by Admin Mediterra | Sep 28, 2020 | Skill Learning
Did you know that your your brain extends throughout your entire body?
Yes. The nerve endings (all various kinds) reaching nearly every cell and covering every square centimeter of your skin are extensions of the brain itself. All those nerve endings on the skin’s surface are in constant contact with water flowing over the skin, detecting temperature, pressure, friction, etc. That is critical feedback for you while swimming.
We technically regard it as ‘subjective’ feedback because it is processed by our brain and not some inerrant ‘scientific’ instrument – but sensitivity to and accuracy in how that information is interpreted can be refined to a point where – for all practical purposes for a swimmer – it is objective.
Then we have proprioception. Technically, it means your ability to sense where your body parts are positioned and what they are doing without having to look at them. Interoception is your ability to sense the information coming from deep within the body and flowing through it (which bypasses your external sensory organs). It is the highly developed use of proprioception and interoception that the most graceful athletes and artists put to use in ways that leave us in awe. Yet these are not secondary, elective skills that only elite athetes can or should develop. You would need serious medical intervention to stay alive if you did not have some level of ability in these two areas. However, they do need to be developed to a higher level if any athlete would like to rise above the level of struggle and mediocrity.
For instance, if you have to lift your head and look forward to see where you are going or what track your hands are taking during the extension, then this is a sign of weakness in your proprioception. Using the eyes for assurance in what is happening is a replacement for proprioception.
Drills are used to build proprioception. When you have refined your proprioception you will be able to feel that your hand enters the water and extends forward just right without having to look at it. You will be able to feel that your spine is aligned and you are swimming straight as an arrow without having to look for some external assurance. You will be able to feel your legs streaming behind placing a compact kick within the envelope.
There are stages to developing this proprioception in drills, and it works best with the help of a partner or coach.
Imagine yourself in a drill position and going through this process of development:
- Someone directs my body part into correct position so I can feel the difference between ‘wrong’ position and ‘right’ position.
- Someone shows me (by demonstration) the difference between ‘wrong’ position and ‘right’ position to I can form a mental map of it.
- Someone mirrors for me (or shows me video) of what I am doing wrong, and where to make the change so that I can do it right so I can recalibrate my brain’s perception.
- Someone gives me verbal feedback (play-by-play) as I am doing the movement so I can make corrections in the middle of the movement.
- I recognize the feel of water, the ease in my body, and the absence or presence of certain natural forces when I am doing the movement well.
- I recognize the changes in the feel of water and the natural forces if I deviate from correct even a little bit.
Drills are meant to connect your body with the water and with the natural forces through the development of your nervous system and attention. They are not there to act upon you like a machine, and you will get nothing from them by going ‘through the motions’ of a drill without understanding, attention and intention. Everything in the drills is meant to turn on and strengthen your subjective skills of proprioception and interoception. So you will begin with external help and feedback from a coach, a friend, from a video camera, or from your own eyes, but all that external help and feedback should be urging you towards using your own internal senses to find and hold excellent swimming position and movement patterns.
by Admin Mediterra | Sep 28, 2020 | Skill Learning
What are Drills?
In the most common understanding, drills are activities we use to isolate a part of your body position or movement pattern and make it easier to focus on that part to train it or correct it.
A drill can be fast or slow, active or passive, moving or stationary, whole stroke or just a part of it.
A drill requires attention and understanding of exactly what you are trying to learn or correct. The whole point is that a drill enables the mind to focus and improve control. Only when you are focusing attention on the skill purpose of the drill is effective drilling is occurring. If not, it does not matter how many repetitions you do.
The main purposes of a drill…
- To slow things down in order to expose improvement opportunities (weak spots)
- To isolate a certain area of the stroke so that specific corrections can be made one at a time
- To give the brain the ideal conditions it needs to make motor corrections and imprint them deeply
- To refocus the swimmer’s attention
- To heighten the swimmer’s sensitivity to external and internal feedback
- To rest one area of the body/brain so that another can be challenged without distraction or competition for resources
There is also a ‘drill mode’ mindset – this is where you maybe be doing what appears to be normal speed, whole stroke swimming to someone looking from the outside, but inside you are still focusing intently on improving some feature of your technique – we call this ‘whole stroke swimming with cues’. You could even be in the mode while doing a racing event! It’s a matter of paying attention and having an intention to protect or correct some feature of your performance.
Types of Drills
There are different types of drills we may use:
- Visualization
- Rehearsals (on land, or standing up)
- Stationary drills
- Limited movement drills (isolating just a part of the movement)
- Slower-motion whole stroke
- Whole stroke with modifications
Drill work is often assumed to require moving slowly, though that doesn’t always need to be the case. And Slower does not necessarily mean Easy. One way you can adjust the challenge level of the drill is to change the speed of your movements. If you are having a hard time successfully controlling the movement then slow it down. If it is getting too easy then speed it up.
One of the mantras in martial arts is, “Slow is smooth. Smooth is fast.” Another we use is, “Slow it down to speed it up”. The idea behind this is that we need to establish precise neural control over the movement skill – to hook up the wire in the brain through slow, careful movement – and once that wire is hooked up we make it stronger by gradually turning up the challenge level of the work we are doing around that skill. As it get stronger the command signal will become more precise and travel faster – the movement skill will become easier to execute, faster and more powerful.
There are different purposes to doing drills at different movement speeds and intensity (amount of force or power applied). We can do them in these different ways:
- Slow speed, low intensity when first getting a grasp of a new skill
- Slow speed, higher intensity when building more strength around the skill
- Moderate or higher speeds, low intensity when building higher precision and fine timing
- Moderate or higher speeds, higher intensity when building resilience to performance stress
Each combination has a particular purpose and are very effective when applied to different parts of your skill development.
Moving from Drills to Whole Stroke
You use drills in order to no longer need them any more. You are practicing in order to master swimming, not to master drilling. The idea is to start with simple drills to get a grasp of the new skill. As your skills get stronger the drills gradually increase in the level of challenge taking you into whole stroke swimming and then to whole stroke swimming in challenging conditions.
Some people can get stuck in drills as an end in themselves, avoiding whole stroke altogether, but this is not what they are intended for. The point is not to become good at doing drills, but to become good at whole stroke swimming, and then to take that whole stroke where ever you want to go. Drills are a tool, not a rule. Use drills when they help, and don’t use them when they don’t help. When the drill is not help that is a sign you need to redesign the drill until it does. You must know the skill you are working on and how the drill is meant to strengthen it, and it has to hold your attention with the right amount of challenge – too easy and you will tune out, and if too hard you will get frustrated.
Here is a progression of mixing drills and whole stroke…
- Set that involve only drills, no whole stroke
- Alternating between drills and whole stroke
- Whole stroke with drills used for active rest between repeats
- Whole stroke with drills used for a tune up just before each set
- Whole stroke swimming with cues (in the ‘drill mode’ mindset)
In early stages of your development you may spend a lot of time doing drills. In later stages of your development you may spend nearly all your time doing whole stroke with cues. Even when advanced, when you take up a new skill or make a significant change to one of your patterns, then you may temporarily revert to spending time doing more drills around that new skill to help it get wired into your body and then more quickly return to whole stroke swimming most of the time.
When to Change Drills or Adjust them
Two important concepts to think about:
- Failure Rate
- Autonomous Control
Failure Rate
It is good to start with a drill that allows you to most easily execute the skill – you need to see and feel that you can successfully do it under easiest conditions.
But to get stronger you need to challenge your control over it right up to the failure point. You will do best and the work will be most interesting to you when the drill is challenging enough that you have to really give your best attention to it to avoid failure.
If the drill has you failing more than half of the time, and you are not making useful observations (learning from) the failures, then the drill is too hard. In this case, you may need to reduce the challenge level slightly.
If he drill is so easy that you can easily execute the skill without failure nearly all the time, then it might be a good reminder, but you risk losing attention. In this case, you may need to increase the challenge level slightly.
The sweet spot for drill challenge is where you are working right up to your failure point, and experiencing failure maybe 10% to 30% of the time and it requires your full attention to keep it there. It is also important that you are understanding what is causing the failure, that you are learning from it.
Autonomous Control
What you are ultimately aiming for is to autonomous control over the skill, or in other words, you are able to execute the skill, under challenging conditions, without having to pay attention to it. It is wired into your brain and body and even under stress your body moves the way you trained it to move.
At some point drill are just not going to be challenging enough. You will want to subject your skill to whole stroke swimming. And then easy whole stroke swimming will not be challenging enough, and you will want to subject it to more difficult conditions, like focusing on other things, going higher speeds, longer distances, in rougher water, or in other race-like conditions. You will have practiced executing this skill under challenging conditions so often that it your brain becomes able to control that skill without your conscious attention on it.
There is no way around the gradual increasing challenge of the work that must be done. To provoke this development in the most enjoyable way you get to learn the art of setting your drill complexity right in your optimal level of challenge, and keep it there – not too much and not too little. From the effect of hundreds of successful repetitions sprinkled with enough failure, of work done in a variety of forms, your abilities will increase (which means your failure point will move back) and you will keep incrementally increasing the drill complexity (i.e. the challenge level) to stay near the edge of your abilities and keep provoking them to grow.
If you find the work boring, then there is a problem in the drills design, or in the attention or in the intention of your work.
by Admin Mediterra | Jun 1, 2020 | Skill Learning
Plan Your First Self-Guided Practice
Perhaps you are totally new to swim training, or to Total Immersion style training, and the online course you have access to is still a bit overwhelming. It will take a little time to study and experiment with some of these concepts to get the idea of how organic training works (organic = it fits you personally, and adjusts to your needs and new conditions each practice time). But we want to do all we can to make your start as easy as possible.
Let me explain how a simple practice pattern is composed. In your discussion zone you can ask any questions about this to help you get started in knowing how to use your time in the pool in a productive TI way.
The Sequence Of The Skills
In the Freestyle Technique series (or in standard private lesson series) we usually have four sessions, with 4 main lessons:
• Balance skills, Streamline skills
• Recovery Arm, Entry, Extension skills
• Catch and Connecting the Two Arms (catch and entry)
• Rhythmic Breathing
We may have added Interrupted Breathing as an additional useful skill. I would like you to use that often until you feel more ready to use Rhythmic Breathing.
We might also have added Counter-Balanced Foot Position, if that was suitable to your needs and capacity right now.
It would be best to work on the first skills first, making those more familiar to your body and brain. But also follow your curiosity and interest and dabble in any of the skills. Major in the earlier ones because the later ones depend on them, especially breathing.
Plan Your Time In The Pool
If you have 45 minutes in the pool, for example, you may divide that time into 3x 15 minute sections.
For each 15 minute section you may pick one of those skill lessons above, and use that as the focus of that time. For each, go back to the lesson notes for that lesson, and choose just 2 or 3 cues to work with for that 15 minutes, to work on that particular skill.
Section 1 – Skill A (15 minutes)
Section 2 – Skill B (15 minutes)
Section 3 – Skill C or Blend Skill A+B (15 minutes)
Choose Activities
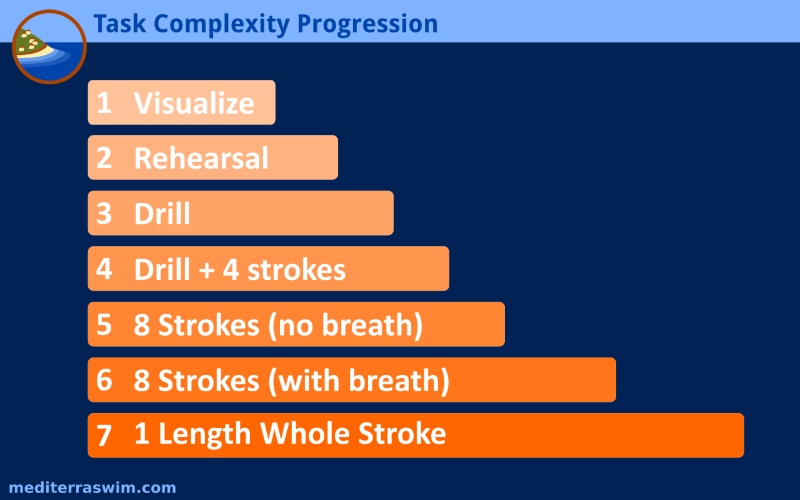
In each section you may use 2 or 3 different activities (drills and perhaps combining with strokes), and use them in order of increasing complexity (challenge):
• Standing rehearsal
• Drill (8 seconds, for a comfortable breath hold)
• Drill 3 seconds + 4 strokes
• 8 strokes (no breathing)
• 8 strokes with one breath in the middle (could be Interrupted Breathing or Rhythmic Breathing)
• 1 full length of whole stroke swimming (with breathing of course, IB or RB)
Choose Cues
On each lesson outline (links are given in the notes above, for each session), there is a list of cues – those are the specific commands we gave to parts of the body, like ‘weightless head’. The list has more cues than we actually used in our lesson, because I pull from that list only a few that seem most relevant to you in your lesson. But the others might be understood by their names.
For the skill you have picked, choose 2 or 3 cues you want to use during your activities.
For each repetition of the activity, use just one cue, or two cues in you feel you can keep attention on both.
Sample Practice Set
A practice set may look like this for one section (about 15 minutes).
Skill: Streamline Position
Drill: Streamline Position (sliding along in Skate)
Cues:
• A – weightless head
• B – lead arm on wide track
• C – low rotation angle
Since there are two sides of the body for Skate, do one cycle of the following for each Skate side…
• 4x (4 repetitions) Skate drill 1 minutes
• 4x ‘Skate drill 3 seconds + 4 strokes’ (slide into your best skate on each stroke)
• 4x 8 strokes (no breathing)
On the first cycle, keep your attention on the Right Skate, and when you take whole strokes, keep attention on the right Skate side (let the left side just do what it will do). When you take whole strokes, imagine you are ‘skating’, side to side, rather than ‘swimming’.
by Admin Mediterra | Jun 1, 2020 | Skill Learning
How to Practice Your Skills
In our training sessions you have the coach to guide you as you get familiar with the new skills, drills and cues. That’s just the start. The rest of the integration process requires you to practice on your own between sessions and after. Just like learning a new musical instrument or a foreign language, it will take time and practice for these skills to get stronger and more automatic.
I recommend that you be patient in your personal practice times to work with simple activities (the drill sequence we listed above) and gain some familiarity with the skills before jumping straight to whole stroke and swimming multiple laps.
A Generic Practice Pattern
You are aiming to practice in the ‘sweet spot’ of challenge – not too little and not too much – to develop these skills in your personal practice time. Some of you may need to stay with less complex drills until the movements become familiar to your brain and you can do the movements at normal movement speeds. Others may feel like you need to move in whole stroke more than drills. You need to choose what level of complexity will allow you to most readily acquire and repeat those new skills with high quality.
Here is the outline for how you might construct a practice…
Swim 3 rounds, with a different skill project for each round
• Round 1 – Streamline Position
• Round 2 – Recovery Swing
• Round 3 – Entry
In each round swim 2 cycles
• Cycle 1 – focus on the right arm or right side
• Cycle 2 – focus on the left side
• Or you may alternate, right side focus, left side focus
Activities in order of complexity
You want to choose 2 or 3 activities (tasks) to use during the set, and do them in the order of increasing complexity. Choose one where you can fairly easily achieve the cue objective. That is your tune up. Then move to the next task of slightly increased complexity for the brain. Then move to a third task which will really challenge your ability to maintain quality. You are looking for the sweet spot of challenge which will require your best concentration, and provoke some failure (20-40% of the time). That’s the best kind of work which will provoke the brain and body to greater adaptation and growth.
For example, if the skill is new and not very stroke you may choose:
• Drill for 2 minutes
• 2x (drill plus 4 strokes)
• 2x 8-strokes (without breathing)
If the skill is more familiar and you can easily do it during basic drills you may choose:
• 2x 8-strokes (without breathing)
• 2x 1 length with interrupted breathing
• 2x 25 whole stroke with breathing
To follow the pattern described above: 3 rounds x 2 cycles = 6 times you would go through this set of tasks, changing the skill project after 2, and alternating your focus on one side of the body to the other.
