
Forums › Library › Swim Course Instructions › Counter-Balanced Foot Position
Please type your comments directly in the reply box - DO NOT copy/paste text from somewhere else into the reply boxes - this will also copy the code behind your copied text and publish that with your reply, making it impossible to read. Our apology for the inconvenience, but we don't see a convenient way of fixing this yet.
-
AuthorPosts
-
May 4, 2017 at 15:44 #14596
Admin Mediterra
KeymasterCounter-Balanced Foot Position Tutorial
If you’ve had a live lesson with Mediterra you may have been introduced to the Counter-Balance Foot Position (CBF). Just as the front of your body is locked into Skate Position while the recovery arm is swinging forward, in the back end, you would lock your feet into the CBF position so that the entire body underwater is counter-balanced and stabilized during that recovery swing. The CBF provides these advantages:
- It helps counter-balance and stabilize the asymmetric rotated Skate Position in front.
- Coming into CBF position absorbs the rotation force of the torso rotation that flows down the legs, keeping them straight behind the body rather than sway side to side on each rotation.
- The particular position of the feet creates a line of tension through the Skate Side of the body which urges the legs to stay near (parallel to) the surface.
- It is the foot position poised for the next 2 Beat Kick – no additional movement is needed to get ready to press the kicking foot.
Perhaps the easiest way of finding the foot position by making the Skate side foot ‘pigeon-toed’.
While keeping the knee fairly straight, turn the big toe of the Skate-side foot inward and pointed at the heel of the other foot. Turn the big toe far enough that it urges your hip to turn with it. You’ll notice that this turn of the foot, corresponds to the turn of the hip, which supports the rotated Skate Position. In the image below notice how the upper (Skate side) foot has the big toe behind and pointed toward the ankle of the other foot. This is the CBF position.
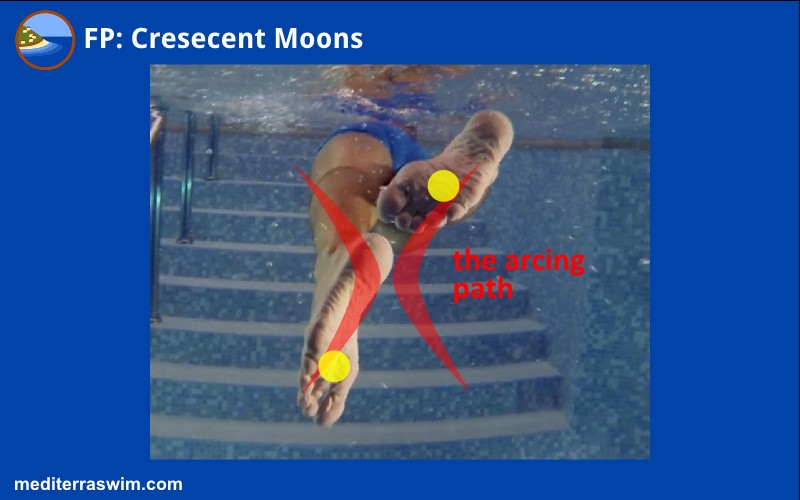
I used the ‘pigeon toe’ term to give us an , but I also use some other pictures to get the idea across, such as the ‘Crescent Moons’ term in the image below, to convey the arcing motion the feet make when switching to the other side. This image shows the feet in the counter-balanced foot position. This would also be the position of the (upper) foot poised to press down in an arc for the 2 Beat Kick motion.
The Counter-Balanced Foot Position seen from behind.
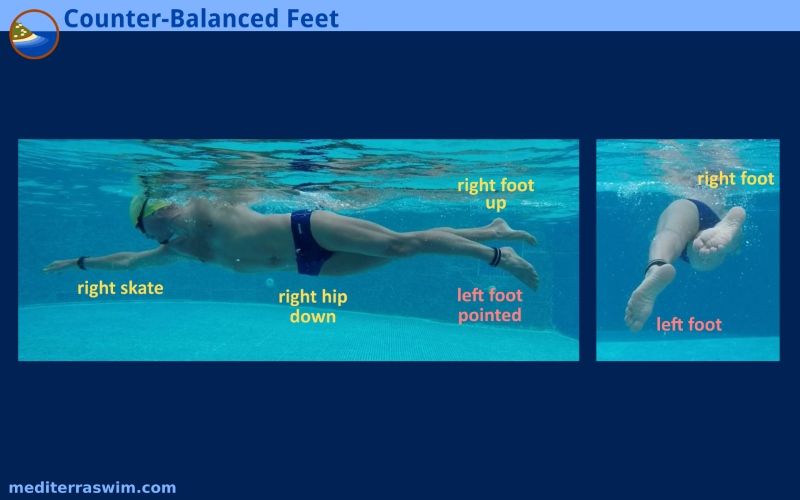
The Counter-Balanced Foot Position seen from the side.
Instructions For Getting Into CBF
We first teach you how to place the Skate side foot in pigeon toe position – seen above in this rear view image. Notice how the upper (Skate side) foot has the big toe behind and pointed toward the heel of the other foot. This is the CBF position.
This foot position creates torque in the hip joint, urging it to also turn inward. Then (keeping the knee fairly straight) rotate the ankle outward, arcing the big toe from pointing-in position to pointing-out position, in order to urge the hip to turn outward. Feel the direct connection between turn of ankles and turn of the hips.
First practice starting in this counter-balanced foot position, and make one smooth arc of the skate side foot as you switch to your other side skate position. Add no pressure to the foot’s downward motion, just let the toes make a smooth arc outward.
As you finish the rotation, come to the distinct ‘pigeon toe’ position on the other side and hold both feet in that stacked position. Do not move feet out of this position until the next switch of the arms in front. No extra wiggles. Don’t bring feet back to the middle.
Warning: if you bring the feet back together in the middle point, between kicks, your legs will start swaying side to side during the stroke.
Come immediately to this CBF position and hold it steady, with feet seemingly stacked and the legs will stay straighter, more compact behind the body, like the tail of a jet plane.
Keep the heel of the Skate side foot below surface of the water by turning the heel outward a bit more. This also creates more space for a more aggressive arcing kick. By arcing the foot (which means turning the ankle, to turn the hip) rather than bending at the knee, you tap into the hip torque principle and can enhance the torso rotation more, while keeping the feet in a very compact space.
You may view some drills for developing this counter-balanced foot position and the 2 Beat Kick on the Video Tutorials page. You may view some additional focal points for 2 Beat Kick on the 101 Focal Points page.
Counter-Balanced Foot Position Drills
- Standing rehearsal, with ‘Pigeon Toe’ foot on the skate side
- Superman position, with ‘Windshield Wiper’ feet
- Spear Switch (PMF video)
- Swing Switch (PMF video)
Focal Points
- Keep toes pointed comfortably (as in Tippy Toes)
- Stack the Skate Side Foot (to what feels like) on top of the other foot
- Make one smooth switch of the feet – no extra wiggles between
- Both feet switch to the opposite CBF position and lock in place – no extra movement until next switch (do not bring feet back together in the middle)
- When switching feet, only the Skate Side foot presses while the other foot slides passively to its poised Pigeon Toe position
- Resist bending the knees – allow them only to flex slightly
- Toes of the pressing foot may gently brush the the other foot while switching
- Practice arcing feet in smaller space – resist spreading the legs very far
- Knees remain very close to each other
- Press the foot smoothly and steadily – at about the same rate as the torso rotates
-
AuthorPosts
- You must be logged in to reply to this topic.