A great test of your fundamental freestyle skills
A great test of your fundamental freestyle skills
(6:00)
by Coach Mat Hudson

(6:00)
by Coach Mat Hudson
(11:52)
by Coach Mat Hudson
Once you have practiced the LT (leg-torso) synchronization, and the ET (entry-torso) synchronization, then it is just a blending of both of those to create the LE synchronization. However, this is moving across the body, from one extreme end to the other. It can be the most difficult connection to make, but once you do, it is the most pleasing one!
Once again, you are ‘zooming out’ to take in the full body, from foot on one side to wrist on the other, to feel the connection between these two actions, through the torso. The torso rotation empowers the entry and extension to the target. The press of the leg supports the torso rotation. Therefore, the press of the leg helps empower the extension forward.
This is often the last sync combination to practice because the other synchronization combinations are set up to support this main action of extending farther forward on each stroke. This LE synchronization is what will make your stroke as long as it can be optimally. It is what creates the acceleration you seek on every stroke. So, take the time to establish the other connections, and they will enhance this one.
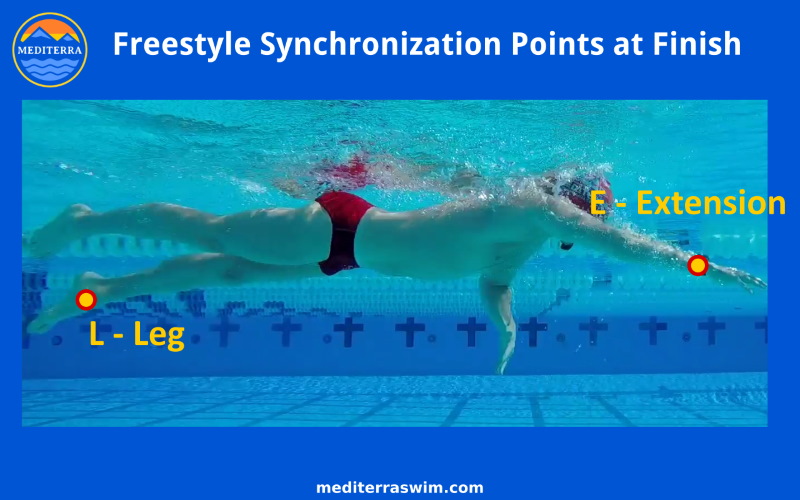
When the leg comes down to its finish position the entry arm is sliding into streamline position.
Just as you practiced pressing the leg more slowly, with a steady pressure to match the torso rotation, aim to match the pressure and rate of speed of the extension also. As noted previously, it is tempting to ‘snap’ the foot for an abrupt kick, but this sends a wave of force too quickly forward, before the extending arm is ready to absorb and apply it to extend further. Keep the press of the leg as steady and smooth, matched to the torso rotation, and thereby matched to the entry/extension. The more closely these two are matched and kept proportional in speed, the more the press of the leg can assist that extension, the more you can feel it assisting. The leg will move faster and get to its finish position before the extension finishes, but aim to make that press last longer.
There is some room to adjust the timing of the press to the tempo. At slower tempos, have the press of the leg come about half way into the entry, with the intent to use the press to help finish the extension to the target. At very fast (sprinting) tempos, it may be more helpful to have the press of the leg come right as the hand is entering in order to drive it more powerfully and more quickly to the target, since the fast tempo allows so little time to get there through the water resistance ahead.
Remember to keep all actions smooth no matter how much force is involved. You can be powerful, but in water, power must be applied smoothly, gradually building up, in order to create a more uniform (less turbulent) displacement of water molecules. Smooth actions keep drag to a minimum. As Coach Mat says sometimes, “Make the action like you are cutting butter, not like pounding meat.”
And, when you are feeling fatigued, or still have a long way to swim, this can be one of the more endurance-promoting focal points you can use. The default land-mammal reaction to fatigue is to start pulling back harder on the water. Resist this urge. Instead, put your dwindling resources into protecting this Send-Force-Forward emphasis in your stroke. Under fatigue, it will do more to reduce your loss of speed and extend your energy than just about any other emphasis.

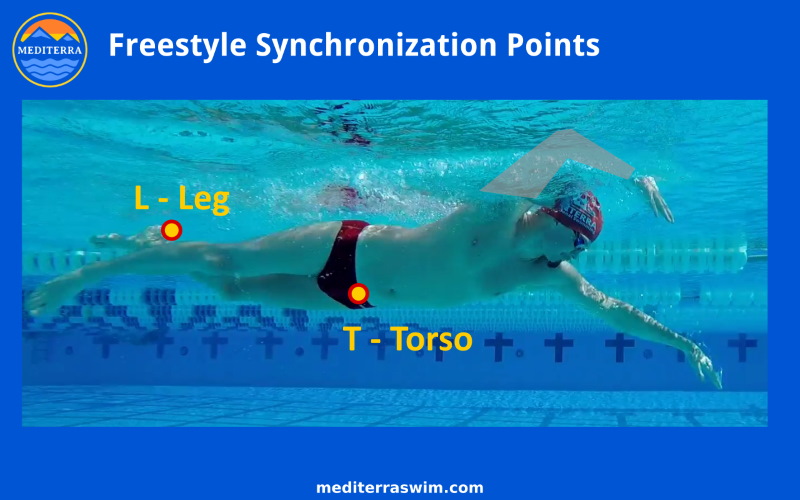
Once you have practiced the LT (leg-torso) synchronization, and the CT (catch-torso) synchronization, then it is just a blending of both of those to create the LC synchronization.
You are ‘zooming out’ to take in the full side of the body, from foot to forearm, to feel the connection between these two actions, through the torso. The torso rotation empowers the catch. The press of the leg supports the torso rotation. Therefore, the press of the leg helps empower the catch.
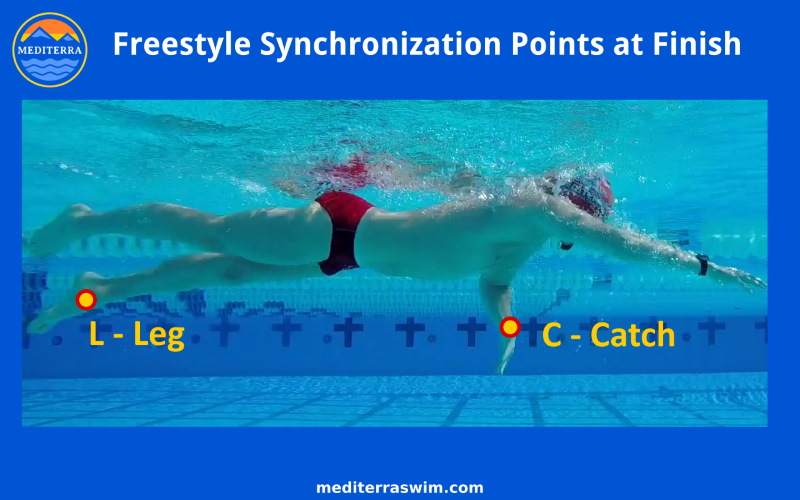
The leg will come down to its finish position as the catch is moving through its phase.
Just as you practiced pressing the leg more slowly, with a steady pressure to match the torso rotation, aim to match the pressure and rate of speed of the catch also. The more closely these two are matched and kept proportional in speed, the more the press of the leg can assist that catch, the more you can feel it assisting. The leg will move faster and get to its finish position before the catch finishes, but aim to make that press last longer.
This can be particularly useful and encouraging when you are starting to feel muscle fatigue in the catch, yet are pushing yourself to maintain steady SPL and/or tempo. Focusing on the connection between the leg and the catch can help ‘lighten the load’ on that catch action, enabling you to persist at the same effort a bit longer.
Keep a close eye on the shape and pathway of your catch so that you are maintaining your best grip on the water. The better your catch the more you will feel the press contributing toward making it easier.
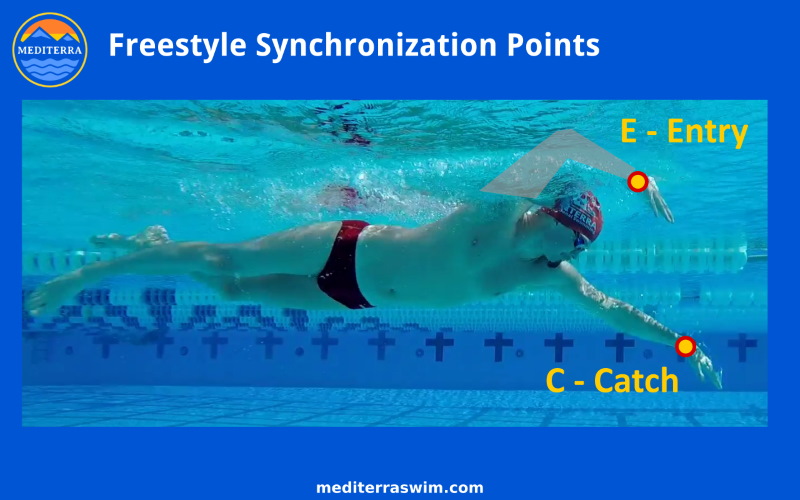
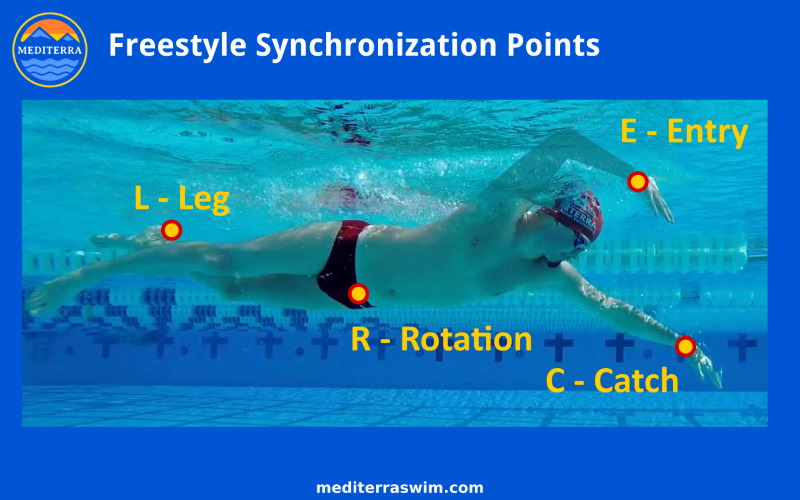
There is an ideal timing for the switch of the arms in front of the body. In the image above you can see the entry hand (E) piercing the water just across from the elbow of the lead arm. This is about the ideal moment for the arms to switch positions. Now the lead arm can begin the catch (C).
Just before this moment, the lead arm continues to extend forward while waiting for the recovery arm to come fully forward. Note that the lead arm is not passively hanging there – that side of the body is actively stretching the whole time. The streamline side of the body feels long and firm and getting longer.
There is some small room for adjustment depending on the tempo, but in general the ideal timing is to have the catch begin at the moment the entry hand has entered the water. For slower tempos your entry arm might be submerged to past the watch band by the time you set the catch, and for faster tempos your fingers may just start to pierce the water at the time you set the catch. But to switch earlier than this, or later than this is going to introduce greater ‘power leaks into your stroke.
Another way to phrase this is ‘arm overlap’. Notice how far the entry arm overlaps the lead arm in about the ideal amount. If you have too little overlap, or too much overlap at the moment the arms switch, then the catch is not able to connect with the full torso rotation, and ‘power leaks’ from the propulsive action. When there is just the right amount of overlap, then you are able to transfer force from the catch side to the entry side of the body instantaneously, and smoothly. Timing both sides with the full torso rotation is the key.
At the moment your entry hand is piercing the water, your torso begins to rotate. The ideal is to connect the catch to the start of this torso rotation also. Notice how all three must happen together.
Imagine a steel cable tying the catch wrist to the entry wrist. This cable passed through the shoulders. When one wrist moves the other must move in immediate response to it, in one smooth motion. The shoulder connect the two arms. When you set the catch on one side and start to press against the water, you instantly transfer that force – through that imaginary steel cable – into the entry arm. The entry arm slides down and then extends forward, receiving the force from the catch side of the body. This is how you generate and feel acceleration on each stroke. This is where the magic begins.
First, in slower motion strokes, establish the ideal timing, or ‘overlap’ position and get very familiar with this.
To make the ideal zone more distinct in your nervous system, occasionally try too much overlap, and too little overlap in order to feel how those distortions cause your stroke to feel less connected, less effective. Notice how you get less acceleration.
Gradually speed up the tempo while maintaining this same ideal overlap. Eventually, you should be able to keep proper switch timing at every tempo you train with, from slow to sprint tempos.
Remember that the motion of the two arms, entry and catch sides, through the shoulders, should feel firmly connected to each other. You are aiming for a immediate, smooth transfer of force from one side of the body to the other, that gives you a sense of acceleration on each stroke.
The better the catch shape and pathway, the more force you generate that is available to be transferred to the other side.
The better your streamline position, the farther your body is able to slide forward once it receives that force.
The better your arm switch timing (the amount of overlap), the more of that force is transferred to the other side.
You’ve worked on building each section of the stroke – the entry, the body rotation, the catch, and the leg press – section by section. They are intended to work together as a harmonious whole, not separately. Eventually, you need to practice connecting these parts and then refining those connections to create a smooth and powerful whole-body propulsive movement.
When these parts are connected and timed well, they do not merely add up, the magnify the power you can utilize in each stroke. When the propulsive movements of the body are coordinated in this way, they provide a thrilling sense of acceleration on each stroke!
When these parts of the stroke are not connected well, it causes what we call ‘power leaks’ in your propulsion. You may be harvesting free force from gravity, you may be generating momentum with the recovery swing and the torso rotation, you may be anchoring your catch hand, but if all these parts are not connected together and timed well, a great portion of the force generated in one part of the body cannot be transferred to another where it would be used – it is burned up as friction or stress inside the body and wasted in moving water around rather than moving your body forward.
Synchronization practice will help tie each piece of the movement together, and plug those power leaks.
Synchronization practice is something that may likely occupy most of your training attention in your advanced stages of development. When there is any change in speed, intensity or in the conditions of your swim, there will likely be a need to adjust and refine your synchronizations to fit those precise conditions. There is only a perfect synchronization arrangement for this moment right now. When the conditions change you may feel a need to make fine adjustments to the synchronization to feel smoother and more efficient in that unique set of conditions. That is why it becomes a frequent focus in one’s advanced training. It is infinitely improvable and it is always rewarding to make synchronization a little better so it becomes a perpetual source of interest and pleasure.
We divide the body into four main propulsive parts and work on synchronizing all four of them together to create this one smooth, harmonious whole propulsive movement on each stroke.
However, it is hard for the brain to focus on all four of those at once. Instead, we work on synchronizing just two of those parts at a time, and work around through each combination over and over again, gradually bringing all of them into better harmony without having to focus on all four together at the start.
Sync Combinations you will practice:
Later on, as the nervous system grows familiar and the synchronization of each combination becomes more autonomous in the brain’s control, you’ll find you can zoom out and hold in attention more parts at one time, like ERC, LRC, and LRE.
A Tempo Trainer is an essential piece of most of our training plans.
And, for open water swimming with a Tempo Trainer, I want to urge you to practice and master this one skill: learn to click the buttons on the TT without removing it from your swim cap.
This has two main advantages:
For race training, there are no ‘rest’ moments given in the race. So, when practicing race simulation with stroke count intervals in open water, you can hold Skate position, reach a hand up to feel the buttons, and click it in just a few seconds, and quickly resume your swimming with a minimal disruption to body position or momentum.
Pre-set the Tempo Trainer to the setting you intend to start with. Turn it off, if you will not use it immediately.
Place the TT under the swim cap toward the back of your head, behind the ear, where you can reach it with your dominant (writing) hand. Make sure the cap completely covers the TT and comes back snugly upon your skin or hair. Make sure the two TT buttons are at the bottom and then check to assure yourself that you can feel with your fingertips both the left and the right button through the swim cap.
Practice turning on the TT by pressing the right button for 1 second and practice turning it off by pressing down on both buttons at the same time.
[In Mode 1] Practice clicking the TT faster by 0.01 second pressing the left button, and practice clicking the TT slower by 0.01 second pressing the right button. In the practice sets of this training plan you will be adjusting tempo only by 0.03 seconds (3 clicks) between any two repeats – so not enough to forget your click amount in the midst of a demanding interval set.
Swimming at faster-than-comfortable tempo you will challenge your ability to maintain precision and consistent timing of the stroke choreography.
It will expose weakness and limitations in your skills that are still present when you swim at your normal tempo, but you may not be aware of how those weaknesses are affecting you. When you swim with faster tempos your brain will try to take short cuts to get the movement roughly completed within the shorter amount of time – your movements will degrade in their precision, and some parts will rush too fast and others go too slow. Working at faster-than-comfortable tempos will give you the opportunity to observe where your stroke breaks down and give you the opportunity to improve them.
If you spend more time at uncomfortably fast tempos, working hard to improve timing and control, you’ll notice things get even easier when you return to your previously ‘normal’ comfortable tempo!
When you would like to challenge your stroke with slightly-uncomfortably-fast tempos, you do this by gradually increasing the tempo until your stroke starts to feel rushed. At this point you are forced to make the movements more quickly than your brain is prepared for.
By counting strokes you can measure how much your stroke breaks down by how much the stroke count goes up each time you increase the tempo. You can also see when your brain begins to adapt to the fast tempo by when your stroke count holds steady or even starts to go back down (while staying at the same tempo for a while).
When you first start increasing tempos away from your comfortable tempo (TC) you may be able to hold the same stroke count (SPL) for a few steps. But at some point in increased tempo you may not be able to resist adding strokes to you SPL. But why? Is it a matter of strength? A matter of your ability to hold precise movements? That is what you want to use faster-than-comfortable tempo sets to discover.
What tempo starts to feel fast to you is quite personal and depends on what you’ve been training with. You can shift your comfortable tempo range a bit over a few weeks with a systematic adaptation process. This is not nearly as difficult as shifting your SPL range, but it still requires a gradual process over time.
When you work into faster-than-comfortable tempo range, the harder it becomes (i.e. the more failure you experience) the more incremental the steps of increased tempo need to be.
For example, while inside your comfortable tempo range you may be able to increase tempo by steps of -0.05 seconds and you don’t need any adaptation time – you can get by with 50 or 100m distance for each round. When it gets near your comfortable limit you may need to make the increments smaller by steps of -0.03 or -0.02 and provide more distance for adaptation at each step – more like 150 to 200m distance for each round. When it gets extremely challenging (where failure is 40-50%) you may need to make the increments just -0.01 seconds and provide even more distance for adaptation at each step – more like 300m or more for each round. When failure is over 50% it is too much.
In this lesson series we are going to get acquainted with the three basic ways of using tempo constraint in your first stages of advanced skills training.
You will use the BEEP to draw your attention to a particular part of the body at a particular moment in the stroke cycle.
For example, you can choose to coordinate the BEEP with the entry, or the catch, or the rotation, or the press of the leg.
Set the Tempo Trainer Pro to your current comfortable tempo TC.
Swim 4x 25 (one length) for each of parts of the stroke mentioned above.
You will practice swimming at a slightly uncomfortably slow tempo. This will create a good challenge for your ability to maintain balance, stability and streamline. Read a bit more in Why Practice at Really Slow Tempos?
Start at your current comfortable tempo TC and swim 2x 25. Then slow down the tempo by +0.05 seconds and swim another 2x 25. Count strokes while you do this and for a while, as you slow tempo down, you should find that you take fewer strokes to get across the pool. When you slow down the tempo farther but your stroke count no longer goes down in response to it, then that is a sign that you’ve reached the limits of your ability to squeeze more travel out of extra time between strokes.
Spend some time working at that slowest tempo where you can just barely hold your lowest stroke count and maintain control over your balance, stability and streamline. You may find that your brain starts to adapt and it gets a little easier (before you get too tired).
Note: swimming with tempos slower than 1.80 seconds per stroke is an extremely slow tempo. It would be remarkable if one can swim much slower than this and continue to lower their stroke count, but it might be possible…
You will practice swimming at a slightly uncomfortably fast tempo. This will create a good challenge for your ability to maintain precision and timing of your movements. Read a bit more in Why Practice at Really Fast Tempos?
Start at your current comfortable tempo TC and swim 2x 25. Then slow down the tempo by -0.03 seconds and swim another 2x 25. At this stage in your training we won’t require you to count strokes – that will come in later stages – but as you speed up the tempo, at some point you will notice that you feel too rushed in your movements, and you are losing control over your body position, your shape, or the precision or coordination of moving parts. This is a sign that you’ve reached the limits of your ability at this time.
Spend some time working at that fastest tempo where you can just barely hold precision, timing and coordination of moving parts. You may find that your brain starts to adapt and it gets a little easier (before you get too tired).
The very first task is to practice using the buttons on the Tempo Trainer Pro (TT) and get familiar with the sound of the BEEP and what the numbers on the screen mean. You can read more about this in Tempo Trainer Pro Basics.
The second task is to simply get acquainted with how to coordinate your stroke rhythm with the BEEP of the Tempo Trainer Pro.
For this we recommend starting with a tempo of about 1.45 second per stroke (with the TT in Mode 1, click the left or right button until 1.45 appears on the screen). That is slow enough that most people will find it comfortable.
It may be easiest to coordinate the entry with the BEEP. Do a few short repeats or a few lengths to get familiar with how to do that, and observe the effects it has on your stroke and on your attention.
Starting at 1.45 seconds may or may not be your most ‘comfortable’ tempo. We encourage you to experiment with it, trying gradually slower or gradually faster tempos until (like Goldilocks) it feels just right for your attention and control.
There are two buttons on the lower part of the device face. You slow the tempo down (the seconds go up) by pushing the right button – one click decreases it by +0.01 seconds (a hundredth of a second). You speed up the tempo (the seconds go down) by pushing the left button – one click increases it by -0.01 seconds.
You may view more guidance for Finding Your Current Comfortable Tempo.
What is fast or slow compared to other swimmers, you mean?
If you are not sure what is too fast or too slow compared to others, you may read more in What is a Functional Range of Tempo?. It may help to have some sort of reference point for what is considered a ‘slow’ or ‘medium’ or ‘fast’ tempo, compared to swimmers, or what is considered appropriate for certain kinds of events (like sprinting versus long distance).
Not only do you want to develop your capability to hold good form at the tempo appropriate for your pace goals, but also to be capable of swimming with good form at a wider range of tempos along that absolute scale from very slow to very fast.
If this interests you, there is a lot more to study on tempo in the Knowledge Base.
In most of our training plans in the Dojo and in live training sessions we will be working with tempo (a form of stroke rate) and controlling it using a device known as a Tempo Trainer Pro, made by Finis.
Tempo is the rate at which your arms (or whole body) are moving through the stroke cycle. For convenience in pool training, we measure tempo in units of ‘seconds per stroke’. Over many stroke cycles to get a more accurate average, we can measure from the time between each rotate of the torso, or we can measure the time it takes after one arm has left a position in the stroke cycle for the other arm to reach that same position . For example, we could measure the time between the left arm coming to the entry point and the right arm coming to the entry point in the stroke cycle.
A Tempo Trainer Pro (which we often abbreviate as “TT”) is a small, waterproof metronome we use for swimming. You can read more about this in Tempo Trainer Pro Basics.
The first objectives for training with a TT is to provoke the brain to refine control over the precision and consistency of your movement patterns. The Tempo Trainer helps build your focused attention and sense of timing, helping the body ‘memorize’ the movement deeply. When you train enough with the TT, you’ll eventually not need it any more – just like a musician would use a metronome to perfect timing then set it aside for the concert.
There are three ways we may have you first start to use the Tempo Trainer:
By first working with a comfortable tempo you can give the brain a chance to organize and smooth out the motions under the constraint of a fixed time interval.
Then you can begin working with slightly uncomfortably-slow tempos to challenge your balance and streamline skills. Then you can begin working with slightly uncomfortably-fast tempos to challenge your precision under the stress of faster movements.
There are more ways to use it once we get into advanced training, but these are where we like you to start. Later on we use TT training, in conjunction with stroke length training, to bring your stroke rate down to the range suitable for your pace goal. Tempo work is recommended only after you have the four fundamental features working in your stroke.
Using a Tempo Trainer adds a new level of challenge to the brain while training your stroke technique. For this reason it takes some time and understanding to learn to use one, and to enjoy using one. Some people love it immediately, and sense it will help them focus. While some people find it annoying at first. If so, don’t worry. That may be a sign your nervous system is not ready for it yet. But that annoyance could also mean that your brain just needs some time working with it to get used to a new form of stimulation and start to appreciate it.