Lesson for Integrated Breathing

Lesson for Integrate Breathing

When we are following a standard freestyle lesson series, in the first two or three lessons we build the Four Essential Features of the freestyle stroke, and then come to Integrate Breathing, which depends on those features.

Below is the outline of the skills, drills and cues, with links to video demonstrations of the drills. The following lists of activities and the lists of cues may contain more items than you experienced in your lesson. The instructor will watch the time and your pace of learning and choose a certain sequence of activities and the few most relevant cues for you to work with.


Integrate Breathing


Skills For Integrated Breathing

1. Position of Head and Lead Arm

2. Timing of Turn

3. Air Management (exhale/inhale)


Drills

These drills are listed, starting with easiest, in order of increasing complexity:

•  Standing rehearsal, Turning the Head with arms moving from Balance Position To Streamline Position

•  Balance Position to Streamline with Nod

•  Balance Position to Streamline with Split The Face

•  Balance Position to Streamline with Hooked Fish

•  3 Strokes To Streamline, with Turn to Breath

•  3 Strokes, 3-Part Breathing, 1 Stroke

•  Whole Strokes with Nod

•  Whole Strokes with 3-Part Breathing

•  Multiple strokes – breathing every 4 strokes (breathe to one side on each length)

•  Multiple strokes – alternate Interrupted Breathing and Rhythmic Breathing

•  Multiple strokes – breathing every 3 strokes (alternate breathing sides)


We may also do some Air Management drills to help with exhale and inhale:

•  Standing rehearsal – Bubbles from nose

•  Standing rehearsal – Clear The Airways

•  Standing rehearsal – Quick Sip of Air


In each drill we may use three stages for developing the head position, starting below the surface and gradually working to a ‘sneaky breathing’ position with half the head still in the water…
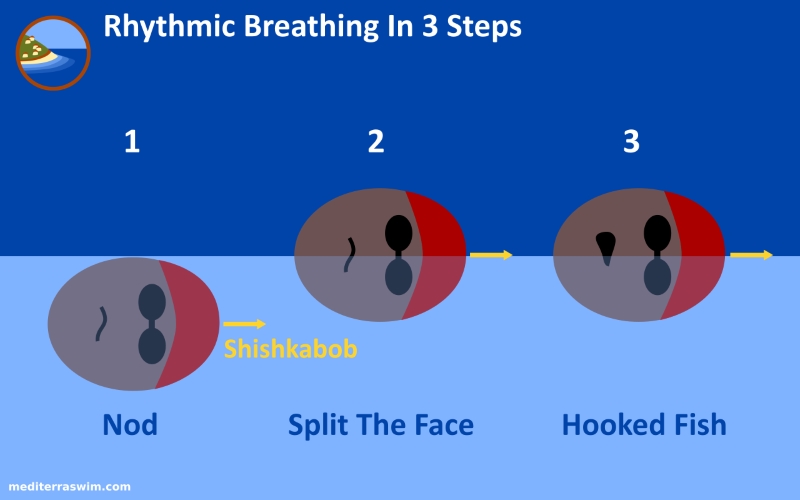
 

First, Nod to the side, both goggles underwater, looking directly at the wall, then quickly turning back to face-down position.

Next, Split The Face, and keep the shishkabob underwater pointing straight ahead. One goggle underwater and one goggle above water. The mouth is half in, half out of the water.

Next, reach the cheek and the lips up to the air. Kiss the air with the lips. You may not attempt to breathe during the first tries of this just to make sure you can touch the air. Then, when you feel more confident that air is there, you may attempt a quick sip of air.


Cues For Position

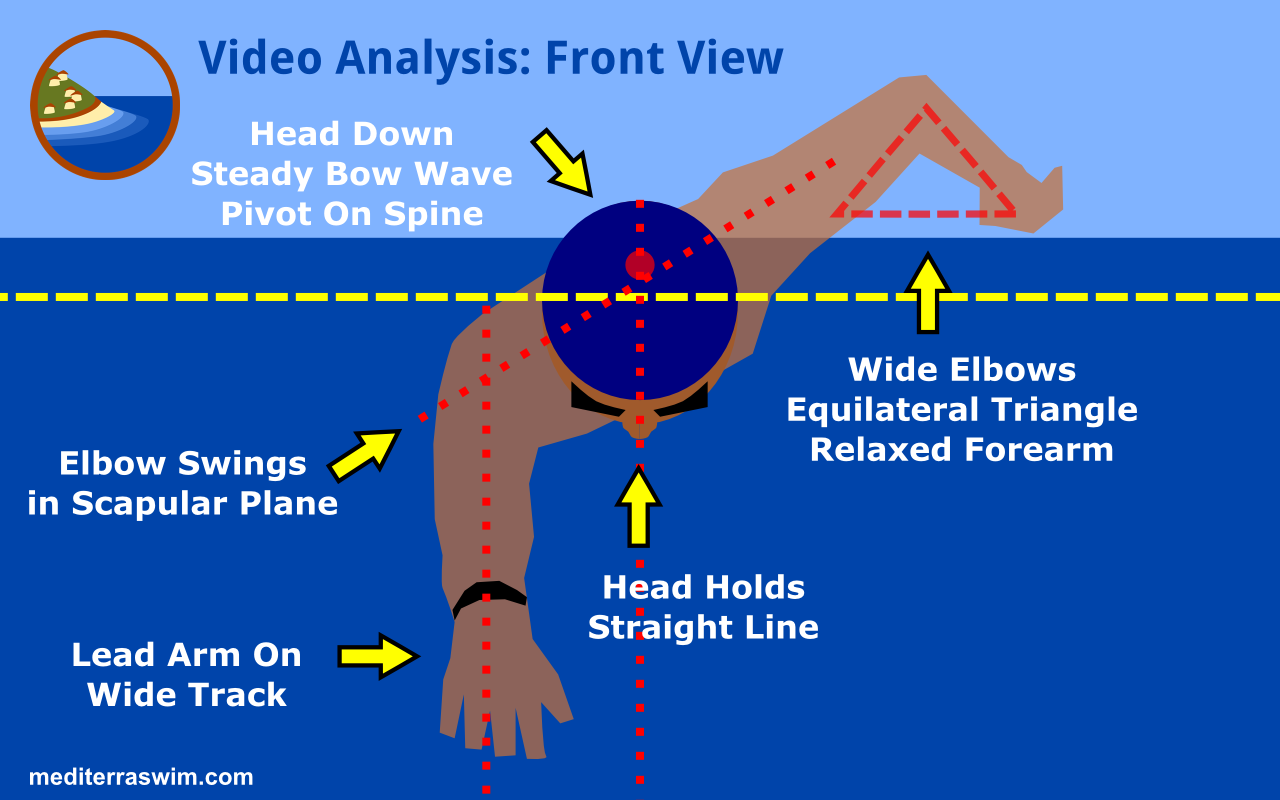
•  Keep head in line with spine

•  Tip of the head is underwater

•  Turn head on spine axis (shishkabob spine)

•  Head remains flat (on pillow) while turned toward air

•  Keep extending lead arm while turning/returning the head

•  Cheek up, forehead down (you don’t breathe with both goggles out of the water)

•  Tilt head down further than you think (your sense of ‘flat’ may not be truly flat)


Cues For Timing Of Turn

•  Turn head right with start of the catch

•  Turn head right with start of entry (turn away from entry arm)

•  Turn a bit faster than torso is turning (but not whiplash)

•  Touch the air just long enough for a quick inhale

•  Return the head to face-down immediately

•  Return the head before recovery arm comes over head


Cues For Air Management

•  Steady bubbles from the nose

•  Burst of air as mouth touches air, to clear the airway of water

•  Emphasize the exhale – body needs to rid of CO2, not need more O2

•  Squeeze out with abdominal muscles

•  Partial, frequent air exchange (rather than massive, complete empty/fill)

•  Quick sip of air

Lesson for Generate Forward Momentum

In the second freestyle fundamental lesson we work on building skills for the recovery arm swing and entry, while relying upon the skills for The Frame and Streamline Shape.

This lesson will build the third and fourth of our Four Essential Features of the freestyle stroke.

And, here is the outline of the skills, drills and cues, with links to video demonstrations of the drills. The following lists of activities and the lists of cues may contain more items than you experienced in your lesson. The instructor will watch the time and your pace of learning and choose a certain sequence of activities and the few most relevant focal points for you to work with.

Skills

  • Hold stretched, straight, stable Streamline Position
  • Wide recovery arm swing
  • Elbow leads, moves forward continuously
  • Momentum builds parallel to surface
  • High Elbow at Entry
  • Continuous, fluid motion, from Exit to Entry to Streamline
  • Recovery Arm ‘lifts’ off the torso for a moment, almost weightless


Drills

There are three sections to this whole Recovery movement that we need to construct:

  1. The exit – how the elbow and forearm and hand will leave the water
  2. The recovery swing – how the shoulder slides and arm swings from back to forward position
  3. The entry – how the arm is positioned to enter the water, and the pathway it follows to Skate


Recovery Swing and Entry Drills

These drills may be used for Exit, Recovery Swing and Entry skills:

Streamline Swing is where you hold Streamline Position on one side and then practice swinging the recovery arm on the other side, in slow motion. There is no switching of the arms.

2-Arm Slot To Streamline is where you are standing in shallow water, with one arm in entry position, the lead arm in front and that side leg forward.  Then you fall forward over your leading leg, as the face touches the water, switch arms, and slide into Skate Position, and slide forward for a couple seconds.

Streamline Switch is where you start in Streamline, swing the recovery arm, then pause just a moment at entry, then switch the arms, slide into Streamline, and repeat on the other side.

In Streamline Switch, once you remove pauses, your stroke is continuous and smooth. Your movements are getting closer and closer to normal-speed, whole stroke swimming. As you gradually speed up the motion of the swing, you may also gradually lift that forearm out of the water (let the hand go wider to gain clearance), up to the point where your fingernails are still brushing the surface.


Cues

Cues for The Exit

  • Flick elbow outward (‘elbow nudge your buddy’)
  • Swing elbow wide (swing out, not up behind the back)
  • Shoulder blade slides, pulling the elbow
  • Elbow pulls the hand – hand is hanging below
  • Exit The Sleeve (pull forearm and hand out of water as if extracting from a jacket sleeve)
  • No splash exit (the arm slips quietly out of the water)

Keep attention on the very moment before the elbow exits the water to begin the recovery swing. Pause there a moment, with arm extended down, alongside the body. Keep the elbow underwater, tucked against the waist, in order to override the instinct that pulls the elbow up in the air, behind your back. At the end of the underwater pull, as the elbow arrives beside the waist, that is the moment it needs to swing out wide from the side of the body rather than going high behind it. Once you set the elbow on the correct path, it will be much easier to keep it going in the right way, swinging wide beside the torso.

It is so important that you start the recovery swing in the best way, right from the exit moment. This sets the stage for the rest of the swing. If there is an error in how your arm exits the water, it will create error through the entire recovery swing. Be patient to get this exit moment down well.

Cues for Recovery Swing

  • Open the Gate
  • Swing hand a bit wider (create equilateral triangle shape)
  • Relaxed forearm and hand (‘rag doll arm’)
  • Drag the knuckles (until the last moment, then swing hand forward)
  • Push the Dot forward (dot on the elbow bone)
  • Swing, then slide the shoulder blade all the way
  • Elbow reaches shoulder line before wrist
  • Keep fingertips in contact with surface (a.k.a. ‘dragonfly fingertips’)

You may start practicing the recovery swing slowly, like a robot, which will keep your torso deep and the recovery arm mostly underwater in drill mode. But eventually, as the precise movement pattern becomes more familiar, more comfortable, you must speed up the motion so that it is fluid and fast enough to feel like the arm is truly swinging, light-weight, lifting off the torso for a moment.


Cues for The Entry

  • Elbow swings forward in front of the head as far as comfortable
  • Elbow high above ear (like a tent over the head)
  • Feel the stretch in the back as you reach entry position
  • Feel BOTH shoulders slide toward the ears, bracing the upper spine
  • Forearm aiming straight ahead on track
  • Forearm angling down steeply (45 degrees)
  • Hand entry position across from opposite (lead arm) elbow)
  • Rotation slides the arm in and forward
  • Ski jump shape entry path – Slide down to target depth and then extend forward
  • Spear wrist through your target

Lesson for Form Streamline Shape

In the first freestyle fundamental lesson we work on Forming Streamline Shape.

This lesson will help you establish the second of our Four Essential Features of the freestyle stroke which encompass lengthening, balance and streamline skills.

Below is the outline of the drills and attention cues, with links to video demonstrations of the drills. The following lists of activities and the lists of cues may contain more items than you experienced in your lesson. The instructor will watch the time and your pace of learning and choose a certain sequence of activities and the few most relevant cues for you to work with.


Skills

  • To maintain Build The Frame skills and…
  • Hold long, straight, firm Streamline, from fingers to ankle
  • Hold low, stable rotation angle

You want to feel long, straight, sleek and stable at a low-rotation angle in Streamline Position. Along with the sensations from Build The Frame skills, you want to see that you can slide parallel to the line on the bottom of the pool and slide farther, more easily, the more streamlined and stable your body is. Sliding in Streamline for 6 seconds with these positive feedback signs is a good goal to work towards.


Drills


Cues

To help you pay attention, interpret, and send commands to particular parts of your body your instructor gave you a selection of cues in each drill. There are more cues on the lists below than you were given in your lesson, as the instructor chose a few to get you going, without overwhelming you with too many details. You may be able to figure out the meaning of the others you were not originally exposed to.

  • Cues for Scapula Slide Position and…
  • Scapula of lead arm stays slide forward
  • Lead Arm stays on Wide Track
  • Head Stays Anchored (it does not turn with torso)
  • Back hand tucked deep into pocket (keep arm underwater)
  • Low Rotation Angle (rotate just off your stomach)
  • Upper shoulder blade touches the air
  • Lower shoulder blade just below the surface
  • Light flutter of the feet (if necessary to prolong time in drill)