The benefit of swimming with long, slow strokes
The benefit of swimming with long, slow strokes
(9:52)
by Coach Mat Hudson

(9:52)
by Coach Mat Hudson
If you’ve had a live lesson with Mediterra you may have been introduced to the Counter-Balance Leg Position (CBL). Just as the front of your body is locked into Streamline Position while the recovery arm is swinging forward, in the back end, you would lock your feet into the CBL position so that the entire body underwater is counter-balanced and stabilized during that recovery swing. The CBL provides these advantages:
Perhaps the easiest way of finding the leg position by making the Skate side foot ‘pigeon-toed’.
While keeping the knee fairly straight, turn the big toe of the Streamline-side foot inward and pointed at the heel of the other foot. Turn the big toe far enough that it urges your hip to turn with it. You’ll notice that this turn of the foot, corresponds to the turn of the hip, which supports the rotated Streamline Position. In the image below notice how the upper (Streamline side) foot has the big toe behind and pointed toward the ankle of the other foot. This is the CBL position.
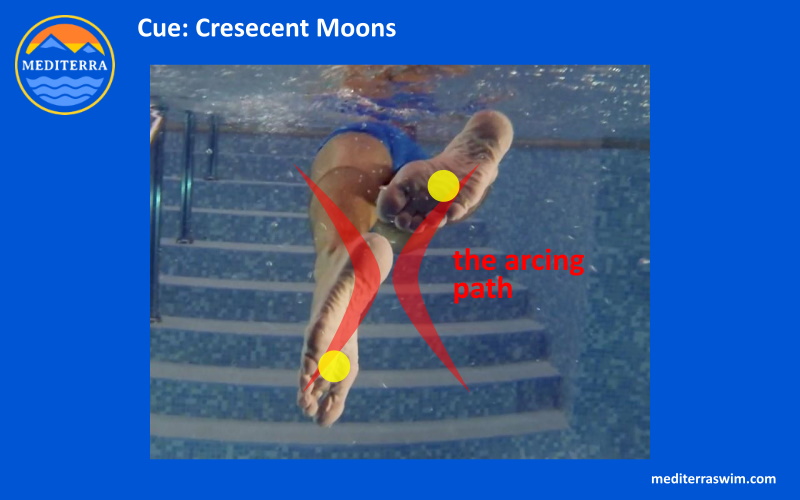
I used the ‘pigeon toe’ term to give us an , but I also use some other pictures to get the idea across, such as the ‘Crescent Moons’ term in the image below, to convey the arcing motion the feet make when switching to the other side. This image shows the feet in the counter-balanced leg position. This would also be the position of the (upper) foot poised to press down in an arc for the 2 Beat Press motion.
The Counter-Balanced Leg position seen from behind.
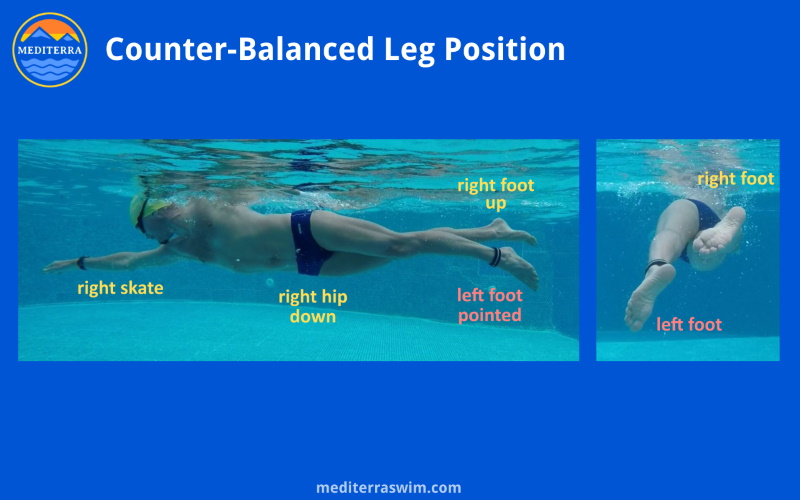
The Counter-Balanced Leg position seen from the side.
We first teach you how to place the Streamline side foot in pigeon toe position – seen above in this rear view image. Notice how the upper (Streamline side) foot has the big toe behind and pointed toward the heel of the other foot. This is the CBL position.
This inward-turned foot position creates torque in the hip joint, urging it to also turn inward. Then (keeping the knee fairly straight) rotate the ankle outward, arcing the big toe from pointing-in position to pointing-out position, in order to urge the hip to turn outward. Feel the direct connection between turn of ankles and turn of the hips.
First practice starting in this counter-balanced leg position, and make one smooth arc of the streamline side foot as you switch to your other side streamline position. Add no pressure to the foot’s downward motion, just let the toes make a smooth arc outward.
As you finish the rotation, come to the distinct ‘pigeon toe’ position on the other side and hold both feet in that stacked position. Do not move feet out of this position until the next switch of the arms in front. No extra wiggles. Don’t bring feet back to the middle.
Warning: if you bring the feet back together in the middle point, between kicks, your legs will start swaying side to side during the stroke.
Come immediately to this CBL position and hold it steady, with feet seemingly stacked and the legs will stay straighter, more compact behind the body, like the tail of a jet plane.
Keep the heel of the Streamline side foot below surface of the water by turning the heel outward a bit more. This also creates more space for a more powerful press. By arcing the foot (which means turning the ankle, to turn the hip) rather than bending at the knee, you tap into the hip torque principle and can enhance the torso rotation more, while keeping the legs in a very compact space.
You may view some drills for developing this counter-balanced leg position and the 2 Beat Press in the Knowledge Base.
Swimming at slower-than-comfortable tempo you will challenge your ability to maintain balance, stability and streamline.
It will expose weakness and limitations in your skills that are still present when you swim at your normal tempo, but you may not be aware of how those weaknesses are affecting you. Working at extremely slow tempos will make you aware of those weaknesses and give you the opportunity to improve them. It will create even more ease for you at your normal Tempos.
It is not recommended that you swim often with extremely slow tempos because this can put a strain on your joints – some people try to increase the power of each stroke and distort the extension of the body to squeeze more distance per stroke – but if you do this occasionally, and for short periods of time, you can make some important observations and see where you need to work on improving control in balance, stability or streamline skills.
Below is a tutorial on how we want to ‘engage the core’ of the body in the freestyle stroke…
Learn how to engage the core and support the extension (lengthening) of the body line.

Below are some tutorials on correcting and preventing over-rotation in freestyle…
Learn how to prevent over-rotation by reaching forward with the shoulder.
Learn how to prevent over-rotation by controlling the path of the elbow.
This introduction refers to the second of our Four Essential Features of the freestyle stroke: Form Streamline Shape.
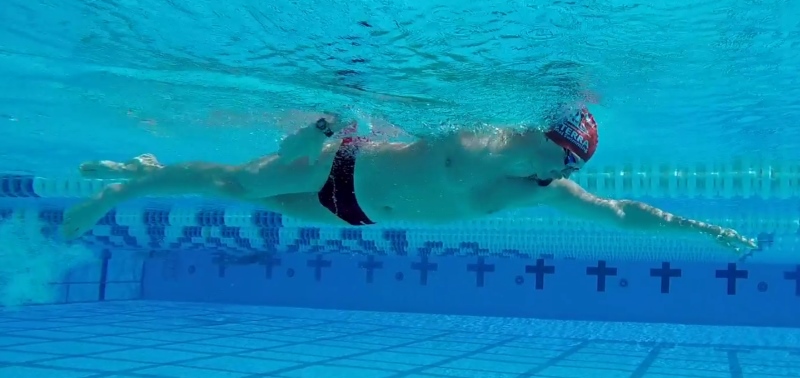
Streamline Position is the start and the finish position for every stroke in freestyle. This position is the most hydrodynamic (low drag) shape you will be in during the stroke cycle, and the moment you will experience the most forward movement. Streamline Position is how you deliver the flow of force through the body into forward motion. In this position, your body line most easily parts water molecules ahead so that your body can occupy that space instead. The more smoothly, the more uniformly and therefore the more quickly those water molecules move out of the way, the faster you will travel forward.
Streamline Position is the most important skill of all because it is determines much of how well you convert effort into forward motion and it is the platform on which you swing the recovery arm forward and the platform on which you take an easier rhythmic breath. You cannot practice Streamline Position too much because there are so many ways to make it better, stronger, more stable.
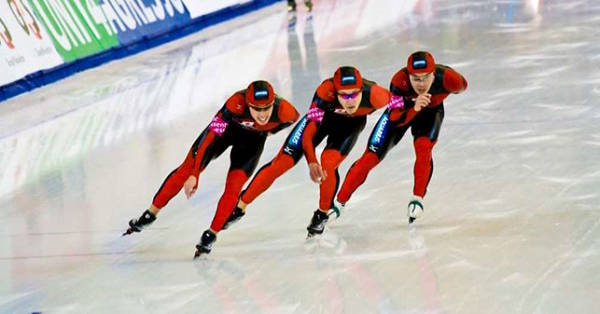
Imagine how a speed skater places her weight confidently on the skate and transfers the wave of momentum into that skate to accelerate forward. That skate blade is long, straight, sharp, and stable. It receives the wave of force and conducts it onto the ice and the skater slides forward. The skater is holds herself with stability on that single skate, over one side of the body, while drawing the other leg forward, getting ready to unleash another wave of force into the other skate on the other side. Stability in this position is crucial to maintaining rhythm and momentum.
The Streamline Position has some lessons we can learn from this action in ice skating. At this moment in the water, you are shaped into your most streamline position, holding a slightly rotated angle, while leaning (laying your weight) onto that streamline side of the body. That streamline side of the body receives the wave of force you generated in the stroke and conducts it forward into the lead arm and leading edges of the body to put that force to work parting water molecules ahead. You hold this position with stability that comes from core muscle strength and control, while the other side of the body brings up the recovery arm to prepare to unleash another wave of force into the Streamline Position on the other side.
A good streamline position is:
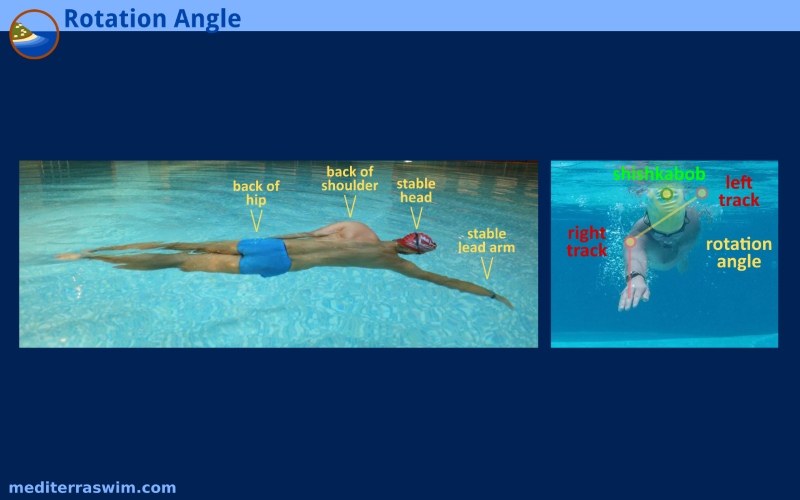
• slightly rotated (about 30 degrees)
• a straight line from wrist to ankle (as seen from above)
• stretched (without twisting or tilting the spine) from wrist to ankle, especially from shoulder to hip
• stable for at least 2 seconds
In your lesson you will learn how to form this streamline shape and learn how to hold it with stability for a few seconds, long enough to be able to swing your recovery arm forward in a relaxed and controlled way.
This position is critical – everything else you do in the stroke will depend on your ability to slip into the position immediately and hold it steady while other actions are taking place.
This introduction refers to the first of our Four Essential Features of the freestyle stroke: Build The Frame.
The first skills we work on is to lengthen the body line, and establish better balance, from front-to-back and from side-to-side (lateral balance) with the support of water beneath.
Like building the frame of a long, lean sea kayak, we need to lay the body out on the surface of the water and lengthen it along the spine. This lengthening of the body triggers a response inside the body to stabilize the spine, pelvis and legs, forming one long fuselage.
This lengthening you want to create is meant to put the spine into a neutral position, to stretch it out and stabilize it comfortably. Your body should feel straight and tall, but not strained to hold this position.
Balance refers to keeping the body parallel to the surface, in the ‘neutral corridor’, or the ‘neutral zone’ between gravity pushing down and water pressure pushing up. This is the corridor where you can swim along without having to waste energy fighting against those two natural forces.
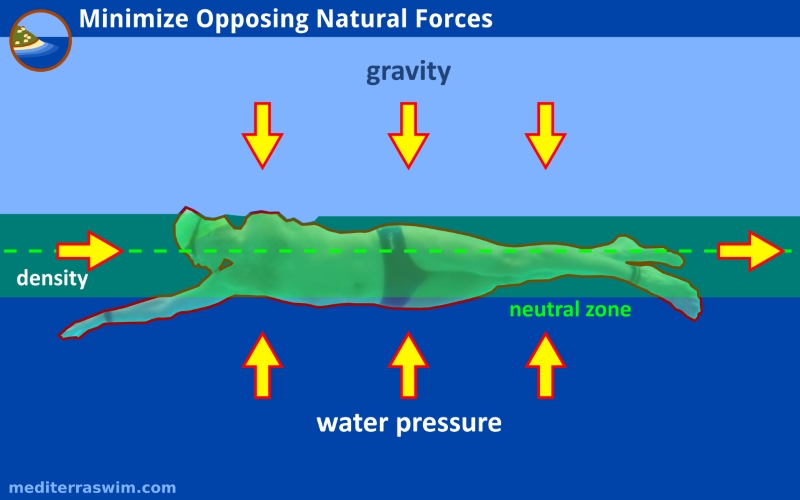
The human body will rest in water like an iceberg. When at rest between gravity and water pressure, approximately 95% of your body will be submerged, give-or-take depending on your body composition. You choose which 5% of your mass gets to stick above the surface. Unfortunately, the head makes up about 10% of body mass and so if you insist on keeping it up, above the neutral zone like a good land-mammal, gravity will shove some other part of your body deeper, triggering a sinking sensation detected by your brain which raises your heart rate, and requires you to start pushing down in order to hold too much of your body mass too high. Your sense of effort will go way up. So, you will practice keeping the head down in the water, where it can fully rest on the water as if on a pillow. A body at rest in the neutral corridor, parallel to the surface, will have just a sliver of the back of the head, the back of the shoulder, and perhaps a side of the hip touching the air.
Using the drills and cues, you work on keeping your body’s frame parallel to the surface by shifting weight forward through that frame. You let the weight of the head and the weight of the arms be heavy, letting them rest fully supported by the water, rather than hold them up. You use the internal tension of your muscles, tendons and fascia to lever your long body line body like a teeter-totter board, pivoting over the buoyant lungs, to shift weight forward, making the upper half of the body feel heavier, and the lower half feel lighter. This will be especially important and appreciated by those who have sinking hips and legs.
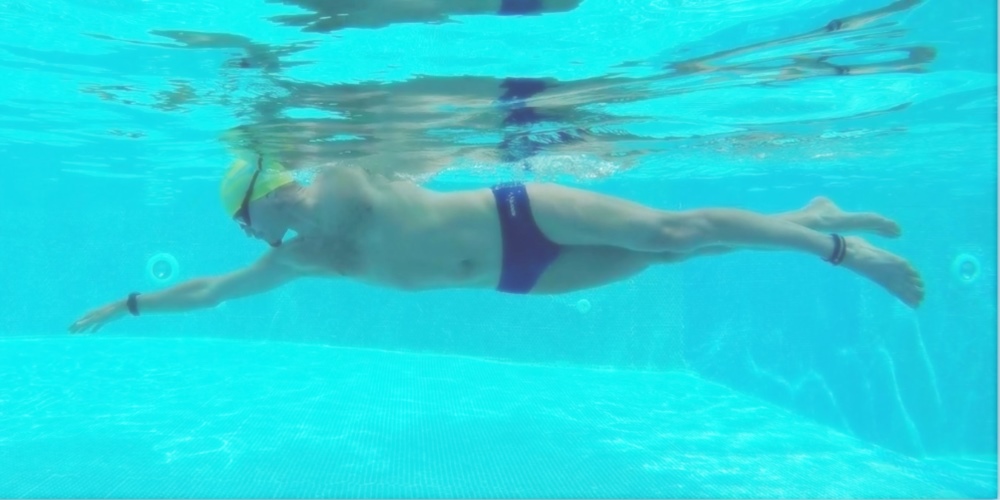
Like a torpedo, think of your body line like a long, firm, sleek, weight (more evenly) balanced from rear to front. Think of the body traveling parallel to the surface and just below it.
Let us use a couple analogies here to make the point…
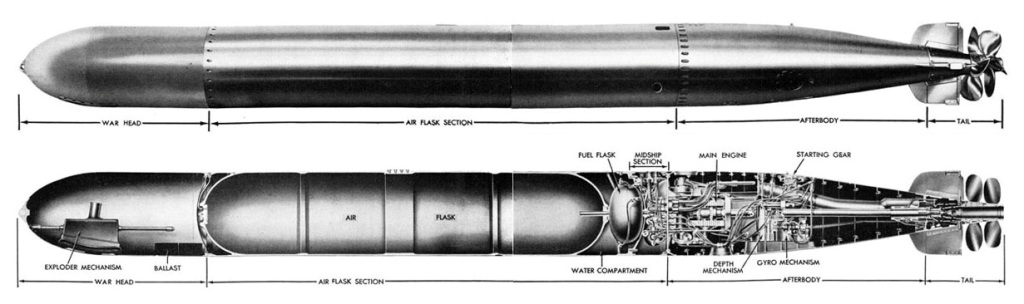
First, imagine a long, straight, firm torpedo. The torpedo is very straight, very solid, and aims straight for the target with no deviations up/down, side-to-side. The force from the motor in the rear is transmitted along the torpedo frame, into the water-cutting edge in front.
This is what you want your spine, from tip of your head, the your tail, and even down the imaginary line between your ankles, to look and feel like. The tip of your head, where the spine would project if it were continued on a laser line, is the tip of your torpedo. Aim that tip underwater, down the lane in the direction you are traveling.
This means your eyes will be looking straight down at the bottom of the pool, not forward, not even a little bit.
Your shoulders and your hips will be locked together, forming a single, solid torso unit. When the torso rotates, the shoulders and hips rotate together as one unit. And, when the torso rotates, the head remains anchored, not turning. The torso turns around the stationary head.
This alignment and and this firm connection along the spine means less stress and more protection for the neck and spine. For anyone who has had neck or back problems, this is good news.
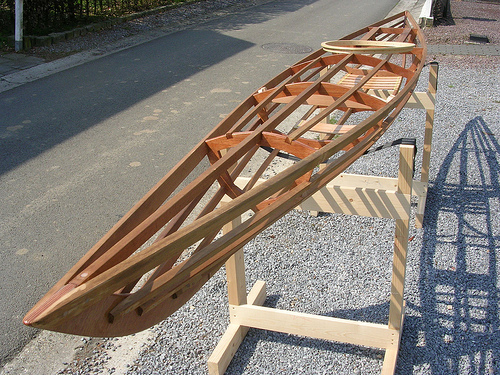
And, now imagine a long, sleek, firm wooden kayak frame. Once wrapped with a tight covering, that internal frame provides two services to the vessel:
1. The water can push up and support the entire vessel evenly.
2. The frame can receive and transmit the force the paddler creates with each stroke of the paddle.
By simply putting your body into a certain shape and then holding that shape firmly, continuously, the water can more easily support your entire body at or near the surface, and when you apply propulsive force, the body can transmit that to the water-splitting edges in front.
If the body is not fully firm, then the water presses up against the body less uniformly. The buoyancy in the upper half of the body cannot lend its buoyancy to the lower half.
If the body is not fully firm, then when you sends a wave of force into it from the stroke, the body absorbs that wave rather than transmit it to the front, where it can be put to work parting water ahead.
This frame alone may not be enough to bring the lower part of the body up to the surface and hold it there perfectly, but it will make it a lot easier, once you add the other three features and some forward motion.
Our very first drills in the freestyle lesson series are going to help you build this frame and learn how to use it to keep the body parallel to the surface (perhaps a bit longer than you could otherwise), and to transmit forces through your body more effectively.