
Forums › Personal Discussion Zone › PDZ Users H through M › Louise.go Discussion Zone › 2021 12 New Swimmer Louise.go
Please type your comments directly in the reply box - DO NOT copy/paste text from somewhere else into the reply boxes - this will also copy the code behind your copied text and publish that with your reply, making it impossible to read. Our apology for the inconvenience, but we don't see a convenient way of fixing this yet.
-
AuthorPosts
-
December 6, 2021 at 17:14 #32270
Jamee Small
Keymaster21/12/06 Lesson Notes
Well done, Louise. It was a pleasure meeting and working with you today.
Based on your goals and starting skills, we can customize a course that suits you best for the couple lessons we do together. This will include gaining more comfort with your air management, finding your balance in both front and back floats, building a frame to apply some propulsion and rescue breath from for a safe travel in the water.
You may find that as we explore these skills, you become curious about new skills you’d like to explore with Coach Mat come January.
—
Introduction
Each activity we do will aim to…
- Build dialogue between you and your holistic body
- Define your proprioception in the aquatic environment
- Learn to hold Discomfort and Relax the Mind and Body
- Shape Body Structure
- Incorporate Air Management Skills
As we progress your list of passive and active details and skills will grow. To best incorporate these skills and not overwhelm the system, we use drills and cues. I will give you a drill (a shape or activity for the body) and ask you to hold one cue (a skill, a body part, sensation, or movement) at a time until it becomes more familiar and comfortable. Eventually it will become easier to hold and balance two cues, eventually three at the same time, and so on. In the meantime, you may like to organize your body into sections.
- Head and Spine
- Shoulders and Arms
- Hips and Legs
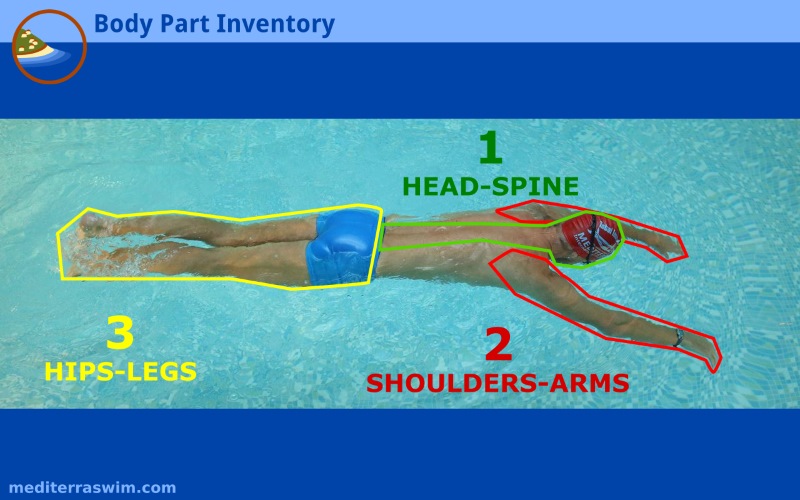
For example – You can use this organization while working through drills and cues by first consider learning to hear your Head and Neck and what it’s doing, where is it and how to does it feel; then relax it fully; followed by noting the ideal shape and structure you want to hold it in for that activity; then incorporate the air management.
There is a lot of feedback in the pool environment. It can easily distract and even overwhelm the nervous system from the activities at hand. To help isolate and alleviate some of the pressures, you may consider using Support Structures as outlined in How to Use Support Structures until you feel more confident with the skills and activities.
Introduction to Air Management
You breath all day, every day, from the first day until your last day. Unless their is a change in physical condition or environment, our access to air and ability to breath is unconscious. Once a change in ability or environment is introduced where oxygen access is potentially compromised, like in the water, your nervous system will make breathing your top priority. We see this even in the best of swimmers in how their head tilts up in a stroke or the reaching and lift of the head during a breath to get closer to air. It’s a natural instinct. But allowing it to go unexamined and work outside of our control, can compromise our comfort, ease and efficiency in the water.
To allow the body to relax and be free to position in the body in the ideal shape, you must first understand how air management works in the water, listen to the natural warning signs the body communicates, and rehearse an ideal rhythm to your air exchange.
There are two main gases that your exercising body needs to deal with. It needs to take in oxygen from the air and deliver it to your cells. And it needs to take carbon dioxide away from the cells and expel some of it from the body. But it is not that simple. The brain is carefully tracking the levels of these two gases in the blood and a certain balance is required between them to trigger the proper responses in the body. The two gases work together in a feedback system inside the body in a process known as the Bohr Effect.
When most people think of breathing distress, they may assume it is a result of insufficient oxygen – hypoxia – like what many high altitude mountain climbers experience when working long hours in thin air. And, it may also be commonly understood that the body needs to get rid of a build up of carbon dioxide or the muscles will start to feel sluggish and slow down. However, just as exercise distress can be triggered by too little oxygen or too much carbon dioxide, it can also be triggered by too little carbon dioxide in the system. That deficiency can be caused by breathing too frequently and too shallow – what is more commonly known as hyperventilation. In this mode of breathing you are you are giving off too much carbon dioxide too quickly (Fried, 1999, p. 26).
To keep relatively comfortable in athletic exertion, the body needs to keep the oxygen-carbon dioxide ratio in a certain range – not too much and not too little – and it does this best by using the proper breathing mode for that activity. To read more in depth on this topic and get some book recommendations see our article on “Could you be Hyperventilating?”
In the Air Management Lesson you will explore not only the means by which to breath in the water (nose and mouth), the platform from which to breath (thoracic, upper chest breathing or diaphragmatic breathing), but also the ideal ratio of exchange (oxygen to carbon dioxide).
Lesson and Practice for Air Management
You may choose to exhale through the mouth or nose, which ever feels most comfortable. However, if your are building up to an active swim stroke, we recommend starting with the nasal exhale and inhale via the mouth as this will be the ideal form of exchange during swimming. A nasal exhale allows you more control and protects against water running up. During all other drills and activities, you will interchangeably hold your breath and exhale, incorporating both sensations.
For each drill, rehearse standing up with head out of the water. Then choose between doing the drill with the body tilted forward and face down in the water or in a squat with the head upright but submerged.
Air Management Drills:
- Diaphragmatic Breathing (Dryland)
- Steady Exhale via mouth
- Steady Exhale via nose
- Fully Exhale, Hold Breath
- Fully Inhale, Hold Breath
- Fully Inhale, Slowly exhale
- Extended Breath Hold
- Extended Breath (with mouth open)
- Submerged Exhale
Air Management Cues:
- Listen for the Body’s Feedback. Where in the body, when (how long do you last) and how (with tension, discomfort, stress in a certain area, or thought) does your body communicate your comfort or lack of comfort during the drill?
- Place hand on abdomen to feel the air compress out as you exhale
- Fast and Forceful Exhale
- Slow and Gentle Exhale
- Medium level of Force, Exhale
- Build up to and aim for 6-12 seconds of control
Practice for Air Management
Repeat the above drills and cues, exploring your body’s response and comfort with each kind of breathing. This is a curiosity exercise and an introduction for the nervous system to the aquatic environment.
Added Activities:
If Air Management in the entire pool environment is overwhelming, practice the following at home.
- Grab a towel and bowl of water in an area of your home you don’t mind getting some water on the floor. Practice your breathing exercises while seated, placing your face in the bowl to hold or exhale.
- In the shower, allow the raining water to hit your face. While here do the following activities. First try holding your breath and feel how the water hits the face (the temperature, the pressure, the rhythm, the skins sensations, etc.). Next Exhale out the nose, removing the face from the water to inhale and return to exhale out the nose. Next, with the mouth open, breath in and out the mouth while water hits the face. Some water will enter the mouth, but you can freely breath in an upright position.
- Over a sink or bowl, with a cup of water, sip and trap some water in your mouth. Hold the water, while breathing in and out or talking. Try gently leaning forward or turning the head on its’ side to feel how the water moves positions. You are able to keep the water without it going down the throat. Avoid leaning back in this activity, it will go down. Let gravity keep it where you want it.
- Before getting in the water, sit on the side of the pool with your feet in the water or on the stairs and practice diaphragmatic breathing, in through the mouth, out through the nose. Listen to the water, feel your breath and allow yourself to find a calming association between breathing and the water.
*Note: If during your other lessons you find the air exchange and drill overwhelming to combine, practice breathing separately at first. When doing the later drills, you may hold your breath until you feel more comfortable with that activity. Once at ease, then incorporate the air exchange to that skill.
Introduction to Balance Basics/Build the Frame
Balance refers to keeping the body parallel to the surface, in the ‘neutral corridor’, or the ‘neutral zone’ between gravity pushing down and water pressure pushing up. This is the corridor where you can swim along without having to waste energy fighting against those two natural forces. We recommend reading further on balance and how it effects movement in the water, in Intro to Build the Frame.
Even as you explore other shapes on the water, your body will seek to find this neutral space. You can play with it, try not to resist as the body bobs around finding balance.
Lesson for Balance Basics/Build the Frame
This lesson will be the foundation in which all other swim strokes are built, which encompasses lengthening, balance and streamline skills.
If you’d like a smooth transition from front float to standing, Front Float Recovery here is a possible solution.
Build the Frame Drills:
- Standing rehearsal of Balance Position (aka Superman)
- Weightless Head in Deadman Float
- Balance Position Glide
Build the Frame Cues:
To help you pay attention, interpret and send commands to particular parts of your body your instructor gave you a selection of cues in each drill. There are more cues on the lists below than you were given in your lesson, as the instructor chose a few to get you going, without overwhelming with too many details. You may be able to figure out the meaning of the others you were not originally exposed to and try them if you’re feeling curious.
- Weightless Head
- Tippy Toes (thighs straight behind torso, toes pointed gently)
- Arms On Wide Tracks
- Arm Straight (no bend at elbows)
- Hands at Target Depth
- Let arms hang heavy
- Shoulder blades (scapula) slide outward and forward (but not strained)
- Keep forearms soft (like a tree branch)
- Keep fingers soft
Practice for Build the Frame
Skills to Develop
- To maintain a neutral head position
- Hold long, straight, firm frame
- Keep arms connected to torso through the scapula
You want to feel your head and upper body fully resting on the support of the water. You want to feel your spine in neutral (good posture), from head to tail, including the legs streaming straight behind. You want to feel as if your body, from head to ankles, is one long, firm fuselage.
Choose 4 or 5 of the cues from the lesson to work on today.
Then, for each cue, work through these activities, as far as you can go successfully. Take one cue and work through the list. Then take the next cue and work through the list again, and so on.
- 5x Balance Position (time of comfortable breath hold) examining one section of the body at a time.
- 5x Balance Position (time of comfortable exhale) examining one section of the body at a time.
December 13, 2021 at 19:30 #32280Keymaster21/12/13 Lesson Notes
*Review Back Float Notes and rehearse both Back Float Breathing and responsive head submersion exhale with a kickboard.
NS Streamline Position Introduction
Besides being used as the foundational shape for the Freestyle Stroke, it is a great position for a stable vessel for both self rescue and gentle movement in the water. You cannot practice Streamline Position too much because there are so many ways to make it better, stronger, more stable.
Imagine how an ice skater, speed skater or cross country skier will rest on one foot or the other, to then transfer weight with a gentle push to glide. That skate blade is long, straight, sharp, and stable. It receives the wave of force and conducts it onto the ice and the skater slides forward. The skater is holds herself with stability on that single skate, over one side of the body, while drawing the other leg forward, getting ready to unleash another wave of force into the other skate on the other side. Stability in this position is crucial to maintaining rhythm and momentum.
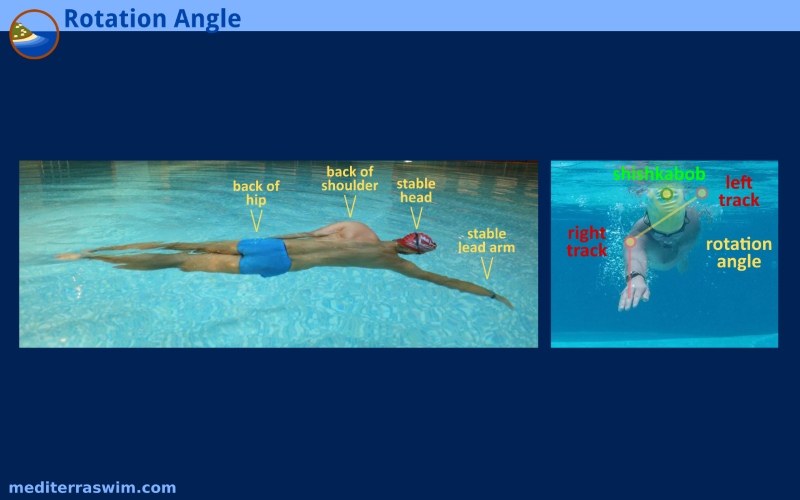
The Streamline Position has some lessons we can learn from this action in ice skating. At this moment in the water, you are shaped into your most streamline position, holding a slightly rotated angle, while leaning (laying your weight) onto that streamline side of the body. You hold this position with stability that comes from core muscle strength and control.
A good streamline position is:
- slightly rotated (about 30 degrees)
- a straight line from wrist to ankle (as seen from above)
- stretched (without twisting or tilting the spine) from wrist to ankle, especially from shoulder to hip
In your lesson you will learn how to form this streamline shape and learn how to hold it with stability for long enough to be able to paddle forward in a relaxed and controlled way.
NS Streamline Lesson Review
Skills:
- To maintain balance skills and…
- Hold long, straight, firm Streamline, from fingers to ankle
- Hold low, stable rotation angle
You want to feel long, straight, sleek and stable at a low-rotation angle in Streamline Position. Along with the sensations from Balance skills, you want to see that you can slide parallel to the line on the bottom of the pool and to slide farther, more easily, the more streamlined and stable your body is. Sliding in Streamline for 6 seconds with these positive feedback signs is a good goal to work towards.
Drills:
- Standing rehearsal for Streamline Position (aka Skate Position)
- Balance Position To Streamline Position
- Streamline To Streamline (aka Streamline > 1 Stroke > Streamline)
- Streamline with 1 Arm Paddle
- Streamline > 2 Strokes >, Streamline
Cues:
To help you pay attention, interpret and send commands to particular parts of your body your instructor gave you a selection of cues in each drill. There are more cues on the lists below than you were given in your lesson, as the instructor chose a few to get you going, without overwhelming with too many details. You may be able to figure out the meaning of the others you were not originally exposed to.
- Cues for Balance Position and…
- Lead Arm stays on Wide Track
- Head Stays Anchored (it does not turn with torso)
- Back hand tucked deep into pocket (keep arm underwater, elbow to ribs)
- Low Rotation Angle (rotate just off your stomach, “Seatbelt” or press streamline side armpit and hip down)
- Upper shoulder blade touches the air
- Lower shoulder blade just below the surface
- Light flutter of the feet (if necessary to prolong time in drill) (See Dryland Flutter Kick for demo)
If you’d like a glimpse into what we’re working towards:
-
AuthorPosts
- You must be logged in to reply to this topic.