
Forums › Library › Swim Course Instructions › DC Synchronization Intro
Please type your comments directly in the reply box - DO NOT copy/paste text from somewhere else into the reply boxes - this will also copy the code behind your copied text and publish that with your reply, making it impossible to read. Our apology for the inconvenience, but we don't see a convenient way of fixing this yet.
Tagged: 2 beat kick, hip drive, kick, propulsion, synchronization, torso rotation
-
AuthorPosts
-
January 1, 2018 at 20:54 #16649
Admin Mediterra
Keymaster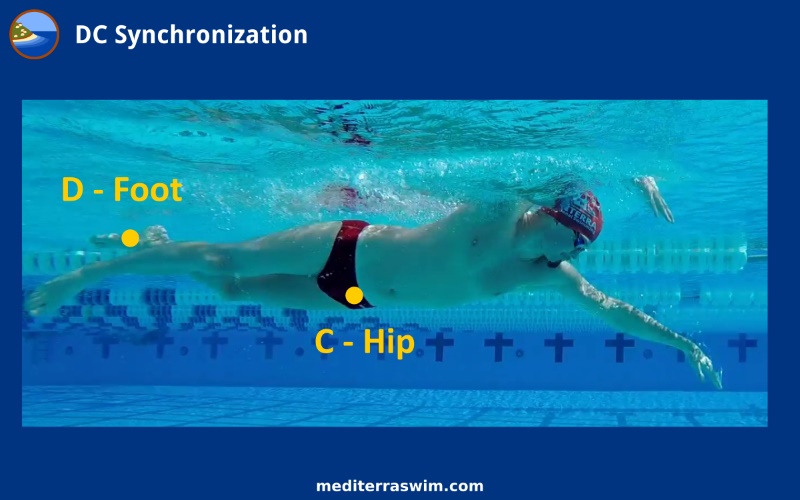
You can begin to synchronize the foot with the torso rotation once you have established the ideal arm switch timing in front, because the foot motion is ultimately going to connect to the lead arm. Without that timing in front, the feet will have a hard time finding the 2BK rhythm in the rear. But before you connect those distant points, you will first work on connecting the press of the foot with the turn of the hip. Again, the hip represents the whole torso unit, but it is easier to focus on just one point of it while establishing synchronization.
Before the torso rotates, you may appreciate how the foot has been positioned in the Counter-Balanced Foot Position, poised, ready to press. Notice in the image above how the Skate side of the body is down, while the Skate side foot is up, near the surface. It is counter-balancing the body. And it is ready to push downward so that the Skate side of the body can rotate upward. The press of the foot offers support, it offers leverage to help the torso turn with a bit more power.
As with the fine tuning of the arm overlap, the timing of the foot has a little room for adjustment according to the tempo of the stroke. At slower tempos, the foot will press a moment after the torso has begun to rotate. At slower tempos, the press of the foot feels like it is helping to finish the torso rotation. At very fast tempos, the foot will press at the same moment the torso begins to rotate. In this case, it may feel like the press of the foot is helping to start the torso rotation. This is very helpful when working at sprinting tempos, where it is harder to keep the torso rotating back and forth to keep up with the demanding tempo.
Instructions
Step 1: Simple Down-Up Foot-Hip Connection
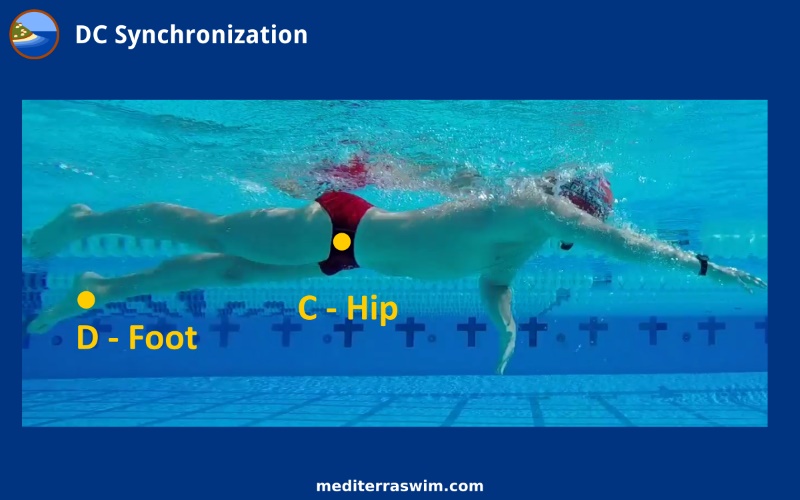
Use the press of the foot to help rotate the hip (of the same side) toward the surface. The foot is moving down and the hip is moving up in response. This is the simple down-up connection. Notice in the image above, how the foot is now down and the hip of the same side is on its way up toward the surface.
And, it will be helpful to practice working just one leg, one side repetitiously. Remember that the 2BK is just one foot pressing in one arcing path. The other foot is not pushing back in the opposite direction. So practice working just one leg at a time, over and over again, while the other practices holding pointed toes.
Step 2: Use Hip Torque
As instructed in our 2 Beat Kick Introduction, now notice how the turn of the ankle corresponds to the turn of the hip. Rather than press straight downward, bending the knee and pushing with the thigh, keep the knee fairly straight (allow the slightest flex) and twist your ankle in order to activate torque in the hip socket. Create that ‘Crescent Moon’ pathway with your toes. This is the more effective way to direct the press of the foot. By arcing the toes from ‘pigeon toe’ inward to ‘toes outward’ this action torques the hip joint, urging the whole torso to rotate with it. This is how you genuinely generate a ‘hip-driven’ kick. Use the torque of the muscles surrounding the hip joint, rather than pressing downward with the thigh muscles as you would with a normal flutter kick.
Review the 2BK drills in the Video Tutorials page to tune up how you perform the kick action.
Step 3: Refine The Timing Per Tempo
Since each swimmer’s functional tempo range is a bit different from any other’s, you will need to do some experimenting to set the best timing of the kick to match each tempo zone (slow, medium, brisk) you work in.
For your slower comfortable tempos, let the press of the foot lag slightly behind the start of the torso rotation.
For your fastest tempos, let the press of the foot start immediately with the start of the torso rotation.
And for your medium tempos, let the press of the foot start somewhere in between.
Step 4: Refine The Pressure
It is tempting to kick abruptly or ‘snap’ the kick, but resist this. When you understand how the press of the foot is suppose to enhance the torso rotation, then you need to slow down that kick and make the pressure steady and continuous as possible during the time the torso is rotating. Try to make the press of the foot last longer, to support the torso rotation longer.
Match the rate of speed of the foot press to the rate of speed of the rotation. It won’t be exact – the foot will certainly move a bit faster – but aim for this match as much as possible. If the foot snaps too quickly, it sends a wave of force that can’t be fully absorbed into the torso rotation, and this becomes another form of ‘power leakage’.
-
AuthorPosts
- You must be logged in to reply to this topic.