The purpose of the recovery swing
The purpose of the recovery swing
(12:02)
by Coach Mat Hudson

(12:02)
by Coach Mat Hudson
This is the general outline for your Distance Practice:
The distance and complexity for each distance set is designed according to the stage. You will find the specific set for each practice listed on this training plan.
There may be one or two main sets, with total distance between 800 to 2000 meters.
Work around RPE 3 to 4, with the expectation that improvement in control over breathing will lower your sense of effort from RPE 4 to 3.
On each distance set you will need to pick 1 or 2 focal points from that week’s practice.
Level 1 swimmers may work on holding a single focal point for one lap and then switch to the other focal point for the next lap, or you may hold one focal point for the entire repeat.
Level 2 swimmers may blend two focal points together to challenge your control further.
You will need to insert rest between each distance interval. I have given recommendations for rest above, on this webpage.
The challenge level (the neurological complexity) is determined by the focal points you choose and the standard for quality you set for each of those focal points.
Your quantity objective is to hold the assigned SPL for each set. Your quality objective is to successfully achieve your focal point goal 60-90% of the drill or interval at 2 or 3 Star performance (see Simple Rating System for Your Practice Results article above for definition of Quality Star Rating).
When you notice yourself failing to achieve your objective for the task that is the trigger for you to find the possible cause so you can make adjustments in your focal point or adjustment in your task complexity. If you are failing to meet your standard for more than 50% of the time you may add more rest, or adjust SPL (adjust by +/- 1 stroke for 25m, or +/- 2 strokes for 50m).
This is the general outline for your Tempo Practice:
The distance and complexity of these tempo sets are designed according to the stage. You will find those sets listed for each practice plan.
To begin you will need to experiment (if you don’t already know) to find a tempo that feels quite natural to you already. This would be a tempo that is comfortable to hold for as long as you can swim right now. We will call this TC (for Tempo – Comfortable).
The main sets will total about 500 to 2000 meters.
Work around RPE 3 to 4, with the expectation that improvement in control over breathing will lower your sense of effort from RPE 4 to 3.
The challenge level (the neurological complexity) is determined by the focal points you choose and the standard for quality you set for each of those focal points, and the tempo at which you try to perform.
For Level 1 swimmers you may keep the tempo at TC for the entire course – though I anticipate you will feel like increasing it slightly within a few weeks, as your breathing gets better. You are free to keep it the same or increase slightly, according to the prescriptions in the practices.
For Level 2 swimmers I will recommend tempo increases at each stage (or per week). In the first week you will keep you tempo at TC. The tempo will increase in certain increments, no more than -0.02 steps at a time.
I will give those recommendations, but again, you will need to adjust a little more or a little less to suit your individual needs.
Your quantity objective is to hold the assigned tempos for each set. Your quality objective is to successfully achieve your focal point goal 60-90% of the drill or interval at 2 or 3 Star performance (see Simple Rating System for Your Practice Results article above for definition of Quality Star Rating).
When you notice yourself failing to achieve your objective for the task that is the trigger for you to find the possible cause so you can make adjustments in your focal point or adjustment in your task complexity. If you are failing to meet your standard for more than 50% of the time you may add more rest, or lower the tempo slightly (by .01 or .02 seconds).
This is the general outline for your Attention Practice:
If not already assigned in the practice plan, for each main set choose any three (3) of the activities below and do them in the order that they are listed below:
While doing drills you may stop and stand when you need a breath, or use interrupted breathing. I highly recommend that you do the drills in short repeats (6 to 10 seconds at most) and give your brain quick reset opportunities with each break for breathing.
Each main set will be about 5 to 15 minutes or 300 to 800 meters long. A different skill project will be assigned to each main set (those sets are given below on this webpage).
Work around rate of perceived effort (RPE) 2. The physical effort should be moderate, while the mental effort should be very high.
The challenge level (the neurological complexity) is determined by the focal points you choose and the standard for quality you set for each of those focal points. Read about this topic in the links above.
Focal points will be suggested for each Main Set, and you may choose any to suit your individual needs. You may choose 1 or 2 focal points to use for each set.
You may view many more of from our collection on the 101 Cues for Freestyle page.
Level 1 swimmers may use one single focal point and practice the discipline of holding attention on that one focal point.
Level 2 swimmers may blend two focal points together and practice at that greater level of complexity.
In addition, I urge Level 2 swimmers to practice counting strokes on much of their practice sets, to monitor the external effects of focal points. Make it a habit (that you can turn on/off as needed).
If the skill requires training one side of the body you may break the set into two rounds and concentrate on one side on the first round, then concentrate on the other side on the second round. This can make it easier to hold attention and build control.
Remember, your objective for these attention practices is to improve control, not accomplish distance. Choose quality over quantity every time.
Level 1 swimmers need to practice counting strokes on each full, whole stroke length. I explain the importance of this in Why count strokes?
Level 2 swimmers need to practice improving stroke count (if you are not using an SPL within your Green Zone) or holding your intended SPL consistent on every length (if SPL is in Green Zone already).
So, be ready to count strokes on most of your full swimming lengths in this class.
Your quantity objective is to achieve the distances for each set. Your quality objective is to successfully achieve your focal point goal 70-90% of the drill or interval at 2 or 3 Star performance (see Simple Rating System for Your Practice Results article above for definition of Quality Star Rating).
When you notice yourself failing to achieve your objective for the task that is the trigger for you to find the possible cause so you can make adjustments in your focal point or adjustment in your task complexity. If you start to do much better then notice what specific change you made to affect that improvement – then protect and memorize that change.
(6:00)
by Coach Mat Hudson
(18:49)
by Coach Mat Hudson
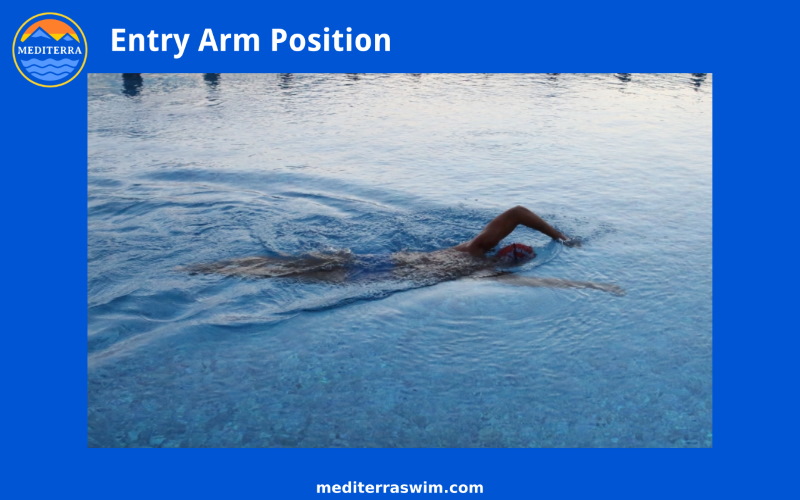
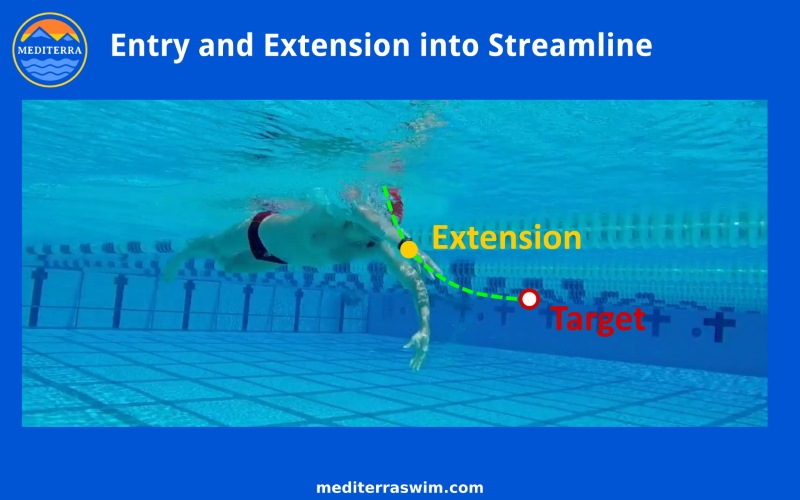
The entry and extension into streamline is how you deliver force into forward motion. The hand enters at a certain location, near the head, in front of the shoulder. It drives down into the water steeply, like traveling down the start of an Olympic ski jump. Then the arm begins to extend underwater, and its path levels out as it reaches target depth, straight in front of that shoulder. Then the arm continues to extend and reach, piercing the target, which brings your body into its best Streamline Position. Your body is lengthening and becoming more streamline with each microsecond. In this way, you receive the three forces from the recovery arm momentum, from gravity, and from the catch and convert all that into acceleration.
Below is an outline for how we form the entry and extension, and you will find some additional focal points and diagrams on the 101 Cues for Freestyle page under the Entry And Extension section.
The entry has a certain timing, a particular pathway and a certain smooth speed to make it most effective. The better your Entry and Extension into your best Streamline Position, the more that force is transferred into forward motion.
Let us reiterate this again so that it sinks in: The whole emphasis of the stroke is to Send Force Forward through the Recovery + Entry + Extension into Streamline. Everything else, including the catch, supports this primary action of sending the vessel of your body forward. This is the finish of the freestyle stroke. Treat this section of the stroke cycle as the important moment everything else has been preparing for.
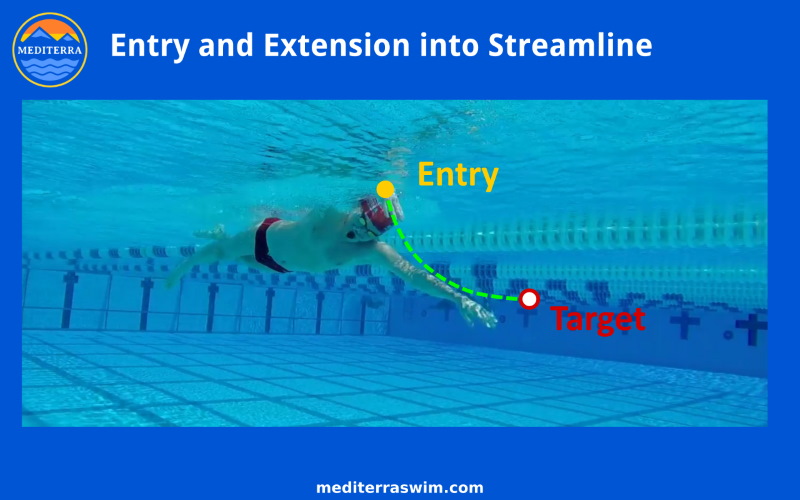
The forearm begins to enter close to the head, in front of the shoulder, with a steep angle, as if driving downward… at first. You are only going to start at a steep angle, but it will not stay this way.
Remember, the goal is to Send Force Forward, the arm must be underwater as it extends toward the target. This requires an early entry position and a steep entry angle so that the arm can harness the rotational force of the torso into parting water molecules in front of the body.
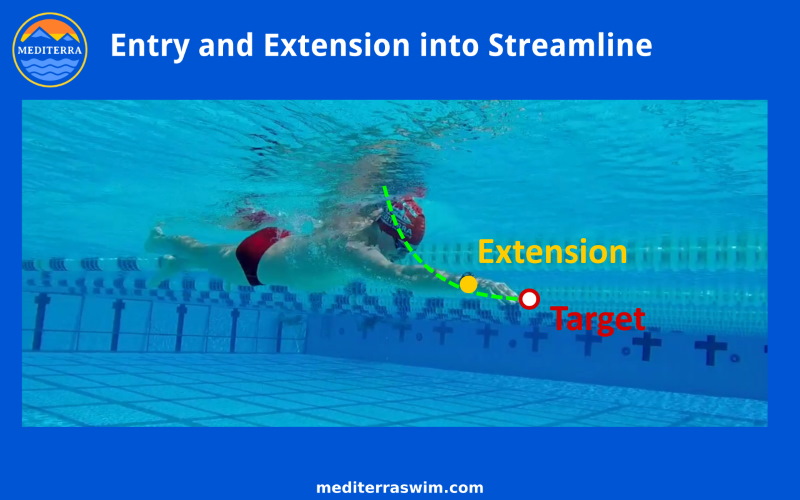
The arm drives down, on a curving path, to target depth and then levels out as it aims to pierce the target. The hand should come to a depth just below the lowest point of the body line. Notice that the emphasis of the lead arm is to stretch forward, not downward.
Notice how long and straight the body is on the streamline side. The swimmer is fully extended and continuing to emphasize the reach. He is not ‘twisting’ into an over-rotated position in order to reach. The side of the body is lengthening, as if he was going to pierce the target with his wrist.
(12:12)
by Coach Mat Hudson
Hip mobility and leg strength in swimming
(10:52)
by Coach Mat Hudson
You’ve worked on building each section of the stroke – the entry, the body rotation, the catch, and the leg press – section by section. They are intended to work together as a harmonious whole, not separately. Eventually, you need to practice connecting these parts and then refining those connections to create a smooth and powerful whole-body propulsive movement.
When these parts are connected and timed well, they do not merely add up, the magnify the power you can utilize in each stroke. When the propulsive movements of the body are coordinated in this way, they provide a thrilling sense of acceleration on each stroke!
When these parts of the stroke are not connected well, it causes what we call ‘power leaks’ in your propulsion. You may be harvesting free force from gravity, you may be generating momentum with the recovery swing and the torso rotation, you may be anchoring your catch hand, but if all these parts are not connected together and timed well, a great portion of the force generated in one part of the body cannot be transferred to another where it would be used – it is burned up as friction or stress inside the body and wasted in moving water around rather than moving your body forward.
Synchronization practice will help tie each piece of the movement together, and plug those power leaks.
Synchronization practice is something that may likely occupy most of your training attention in your advanced stages of development. When there is any change in speed, intensity or in the conditions of your swim, there will likely be a need to adjust and refine your synchronizations to fit those precise conditions. There is only a perfect synchronization arrangement for this moment right now. When the conditions change you may feel a need to make fine adjustments to the synchronization to feel smoother and more efficient in that unique set of conditions. That is why it becomes a frequent focus in one’s advanced training. It is infinitely improvable and it is always rewarding to make synchronization a little better so it becomes a perpetual source of interest and pleasure.
We divide the body into four main propulsive parts and work on synchronizing all four of them together to create this one smooth, harmonious whole propulsive movement on each stroke.
However, it is hard for the brain to focus on all four of those at once. Instead, we work on synchronizing just two of those parts at a time, and work around through each combination over and over again, gradually bringing all of them into better harmony without having to focus on all four together at the start.
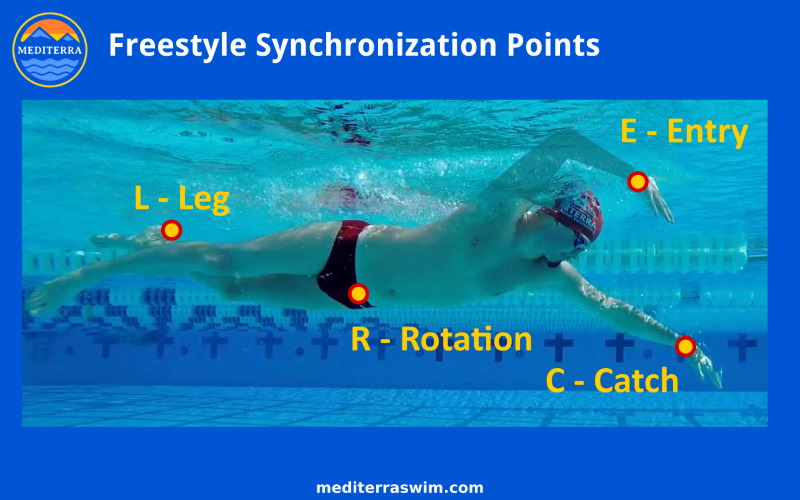
Sync Combinations you will practice:
Later on, as the nervous system grows familiar and the synchronization of each combination becomes more autonomous in the brain’s control, you’ll find you can zoom out and hold in attention more parts at one time, like ERC, LRC, and LRE.
In this lesson series we are going to get acquainted with the three basic ways of using tempo constraint in your first stages of advanced skills training.
You will use the BEEP to draw your attention to a particular part of the body at a particular moment in the stroke cycle.
For example, you can choose to coordinate the BEEP with the entry, or the catch, or the rotation, or the press of the leg.
Set the Tempo Trainer Pro to your current comfortable tempo TC.
Swim 4x 25 (one length) for each of parts of the stroke mentioned above.
You will practice swimming at a slightly uncomfortably slow tempo. This will create a good challenge for your ability to maintain balance, stability and streamline. Read a bit more in Why Practice at Really Slow Tempos?
Start at your current comfortable tempo TC and swim 2x 25. Then slow down the tempo by +0.05 seconds and swim another 2x 25. Count strokes while you do this and for a while, as you slow tempo down, you should find that you take fewer strokes to get across the pool. When you slow down the tempo farther but your stroke count no longer goes down in response to it, then that is a sign that you’ve reached the limits of your ability to squeeze more travel out of extra time between strokes.
Spend some time working at that slowest tempo where you can just barely hold your lowest stroke count and maintain control over your balance, stability and streamline. You may find that your brain starts to adapt and it gets a little easier (before you get too tired).
Note: swimming with tempos slower than 1.80 seconds per stroke is an extremely slow tempo. It would be remarkable if one can swim much slower than this and continue to lower their stroke count, but it might be possible…
You will practice swimming at a slightly uncomfortably fast tempo. This will create a good challenge for your ability to maintain precision and timing of your movements. Read a bit more in Why Practice at Really Fast Tempos?
Start at your current comfortable tempo TC and swim 2x 25. Then slow down the tempo by -0.03 seconds and swim another 2x 25. At this stage in your training we won’t require you to count strokes – that will come in later stages – but as you speed up the tempo, at some point you will notice that you feel too rushed in your movements, and you are losing control over your body position, your shape, or the precision or coordination of moving parts. This is a sign that you’ve reached the limits of your ability at this time.
Spend some time working at that fastest tempo where you can just barely hold precision, timing and coordination of moving parts. You may find that your brain starts to adapt and it gets a little easier (before you get too tired).
You start with paying attention to the connection of two synchronization points at a time (like EC, or CR), examining and refining them. After working with related pairs for a while, you may ‘zoom out’ to hold attention on hold three points at a time (like ECR), feeling how they all work together. In the end, you intend to have all four working in smooth synchronicity, but it will be easier to arrive at that when you work on these in pairs, rotating through the combinations.
Eventually, all the individual pieces are brought together here in the full stroke to create a smooth, powerful, synchronized, whole-body propulsive movement.
In your session or practice time you should examine each of these combinations several times, making observations about how well the parts feel connected and moving smoothly together.
The moment the entry hand (E) pierces the water is the moment your lead arm (C) sets the catch. If that entry happens a little too late or a little too early, then you are not able to connect the rotation power to the catch.
You may read more detail about the The Entry and Catch Combination.
One view…
ER: The entry arm (E) is entering and extending underwater and the body rotation follows after it, as if the torso is pulled by an elastic band.
A second view…
RE: The extending arm (E) underwater feels as if it is being pushed forward by the rotation of the body. It is another way of viewing the same connection as ER.
You may read more detail about The Entry and the Rotation.
The catch arm slides into catch shape (C) but then hesitates for a microsecond as rotation begins, then the catch arm can gradually increase pressure and shift the loading to the back muscles, lightening the load a bit on the smaller shoulder muscles. Imagine an elastic band tied from the hip to the wrist, and as the hip turns it pulls the wrist of the catch hand with it.
You may read more detail about The Catch and Rotation.
The press of the leg (L) in a downward arc helps rotate (R) the same side of the torso upward.
You may review the previous lesson on the Leg Press.
Being connected through the torso, the press of the leg also assists with the catch – the press of the leg downward (by helping the torso rotate upward) lightens the loading on the catch arm slightly.
You may read more detail about The Leg Press and the Catch.
Being connected through the torso, the press of the leg (L) on one side of the body helps the entering arm (E) extend fully into Streamline Position on the other side of the body.
You may read more detail about The Leg Press and the Entry.