by Admin Mediterra | Aug 6, 2020 | Fundamental Skills
This is an outline of the main drills, cues we may use while introducing you to the Interrupted Breathing skill.
Drills
Here are some demonstrations of how to practice…
Cues
Here are the main cues to help you with critical parts of body position and movement…
- Turn towards open side (‘through the window’)
- Rotate head first – the turn of the head encourages the torso to turn
- Rotate with the Hip
- Keep head underwater as you turn
- Turn on the ‘shishkabob’ spine – keep head perfectly aligned with spine
- Bubble out from the nose until nose and mouth breach the surface
- Keep lead arm anchored deep as is comfortable (in Backstroke Streamline position)
- Keep the smallest face out of the water while breathing
- Relax head and neck once in neutral
- Water should brush the top of your goggles
- Exhale from nose as face rotates under
- Relax head and neck once in neutral
by Admin Mediterra | Jun 1, 2020 | Practice Design
For measuring progress objectively and for supporting motivation we recommend that you conduct a test swim periodically. Depending on your needs and how demanding the test might be on you energy, you might do this once a week, twice a month, once a month or so.
First, select the distance and condition that fits your current abilities and that will be long enough to test the skills you are working on.
When you choose a test swim to start with, use that same test swim throughout the course so that results can be more easily compared. If your test swim starts to feel too easy and you want to increase the challenge (a wonderful sign of progress!) you may:
- Move up to a more difficult test in that same level (= less rest).
- Move up to the next level (= longer distance).
Suggested Test Swims
We have some recommendations (distances can be meters or yards):
Beginner – 200 total (choose one of the sets below)
- 200 (no rest)
- 2x 100 (20 seconds rest)
- 4x 50 (20 seconds rest)
- 8x 25 (20 seconds rest)
Intermediate – 400 total (choose one of the sets below)
- 400 (no rest)
- 2x 200 (15 seconds rest)
- 4x 100 (15 seconds rest)
Advanced – 800 total (choose one of the sets below)
- 800 (no rest)
- 2x 400 (15 seconds rest)
- 4x 200 (15 seconds rest)
Essential Measurements
Try to measure at least one quantity and one quality during the test swim. If you can do more than one that is good, and you might have a friend on deck help you keep track. Remember, the qualities are the first place to look for improvements. Improvement in qualities will eventually produce improvement in the quantities. So, remain observant to the qualities and be loyal to their development over quantities in this foundation training phase.
Quantities to measure:
- Total time
- Time per split (for each 50 or 100, if possible)
- Stroke count on each length (or every 2nd, or 4th length)
- Changes in amount of rest (taking more or less than assigned)
Qualities to measure:
- How precise was my control over a certain body part? (how close did it come to my best)
- How consistent was my control over a certain body part? (how often did I achieve my best)
- Overall, how much easier to move did it feel?
- How much smoother did it feel?
- How much less stress was there?
- How much less effort was there? (in terms of heart rate, breathing intensity)
- How much stronger did it feel?
Recording Results
We HIGHLY recommend that you keep a training journal and record data from your practices and test swims.
If you are receiving attention from a coach, he/she will certainly want to view these results.
by Admin Mediterra | Jun 1, 2020 | Advanced Skills
Skills for Catch and Hold
In this lesson you will work through a series of drills to help you:
- Build better catch shape to generate more resistant force
- Empower the catch/hold with the torso rotation, so that the torso muscles do more of the work
- Improve the catch pathway – straight back so the body slides straight forward
- Improve the smooth, steady sense of pressure through the whole motion
The cues below will help you create and improve these three features in your catch action.
Drills for Catch and Hold
Cues for Catch and Hold
- Set the catch (or ‘gather inward’)
- Hand stays on track with the shoulder
- Elbow slide out and upward to make shape of arm
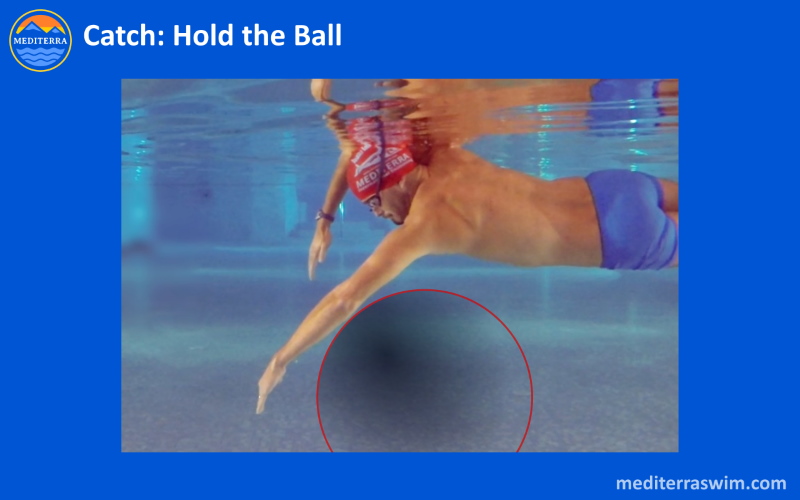
- Touch the ball with entire forearm and palm
- Hold the ball and rotate body past it
- Press the ball straight toward the hip – hips rolls out of the way at last moment
- Press the ball straight toward the toes – send the ball of water under hip and leg
- Press the ball steadily
- Catch hand and extending hand move (on their tracks) exactly opposite to each other, at approximately the same rate of speed
- Hesitate ever so slightly after ‘Set The Catch’ in order to Load The Torso
- Pull with hip (not with shoulder)
The entry and extending arm is the main actor, while the catch arm is the supporting actor. Set a good catch and then focus upon transferring force across the body, forward, into your best Streamline Position. The better your Entry, Extension and Streamline, the farther you will slide forward on each stroke!
by Admin Mediterra | Jun 1, 2020 | Advanced Skills
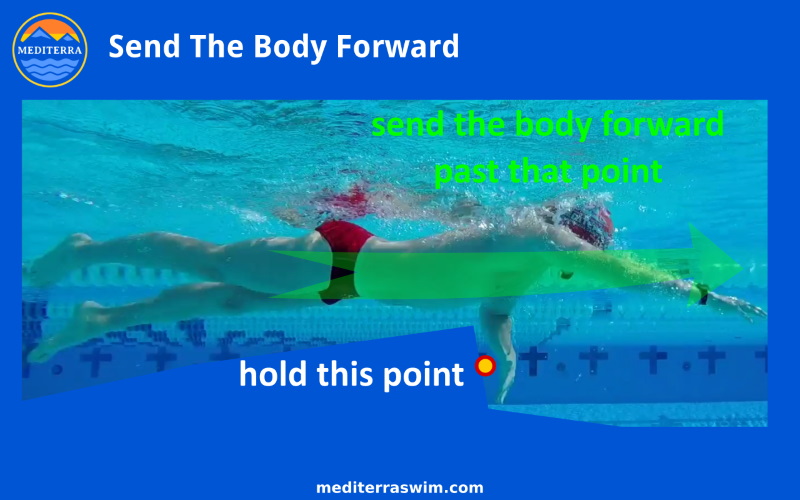
In conventional swimming, the underwater part of the freestyle stroke is called the pull (or pull/push) phase because in that tradition, the emphasis of the whole stroke is about pulling on the water to move the body forward. We prefer to call it the ‘catch and hold’ phase because our orientation is about holding a point in the water and sliding the body forward, past that point. Our emphasis is on the body moving forward, not on pushing water backward. In this view, the main emphasis of the stroke is to Generate Forward Momentum delivered into the Streamline side of the body, while the catch is in a supporting role.
We have waited until the Freestyle Advanced series to present this skill because the Catch and Hold is meant to serve what the body is doing in those fundamental skills. Those skills need to be in place so that the Catch and Hold can have the intended effect.
Explaining the Catch and Hold
As noted above, the Catch and Hold does not work well apart from its coordination with other parts of the stroke. When the catch is connected to the torso rotation, the force of that catch can be transferred into the torso. When the torso is connected to the entry and extension arm, that force can be transferred into that side of the body, producing better forward motion. All three need to be tied together in a smooth choreography, and when they are, you feel a wonderful acceleration in each stroke.
In the Generate Forward Momentum lesson you developed the First Connections, which includes the optimal arm switch timing – this timing is necessary in order to transfer that force from the catch side to the entry/extension side of the body, through the torso rotation. If the timing of the arm switch timing is too late or too early, then less of that force can be transferred from one side to the other.
Three Components
This effective forward propulsion depends on the three components each doing their part and being well-synchronized with the others:
- the Catch generates a wave of force
- the Torso Rotation transfers that wave of force from the catch side to the entry/extension side of the body
- the Entry/Extension into Streamline Position receives and delivers that wave of force into forward motion
In the Catch and Hold lesson you are learning to form a more effective catch to generate more force, then connect that to the torso to transfer that force from one side of the body to the other, and connect that to the entry actions to transform this into forward motion.
Skills for Catch and Hold
The better you perform the catch and hold, the bigger the wave of force you may transmit to the other side of the body.
The quality of this wave depends on:
- The shape of your catch arm in order to get a bigger grip on the water
- Loading the torso muscles, more than shoulder muscles
- The pathway that catch action follows
- The pressure applied – steadily through the motion, not too abrupt, and not too weak but just right
The cues below will help you create and improve these three features in your catch action.
Creating the wave with an arm is not enough – it must be tied into the torso rotation so that the torso is doing most of the work of holding the water, which mean it is transferring that force from the catch side to the streamline side of the body. So, the lesson starts with a focus on only the catch arm and torso, and eventually adds the other side of the body, completing the full choreography.
In this lesson you will work through a series of drills to help you:
- Build better catch shape to generate more resistant force
- Empower the catch/hold with the torso rotation, so that the torso muscles do more of the work
- Improve the catch pathway – straight back so the body slides straight forward
- Improve the smooth, steady sense of pressure through the whole motion
Useful Imagery For Catch and Hold
During the lesson you will likely be given these images/analogies to work with:
- the ‘beach ball’ of water molecules (or ‘swiss ball’, or ‘pilates ball’ if you prefer)
- the underwater aluminum ladder, under your body, parallel to the surface
The Beach Ball
The beach ball of water molecules represents the pressure zone of water you create and direct with each underwater stroke. When you initially form the catch shape, you are gathering water molecules – or more specifically, you are creating a ‘traffic jam’ or ‘pressure zone’ of water molecules against your arm, and this pressure zone which offers resistance to your arm. You form this pressure zone of water, and by pressing on it, you leverage your body forward through the rotation.
Another way of viewing it, is that you press and send this ball of water under your body, and your body rides over the top. More specifically, you create a layer of pressurized water and slide your hip and leg over the top, helping them stay up near the surface.
The Ladder
The ladder gives you a directional grid, it gives you fixed locations in the water, to set the position and trajectory of your movements.
The two rails correspond to your two arm tracks. Your lead arm extends forward on that rail, while your catch hand holds a fixed point – a rung – on the rail. The rungs represent the point ahead where you set your catch (get a grip on the water).
The depth of this imaginary latter is set at the depth of your catch, in the layer of water just below your body. That is where you want to get a grip on the beach ball. That is where you want to create the pressure zone of water that the frame of your body can slide over.
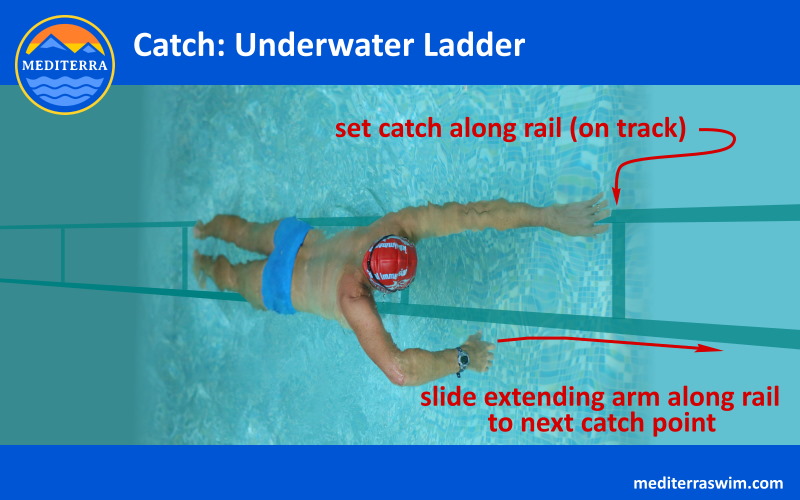
Imagine if there really was a ladder in the water underneath you. Imagine reaching ahead, getting a grip on a rung, and then pulling on it in order to slide your whole body forward past that rung. Your pulling hand would be fixed – it would not slide to the side or up/down. It would stay at the same depth, on the same track, while the body rotated around it, smoothly sliding forward, up the ladder, with your lead arm reaching for the next rung. Likewise, your body would not be sliding to the side or up/down, but stay parallel to the surface and to the ladder, simply sliding forward in the opposite direction of your pull.
by Admin Mediterra | Jun 1, 2020 | Fundamental Skills
Practice Sets for Integrated Breathing
Skills To Build
• To maintain the First Connections
• To turn and return the head without disrupting that ideal stroke pattern
• To feel as little disruption to The Frame and Streamline Shape as possible
• To make breathing feel the same on either side
Breathing easily depends greatly on the strength of your stroke skills which support it. You want to feel your body long, straight, and firm in Streamline as you turn and return the head from breathing. The turning of the head should not disrupt the position of the body, nor force the movement of the recovery arm. Use the thrust of the catch and aim your body in Streamline to slide the upper body near the surface so the head is right there at the air already.
Practice Set for Integrated Breathing
Choose 2 or 3 of the cues from the lesson to work on today.
Then, for each cue, work through these activities, as far as you can go successfully. Take one cue and work through the list. Then take the next cue and work through the list again, and so on.
• 4 to 6x, for each side, Balance Position to Streamline with ‘Nod’
• 4 to 6x, for each side, Balance Position to Streamline with ‘Split The Face’
• 4 to 6x, for each side, Balance Position to Streamline with ‘Hooked Fish’
• 4 to 6x, for each side, 3 Strokes To Streamline
• 4 to 6x, for each side, 3 Stroke, 3-Part Breathing, 3 Strokes
• 4 to 6x, for each side, 6 Strokes with 1 turn to breath (no pauses)
• 4 to 6x, for each side, 9 strokes with 2 turns to breath along the way
• 2x length of pool, for each side, turning toward air on every 4-2-4-2 strokes
• 2x length of pool, turning toward air on every 3 strokes
by Admin Mediterra | Jun 1, 2020 | Fundamental Skills
Lesson for Integrate Breathing
When we are following a standard freestyle lesson series, in the first two or three lessons we build the Four Essential Features of the freestyle stroke, and then come to Integrate Breathing, which depends on those features.
Below is the outline of the skills, drills and cues, with links to video demonstrations of the drills. The following lists of activities and the lists of cues may contain more items than you experienced in your lesson. The instructor will watch the time and your pace of learning and choose a certain sequence of activities and the few most relevant cues for you to work with.
Integrate Breathing
Skills For Integrated Breathing
1. Position of Head and Lead Arm
2. Timing of Turn
3. Air Management (exhale/inhale)
Drills
These drills are listed, starting with easiest, in order of increasing complexity:
• Standing rehearsal, Turning the Head with arms moving from Balance Position To Streamline Position
• Balance Position to Streamline with Nod
• Balance Position to Streamline with Split The Face
• Balance Position to Streamline with Hooked Fish
• 3 Strokes To Streamline, with Turn to Breath
• 3 Strokes, 3-Part Breathing, 1 Stroke
• Whole Strokes with Nod
• Whole Strokes with 3-Part Breathing
• Multiple strokes – breathing every 4 strokes (breathe to one side on each length)
• Multiple strokes – alternate Interrupted Breathing and Rhythmic Breathing
• Multiple strokes – breathing every 3 strokes (alternate breathing sides)
We may also do some Air Management drills to help with exhale and inhale:
• Standing rehearsal – Bubbles from nose
• Standing rehearsal – Clear The Airways
• Standing rehearsal – Quick Sip of Air
In each drill we may use three stages for developing the head position, starting below the surface and gradually working to a ‘sneaky breathing’ position with half the head still in the water…
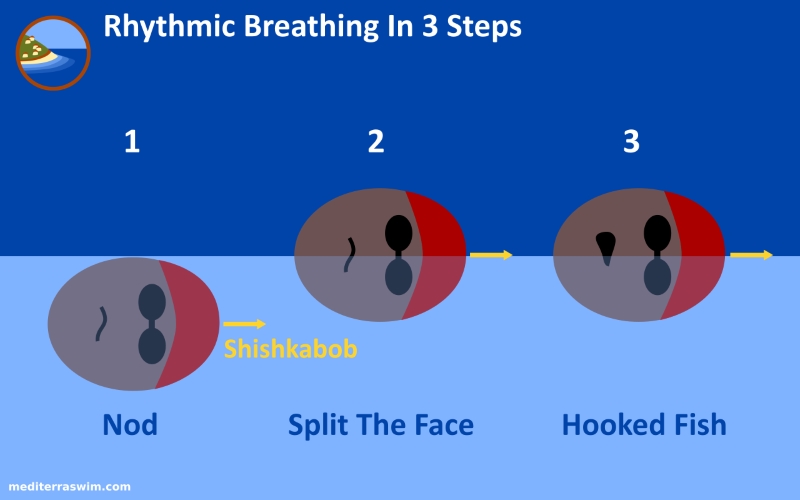
First, Nod to the side, both goggles underwater, looking directly at the wall, then quickly turning back to face-down position.
Next, Split The Face, and keep the shishkabob underwater pointing straight ahead. One goggle underwater and one goggle above water. The mouth is half in, half out of the water.
Next, reach the cheek and the lips up to the air. Kiss the air with the lips. You may not attempt to breathe during the first tries of this just to make sure you can touch the air. Then, when you feel more confident that air is there, you may attempt a quick sip of air.
Cues For Position
• Keep head in line with spine
• Tip of the head is underwater
• Turn head on spine axis (shishkabob spine)
• Head remains flat (on pillow) while turned toward air
• Keep extending lead arm while turning/returning the head
• Cheek up, forehead down (you don’t breathe with both goggles out of the water)
• Tilt head down further than you think (your sense of ‘flat’ may not be truly flat)
Cues For Timing Of Turn
• Turn head right with start of the catch
• Turn head right with start of entry (turn away from entry arm)
• Turn a bit faster than torso is turning (but not whiplash)
• Touch the air just long enough for a quick inhale
• Return the head to face-down immediately
• Return the head before recovery arm comes over head
Cues For Air Management
• Steady bubbles from the nose
• Burst of air as mouth touches air, to clear the airway of water
• Emphasize the exhale – body needs to rid of CO2, not need more O2
• Squeeze out with abdominal muscles
• Partial, frequent air exchange (rather than massive, complete empty/fill)
• Quick sip of air
by Admin Mediterra | Jun 1, 2020 | Fundamental Skills
Integrate Breathing Introduction
In order to work on Breathing skills, we have first worked on establishing the Four Essential Features of the freestyle stroke:
1. Build The Frame
2. Form Streamline Shape
3. Generate Forward Momentum
4. Make First Connections
These four features create the foundation upon which you may perform easier breathing.
Previously you learned how to pause the stroke and roll onto your back to breathe in the Interrupted Breathing position. In Integrated Breathing, you turn only half-way, where the here the breath is integrated into the stroke rhythm rather than pausing or disrupting the stroke.
Though absolutely necessary to swim more than a few seconds, breathing is an advanced skill because it is a dependent skill. It is dependent on the foundation features of The Frame, the Streamline Position, and the First Connections. When these features are in place learning to breath rhythmically is much easier. When these are absent breathing will challenging to learn.
Integrated Breathing
There are a lot of little details to making breathing rhythmic and easy – there are so many details it can feel overwhelming to work on all at once. To make it more manageable we’ve arranged them into 3 categories and you work on them in this order of priority, so the skills come together more easily.
Skill Categories for Integrated Breathing
1. Positioning of Head and Lead Arm
2. Timing of Turn
3. Air Management (exhale/inhale)
Positioning
The two main features of Positioning are the head position and the lead arm position.
Head Position
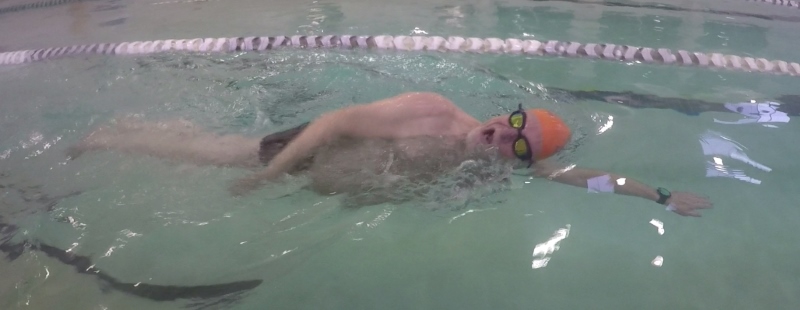
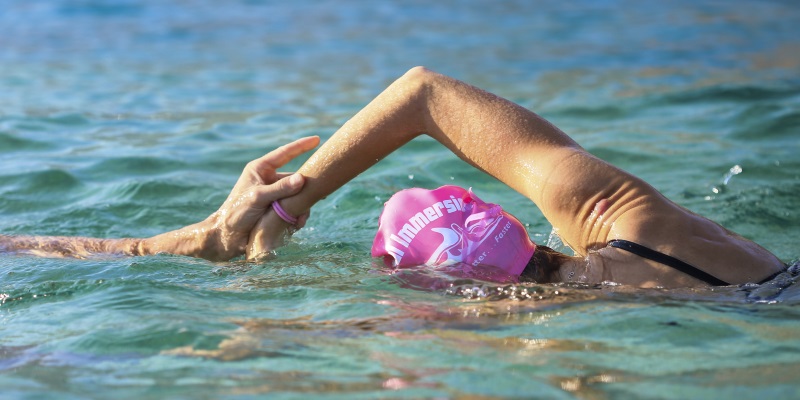
Head position is absolutely critical – the more you trust and lay that head down flat, the easier it is to get the mouth to air. This is counter-intuitive to the land-mammal brain, which urges you to tilt the head up above the surface of the water. But you don’t need the head to be out of the water to breathe – actually you just need the side of the mouth to reach up into the air.
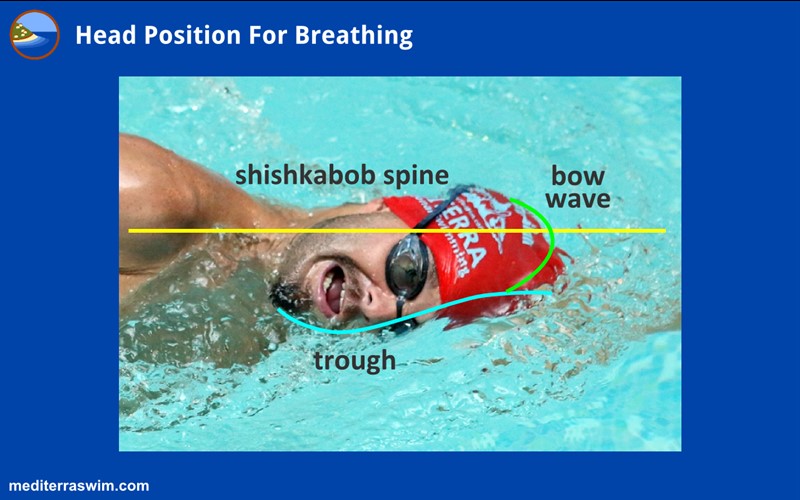
The more of the head you can down in the water, the less you provoke gravity, the less drag created from the act of breathing. And more, by keeping the head down in the water (as seen in the image above) the head pushing through the water creates a bow wave which then creates a trough, or dip in the water right where the mouth is so that you can actually keep the mouth even lower. This is called ‘sneaky breathing’.
However, this is an all-or-nothing situation – if you tilt your head even just a little bit, that removes the bow wave and the trough and then you have to lift the head even higher out of the water to get the mouth clear. In our lessons we work on getting you into that sneaky breathing position. If it is too difficult at first to get into this position, then we’ll help you keep the head low in the water and turn the face farther up, toward the air, rather than tilt the head up.
Characteristics Of Best Head Position
• Head is in line with the spine (no tilt)
• Side of head is laying on the ‘water pillow’
• Half the face is underwater while turned
• The chin and mouth are reaching farther sideways, above the surface
Lead Arm Position
And, while turning to breathe and returning the head to face-down position, the body remains extending in Streamline Position. In particular, you must keep that lead arm extending forward. Again, the land-mammal instinct is to push down on the water with that lead arm in order to push the head up above the surface. The drills are meant to give you the opportunity to resist and override that old instinct.

Timing Of The Turn
The turning of the torso creates the window of opportunity for turning the head to that side to breathe. But that window is much wider than you need. You could turn early in that window of time, in the middle, or later. The best moment to turn is as soon as possible, and come to the surface as soon as possible, and return to face-down position as soon as possible – to take advantage of the moment of the stroke where there is the most acceleration, the most lift.
The later you turn, or the longer you stay, the more problems there will be because later in that window there is no more propulsion, the body is decelerating, the body is dropping lower in the water and the recovery arm is starting to come over the body, increasing the press of gravity on the body.
Characteristics Of Head Turn
• Begin turning right with the start of the catch
• Turn a bit more aggressively than the torso is turning (but not ‘whiplash’!)
• Touch the air with the mouth just long enough to make a quick sip
• Return the head immediately to face-down weightless position
Air Management
In freestyle there is an asymmetric pattern to breathing, which is not normal for humans. There is a long period of time in the non-breathing strokes where you are exhaling, and then a very brief moment where you inhale and refill the lungs.
You need to avoid two extremes:
1. Holding the breath on the non-breathing strokes (no exhale underwater)
2. Massive exhales (or emptying the lungs completely)
Rather, to stay most comfortable, aim for a partial air exchange, using only about 1/3 to 1/2 of your perceived lung volume. Always keep a portion in reserve. The goal is to take smaller but more frequent breaths, so that you could afford to skip one from time to time as interruptions in your access to air is common in pools and open water.
As breathing skill increases, it will feel easier to get to air, and it will be less disruptive to your stroke rhythm so you will feel like you can afford to take breaths more often.
Three Parts Of Breathing
1. Exhale underwater
2. Clear The Airways
3. Quick Sip Of Air
Exhale Underwater
You control the volume through the exhale underwater. When swimming is light to moderate in intensity, you aim for exhaling from the nose only, mouth closed. As intensity increases you may add exhale from the mouth as well.
On the first non-breathing stroke, you may hold the breath for a moment or give the smallest bubbles from the nose. Then as you take the second and third stroke, anticipating the upcoming breathing stroke, you may start to gradually increase the intensity of the exhale, measuring it so that you come to the right volume just as your face breaks the surface to begin inhaling.
Clear The Airway
Let’s use a little technique from our aquatic cousins.
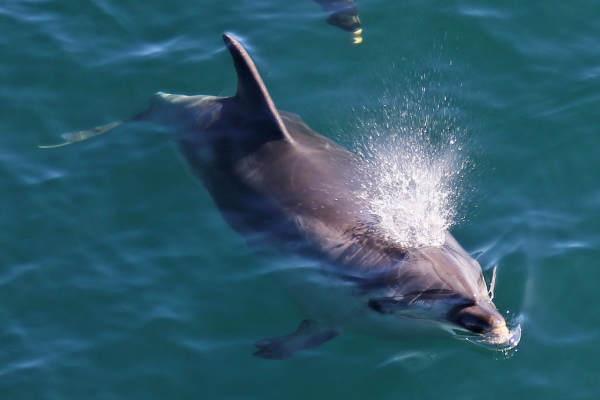
As the face is turning toward the air, right at the moment the nose and mouth are about to break the surface, you compress the diaphragm to send a blast of air out the nose and mouth to push water away from those openings.
This will help the brain feel more comfortable immediately taking an inhale. The compression of the diaphragm will prime the lungs to immediately start pulling air back in without you having to forcefully do it.
Quick Sip Of Air
The time that your face is out of the water is brief and precious. Do not waste any of that time exhaling, since you can do all of that underwater. When the mouth clears the water, everything needs to be ready to inhale immediately.
And, you are aiming to take just a quick sip of air, to top off the lungs… if you’ve carefully exhaled just a partial amount. Then turn the face back down immediately. Do not linger with the face at the surface.
Keep in mind that the farther you turn your mouth away (above) the surface of the water, the farther the head turns, the longer it will take to turn the head up and the longer it will take to get the head back to face-down weightless position. If you need to take a longer inhale, you may turn the face farther up toward the air, and be aware that you may need to pause the stroke briefly to allow for this extra time, without disrupting the stroke overlap once you resume the arm movements.
by Admin Mediterra | Jun 1, 2020 | Fundamental Skills
Practice Set for Make First Connections
Skills To Build
• To maintain recovery swing skills and…
• Have the entry arm be pulled in by gravity
• Connect the entry and torso rotation
• Have the entry arm slide in without a splash, no waves
• Have Lead Arm hold extended position until Entry
• Slide into your best Streamline Position
Practice Set for Make First Connections
Choose 2 or 3 of the cues from the lesson to work on today.
Then, for each cue, work through these activities, as far as you can go successfully. Take one cue and work through the list. Then take the next cue and work through the list again, and so on.
• 4 to 6x, for each side, Standing Entry To Streamline
• 4 to 6x, for each side, Streamline Swing to Balance Position for 6 seconds (time of comfortable breath hold)
• 4 rounds of ‘4 to 6x Streamline Switch with pauses’
• 4 rounds of ‘4 to 6x Streamline Switch without pauses’
• 4 rounds of gradually faster swing, gradually bring forearm out of the water
• 4 rounds of ‘6 to 8x whole strokes’ holding the same cue (no breathing)
• 2 rounds of ‘4x whole strokes, Interrupted Breathing, 4x whole strokes’
by Admin Mediterra | Jun 1, 2020 | Fundamental Skills
In the second freestyle fundamental lesson we work on building skills for the recovery arm swing and entry, while relying upon the skills for The Frame and Streamline Shape.
This lesson will build the third and fourth of our Four Essential Features of the freestyle stroke.
And, here is the outline of the skills, drills and cues, with links to video demonstrations of the drills. The following lists of activities and the lists of cues may contain more items than you experienced in your lesson. The instructor will watch the time and your pace of learning and choose a certain sequence of activities and the few most relevant focal points for you to work with.
Skills
- Hold stretched, straight, stable Streamline Position
- Wide recovery arm swing
- Elbow leads, moves forward continuously
- Momentum builds parallel to surface
- High Elbow at Entry
- Continuous, fluid motion, from Exit to Entry to Streamline
- Recovery Arm ‘lifts’ off the torso for a moment, almost weightless
Drills
There are three sections to this whole Recovery movement that we need to construct:
- The exit – how the elbow and forearm and hand will leave the water
- The recovery swing – how the shoulder slides and arm swings from back to forward position
- The entry – how the arm is positioned to enter the water, and the pathway it follows to Skate
Recovery Swing and Entry Drills
These drills may be used for Exit, Recovery Swing and Entry skills:
Streamline Swing is where you hold Streamline Position on one side and then practice swinging the recovery arm on the other side, in slow motion. There is no switching of the arms.
2-Arm Slot To Streamline is where you are standing in shallow water, with one arm in entry position, the lead arm in front and that side leg forward. Then you fall forward over your leading leg, as the face touches the water, switch arms, and slide into Skate Position, and slide forward for a couple seconds.
Streamline Switch is where you start in Streamline, swing the recovery arm, then pause just a moment at entry, then switch the arms, slide into Streamline, and repeat on the other side.
In Streamline Switch, once you remove pauses, your stroke is continuous and smooth. Your movements are getting closer and closer to normal-speed, whole stroke swimming. As you gradually speed up the motion of the swing, you may also gradually lift that forearm out of the water (let the hand go wider to gain clearance), up to the point where your fingernails are still brushing the surface.
Cues
Cues for The Exit
- Flick elbow outward (‘elbow nudge your buddy’)
- Swing elbow wide (swing out, not up behind the back)
- Shoulder blade slides, pulling the elbow
- Elbow pulls the hand – hand is hanging below
- Exit The Sleeve (pull forearm and hand out of water as if extracting from a jacket sleeve)
- No splash exit (the arm slips quietly out of the water)
Keep attention on the very moment before the elbow exits the water to begin the recovery swing. Pause there a moment, with arm extended down, alongside the body. Keep the elbow underwater, tucked against the waist, in order to override the instinct that pulls the elbow up in the air, behind your back. At the end of the underwater pull, as the elbow arrives beside the waist, that is the moment it needs to swing out wide from the side of the body rather than going high behind it. Once you set the elbow on the correct path, it will be much easier to keep it going in the right way, swinging wide beside the torso.
It is so important that you start the recovery swing in the best way, right from the exit moment. This sets the stage for the rest of the swing. If there is an error in how your arm exits the water, it will create error through the entire recovery swing. Be patient to get this exit moment down well.
Cues for Recovery Swing
- Open the Gate
- Swing hand a bit wider (create equilateral triangle shape)
- Relaxed forearm and hand (‘rag doll arm’)
- Drag the knuckles (until the last moment, then swing hand forward)
- Push the Dot forward (dot on the elbow bone)
- Swing, then slide the shoulder blade all the way
- Elbow reaches shoulder line before wrist
- Keep fingertips in contact with surface (a.k.a. ‘dragonfly fingertips’)
You may start practicing the recovery swing slowly, like a robot, which will keep your torso deep and the recovery arm mostly underwater in drill mode. But eventually, as the precise movement pattern becomes more familiar, more comfortable, you must speed up the motion so that it is fluid and fast enough to feel like the arm is truly swinging, light-weight, lifting off the torso for a moment.

Cues for The Entry
- Elbow swings forward in front of the head as far as comfortable
- Elbow high above ear (like a tent over the head)
- Feel the stretch in the back as you reach entry position
- Feel BOTH shoulders slide toward the ears, bracing the upper spine
- Forearm aiming straight ahead on track
- Forearm angling down steeply (45 degrees)
- Hand entry position across from opposite (lead arm) elbow)
- Rotation slides the arm in and forward
- Ski jump shape entry path – Slide down to target depth and then extend forward
- Spear wrist through your target
by Admin Mediterra | Jun 1, 2020 | Fundamental Skills
Using Rotation Power
The human body is designed to use rotational force to empower many movements: walking, running, throwing, kicking, punching, rolling, and swimming too. The spine creates an axis from top to bottom which the mass of the body rotates around. The rotating body, with appendages attached can generate a lot of force in a rhythmic manner, which increases efficiency and endurance of movement. A single rotation of the body creates the wave of force which travels down one of the appendages to reach the point where it can do some work like throwing or kicking a ball, or swinging the leg forward in running. The arm or leg receives and directs more force from the rotation than it could generate on its own. The torso has mass and it has the prime mover muscles which can do the main work of swimming for longer periods of time. The arm muscles are put to work directing this rotation force. When the arms are in this cooperative role with the body’s rotation they can tolerate work a lot longer than if they were trying to work independent of it.
Ideally in swimming freestyle, you will use the rotation to empower both the entry/extending lead arm as well as the catch and hold on the other side of the body. In order for the single rotation to empower both of those actions at the same time, those two need to happen at the same time, with rotation. When the catch and hold is connected to the rotation it generates force that is taken into the torso. When the entry and extension is connected to the rotation at the same time it receives this force and directs it into the streamline shape where it is converted into forward motion.
The problem is that humans are not natural swimmers and the body is not shaped ideally for it. The land-mammal instinct in water is to pull and push with the appendages and not use the rotation power of the torso rotation in a coordinated way. This instinct almost always disconnects the catch and pull arm from the torso rotation, and because of this humans, even many elite swimmers, tend to be shoulder-powered swimmers more than torso powered.
Why? They are not timing both arms to move with the torso. The rotation will wait for the entry arm, because it’s rotated position is holding that arm above the surface of the water. The untrained human swimmer, meanwhile, will impatiently pull with the lead arm before the body is ready to rotate (because its still waiting for the recovery arm to come forward!). When they do this, they are pulling without the empowerment of the rotation and so that arm has to pull against the water using the smaller, more quickly tiring shoulder muscles.
It is possible to swim fast and far without using the rotation to empower the catch and hold, but it is very tiring, and greatly increases the risk of shoulder injuries.
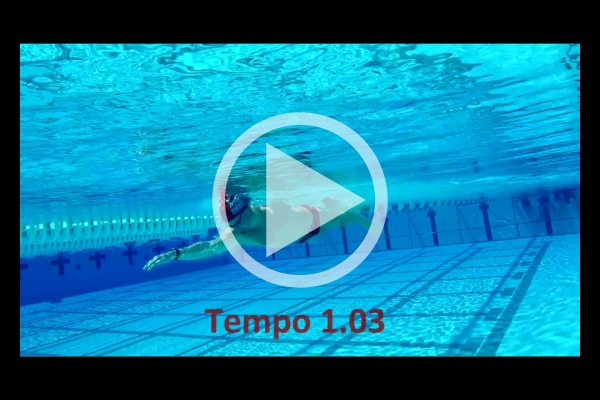
There is only one moment where the two actions – the entry/extension on one side and the catch/pull on the other side – can be synchronized to tap into the torso rotation at the same time. Right here…
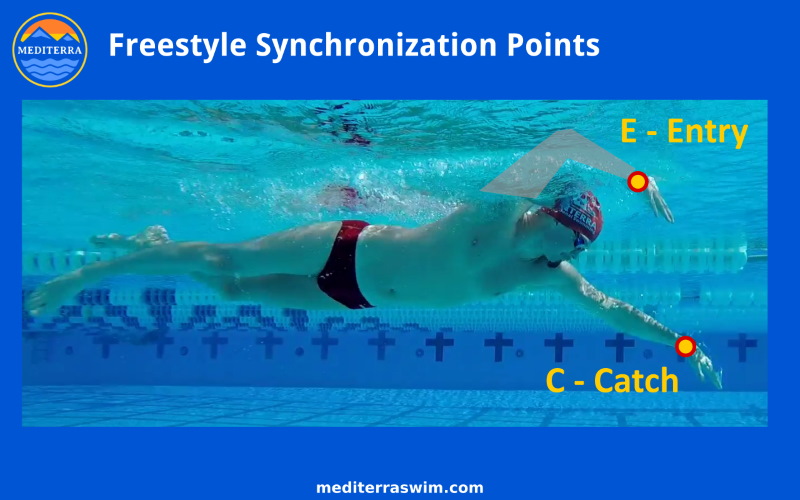
The Ideal Position
The lead arm must wait (rather, it must keep extending forward) until the recovery arm has come all the way forward into entry position. Only then can the two sides be empowered by the rotation. There is a little room for adjustment on this depending on how fast and intense you are swimming – it could be slightly sooner or slightly later – but this is approximately where the arms need to be when the body starts to rotate.
If you set the catch too soon, then the shoulder muscles are taking the entire load. If you do this, once moving through the catch phase without that initial connection to the rotation, you cannot connect to its power later in that phase. You’ve lost the opportunity. In most untrained swimmers observed, most of the catch phase will be finished before the body even starts rotating. If you set the catch too late (as if coming back into Balance Position before setting the catch), then the body has finished the best part of its rotation and not much rotation is left to empower the catch phase. Most untrained swimmers fall into the former category. Some swimmers who were given some clue about this may end up exaggerating it and falling into the latter category. Both need to be brought closer to the optimal arm switch timing.
The rotation-empowered stroke requires what is called asymmetric stroke timing or in other words, overlapping the arms in front of the head before they switch. This general concept is also known as ‘front-quadrant swimming’ but that is a vague term which can mean different things to different swimmers. This asymmetric stroke timing does not come instinctively, but once you take the time to train this into the stroke choreography it opens up a great deal more control over energy and pace. Once you can control the connection of the arms to the rotation, you can begin to control your stroke length, which is the foundation of building speed.
You may view this video to see the optimal arm switch timing applied to this stroke at 1.03 second tempo.
Without focusing on it directly, the drills for the Recovery Swing also set up the critical timing of the arm switch. As you were doing in the drills, your streamline side of the body remain long, firm, and the lead arm should continue extending forward, until the recovery hand arrives at the entry position. This is the best switch moment. Switch a little too early or a little too late and you lose the effect.
You may notice the feeling of acceleration on each stroke when you shaped the entry and timed the arm switch like this. This is exactly the magic we are looking for as these pieces come together!
Memorize this entry position and timing (in the picture above). This is where your recovery arm should be when you set the catch on the lead arm. That lead arm needs to learn to keep extending forward until the other arm reaches this position.
This will get you very close to tapping into the longer lasting muscles of the torso. However, just because the arms are timing with the rotation does not mean they are tapping into that muscle power as much as they could be. Deeper perception of fine timing and muscle activation is required. During the lesson we will look for this connection and help you begin to feel it. Yet, this touches on skills you will study more thoroughly in Freestyle Advanced and after that, the Master Class Synchronization.
by Admin Mediterra | Jun 1, 2020 | Fundamental Skills
Forward Momentum Introduction
This introduction refers to the third of our Four Essential Features of the freestyle stroke: Generate Forward Momentum.
The Recovery Swing
In traditional swimming and land-mammal thinking, the main action of the stroke is pull-pull-pull back on the water with the arms. It is not so important how the arms get forward to get back into position to pull again. But understand that the recovery and entry and slide into Streamline Position is the most important moment of the whole stroke because this is where you deliver force into the most effective place to make your body accelerate forward.
So it is extremely important to bring the arm forward in a certain way to create this acceleration effect.
Imagine how a baseball pitcher winds up and swings his torso and arm in a special choreography in order to throw a ball extremely fast with great precision in a certain direction. His rotation and arm swing generate a wave of force that travels down his arm and reaches the fingers at the moment he’s ready to release the ball. The ball receives that waves of force and shoots forward out of his hand and toward the target.
So too, you are using the carefully shaped and directed swing of your arm and the torso rotation (at entry moment) to send a wave of force down your arm as that arm enters and extends under the water, in the direction you are traveling. Whereas the baseball pitcher delivers force into the ball and then the ball travels away, in the case of swimming your body is the projectile. This wave of force drives into the water molecules ahead of you and gets them moving out of the way so that your body can occupy that space ahead. That is how you move forward.
The primary purpose of the whole stroke is about generating force that flows through the body and into that streamline shape, in order to part a path through the water ahead of you. The shape, motion and direction of that recovery swing is the start of this action. How you swing that arm, and direct it into the water have a tremendous effect on how well your body moves forward, at what energy cost. You must create a wave of force in the direction you intend to travel.
The ‘wind up’ or delivery of that force-forward in the forward direction requires the recovery arm to come forward in a particular manner. The shoulder slides and arm swings in such a way that they move parallel to the spine, never pulling or pushing it. That arm lifted up into the air draws gravity, and it builds momentum as it swings its weight.
At the entry moment, that force of gravity pulling downward is used to pull the arm and the high side of the body back down into the water, and the forward momentum is channeled into that arm extend forward underwater, parting water molecules. The whole body then slides behind that extending lead arm.
This is the ‘wind up’ for delivering force forward, into the water to cut a path ahead. The body slides into Streamline Position as the wave of momentum travels through it, sliding it forward, until the other arm is ready to enter on the other side, repeating the same process again.
Overall, we want to create three main features in the Recovery swing movement:
1. The shoulder joint ‘opens up’, sliding parallel to the spine, to swing freely, with the least tension or internal resistance.
2. The elbow leads the way, fingers hanging below, barely brushing the surface.
3. The swing of the arm builds momentum in the forward direction, no other direction.
4. The swing of the arm is fluid, almost weightless feeling

In this video you can observe the characteristics we’re trying to achieve in at normal stroke rates.
by Admin Mediterra | Jun 1, 2020 | Fundamental Skills
Skills To Develop
- To maintain balance skills and…
- Hold long, straight, firm Streamline, from fingers to ankle
- Hold low, stable rotation angle
You want to feel long, straight, sleek and stable at a low-rotation angle in Streamline Position. Along with the sensations from Balance skills, you want to see that you can slide parallel to the line on the bottom of the pool and to slide farther, more easily, the more streamlined and stable your body is. Sliding in Streamline for 6 seconds with these positive feedback signs is a good goal to work towards.
Practice Set
Choose 2 or 3 of the cues from the lesson to work on today.
Then, for each cue, work through these activities, as far as you can go successfully. Take one cue and work through the list. Then take the next cue and work through the list again, and so on.
- 4x on each side Balance Position To Streamline for 6 seconds (time of comfortable breath hold)
- 4 rounds of starting in Balance Position for 1 second, then Streamline Position for 2 seconds, then take 4 strokes
- 4 rounds of ‘6 whole strokes’ holding the same focal point (no breathing)
- 2 rounds of ‘4x whole strokes, Interrupted Breathing, 4x whole strokes’
- 2 rounds of 2x length of pool, whole strokes with interrupted breathing
