by Admin Mediterra | Sep 26, 2020 | Fundamental Skills
If you’ve had a live lesson with Mediterra you may have been introduced to the Counter-Balance Leg Position (CBL). Just as the front of your body is locked into Streamline Position while the recovery arm is swinging forward, in the back end, you would lock your feet into the CBL position so that the entire body underwater is counter-balanced and stabilized during that recovery swing. The CBL provides these advantages:
- It helps counter-balance and stabilize the asymmetric rotated Streamline Position in front.
- Coming into CBL position absorbs the rotation force of the torso rotation that flows down the legs, keeping them straight behind the body rather than sway side to side on each rotation.
- The particular position of the legs creates a line of tension through the Streamline Side of the body which urges the legs to stay near (parallel to) the surface.
- It is the position with legs poised for the next 2 Beat Press – no additional movement is needed to get ready to press the leg.
Perhaps the easiest way of finding the leg position by making the Skate side foot ‘pigeon-toed’.
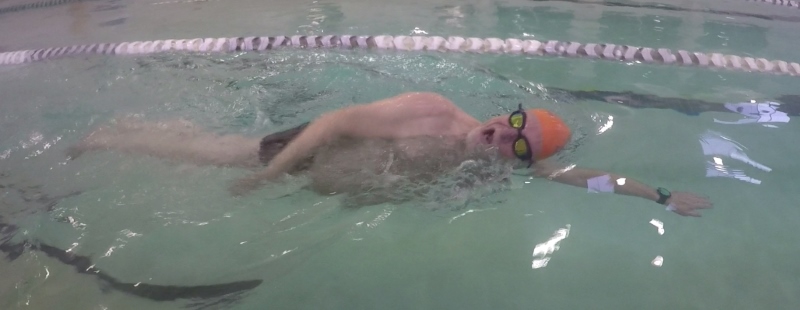
While keeping the knee fairly straight, turn the big toe of the Streamline-side foot inward and pointed at the heel of the other foot. Turn the big toe far enough that it urges your hip to turn with it. You’ll notice that this turn of the foot, corresponds to the turn of the hip, which supports the rotated Streamline Position. In the image below notice how the upper (Streamline side) foot has the big toe behind and pointed toward the ankle of the other foot. This is the CBL position.
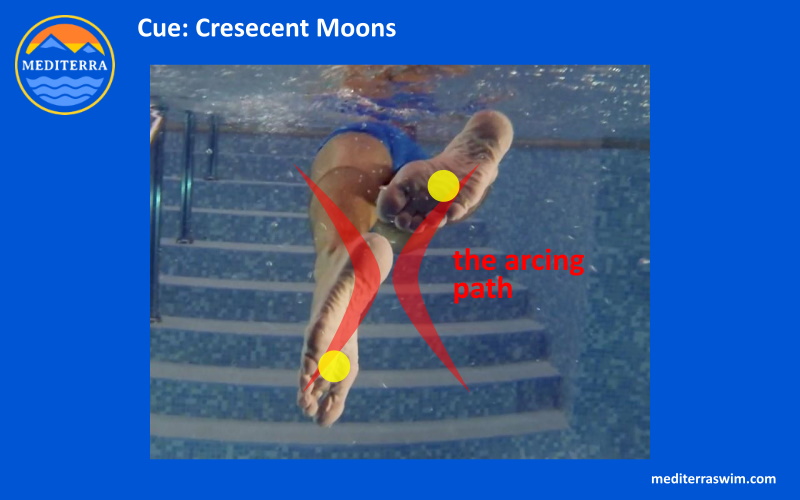
I used the ‘pigeon toe’ term to give us an , but I also use some other pictures to get the idea across, such as the ‘Crescent Moons’ term in the image below, to convey the arcing motion the feet make when switching to the other side. This image shows the feet in the counter-balanced leg position. This would also be the position of the (upper) foot poised to press down in an arc for the 2 Beat Press motion.
The Counter-Balanced Leg position seen from behind.
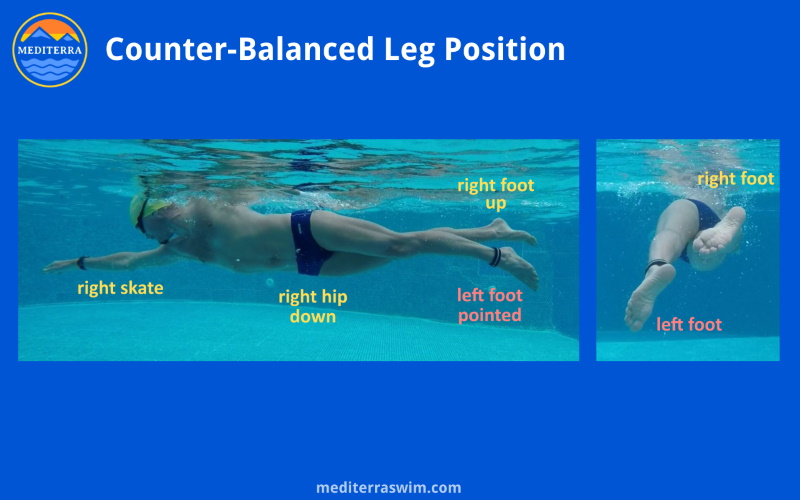
The Counter-Balanced Leg position seen from the side.
Instructions For Getting Into CBL
We first teach you how to place the Streamline side foot in pigeon toe position – seen above in this rear view image. Notice how the upper (Streamline side) foot has the big toe behind and pointed toward the heel of the other foot. This is the CBL position.
This inward-turned foot position creates torque in the hip joint, urging it to also turn inward. Then (keeping the knee fairly straight) rotate the ankle outward, arcing the big toe from pointing-in position to pointing-out position, in order to urge the hip to turn outward. Feel the direct connection between turn of ankles and turn of the hips.
First practice starting in this counter-balanced leg position, and make one smooth arc of the streamline side foot as you switch to your other side streamline position. Add no pressure to the foot’s downward motion, just let the toes make a smooth arc outward.
As you finish the rotation, come to the distinct ‘pigeon toe’ position on the other side and hold both feet in that stacked position. Do not move feet out of this position until the next switch of the arms in front. No extra wiggles. Don’t bring feet back to the middle.
Warning: if you bring the feet back together in the middle point, between kicks, your legs will start swaying side to side during the stroke.
Come immediately to this CBL position and hold it steady, with feet seemingly stacked and the legs will stay straighter, more compact behind the body, like the tail of a jet plane.
Keep the heel of the Streamline side foot below surface of the water by turning the heel outward a bit more. This also creates more space for a more powerful press. By arcing the foot (which means turning the ankle, to turn the hip) rather than bending at the knee, you tap into the hip torque principle and can enhance the torso rotation more, while keeping the legs in a very compact space.
You may view some drills for developing this counter-balanced leg position and the 2 Beat Press in the Knowledge Base.
Counter-Balanced Leg Position Drills
- Standing rehearsal, with ‘Pigeon Toe’ foot on the skate side
- Balance position, with ‘Windshield Wiper’ feet
Cues
- Keep toes pointed comfortably (as in Tippy Toes)
- Stack the Streamline side foot (to what feels like) on top of the other foot
- Make one smooth switch of the legs – no extra wiggles between
- Both legs switch to the opposite CBL position and lock in place – no extra movement until next switch (do not bring feet back together in the middle)
- When switching legs, only the Streamline side leg presses while the other leg slides passively to its poised Pigeon Toe position
- Resist bending the knees – allow them only to flex slightly
- Toes of the pressing foot may gently brush the the other foot while switching
- Practice arcing feet in smaller space – resist spreading the legs very far
- Knees remain very close to each other
- Press the foot smoothly and steadily – at about the same rate as the torso rotates
by Admin Mediterra | Sep 25, 2020 | Fundamental Skills
The entry and extension into streamline is how you deliver force into forward motion. The hand enters at a certain location, near the head, in front of the shoulder. It drives down into the water steeply, like traveling down the start of an Olympic ski jump. Then the arm begins to extend underwater, and its path levels out as it reaches target depth, straight in front of that shoulder. Then the arm continues to extend and reach, piercing the target, which brings your body into its best Streamline Position. Your body is lengthening and becoming more streamline with each microsecond. In this way, you receive the three forces from the recovery arm momentum, from gravity, and from the catch and convert all that into acceleration.
Below is an outline for how we form the entry and extension, and you will find some additional focal points and diagrams on the 101 Cues for Freestyle page under the Entry And Extension section.
The entry has a certain timing, a particular pathway and a certain smooth speed to make it most effective. The better your Entry and Extension into your best Streamline Position, the more that force is transferred into forward motion.
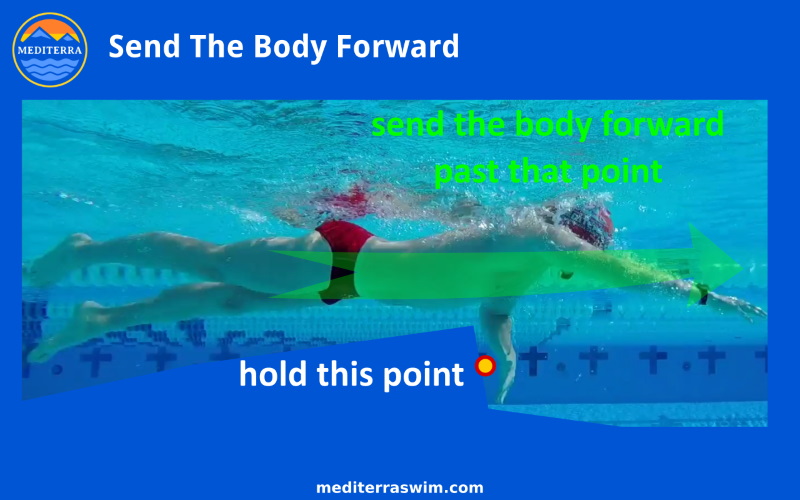
Let us reiterate this again so that it sinks in: The whole emphasis of the stroke is to Send Force Forward through the Recovery + Entry + Extension into Streamline. Everything else, including the catch, supports this primary action of sending the vessel of your body forward. This is the finish of the freestyle stroke. Treat this section of the stroke cycle as the important moment everything else has been preparing for.
Instructions
The forearm begins to enter close to the head, in front of the shoulder, with a steep angle, as if driving downward… at first. You are only going to start at a steep angle, but it will not stay this way.
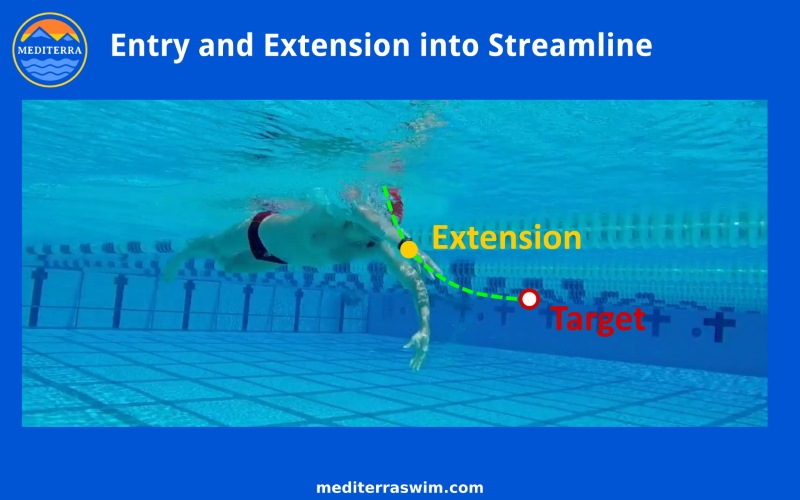
Remember, the goal is to Send Force Forward, the arm must be underwater as it extends toward the target. This requires an early entry position and a steep entry angle so that the arm can harness the rotational force of the torso into parting water molecules in front of the body.
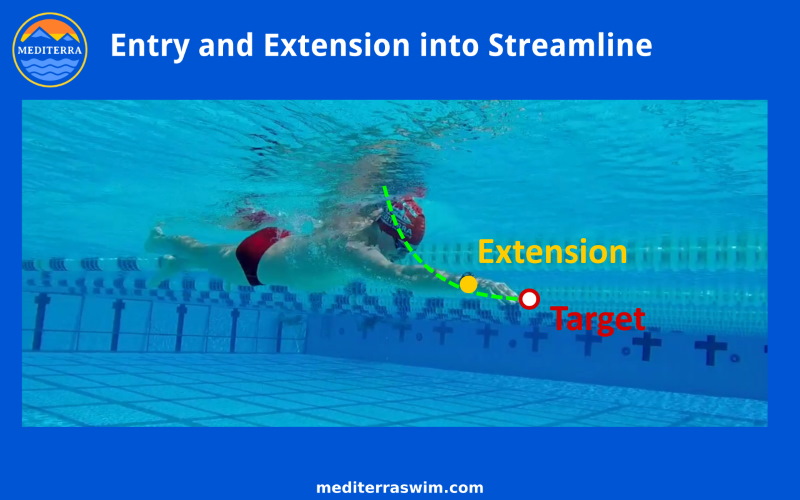
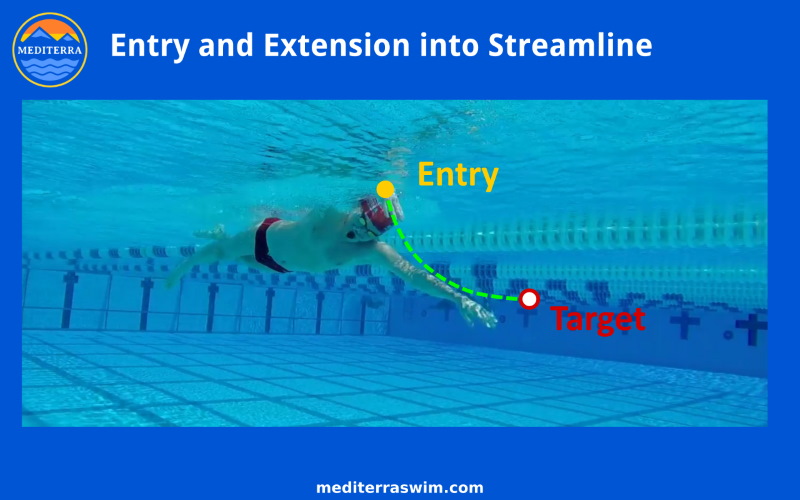
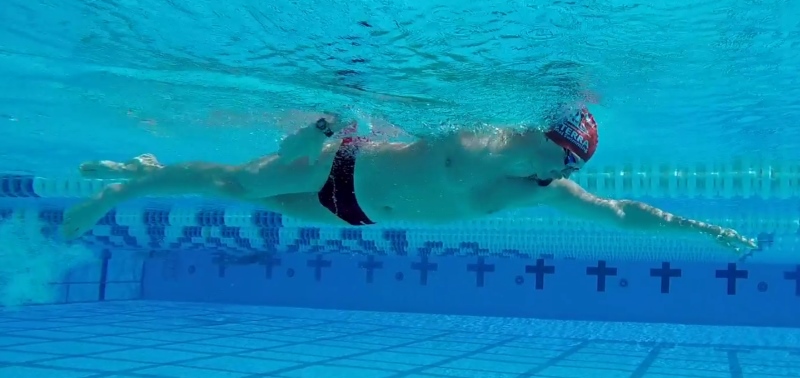
The arm drives down, on a curving path, to target depth and then levels out as it aims to pierce the target. The hand should come to a depth just below the lowest point of the body line. Notice that the emphasis of the lead arm is to stretch forward, not downward.
Notice how long and straight the body is on the streamline side. The swimmer is fully extended and continuing to emphasize the reach. He is not ‘twisting’ into an over-rotated position in order to reach. The side of the body is lengthening, as if he was going to pierce the target with his wrist.
Drills Useful For Entry Practice
- Standing rehearsal to create entry arm shape
- Recovery Swing, One Arm (swing to Entry Position and dip it a few times)
- 1-Arm Slot To Streamline (standing, with one arm in entry position, fall forward into Skate)
- 2- Arm Slot To Streamline (standing, with one arm in entry position, and one arm in Streamline Position, fall forward and switch arms, slide into Streamline)
Cues for Entry
- Elbow high above ear
- Elbow swings forward as far as comfortable
- Feel the stretch in the back as you reach entry position
- Forearm aiming straight ahead on track
- Forearm angling down (45 degree, like ski jump)
- Hand entry position across from opposite (lead arm) elbow)
Cues for Extension Pathway
- ‘Ski jump’ shape entry path
- Slide down to target depth and forward
- Spear wrist through your target
by Admin Mediterra | Sep 24, 2020 | Synchronization
Once you have practiced the LT (leg-torso) synchronization, and the ET (entry-torso) synchronization, then it is just a blending of both of those to create the LE synchronization. However, this is moving across the body, from one extreme end to the other. It can be the most difficult connection to make, but once you do, it is the most pleasing one!
Once again, you are ‘zooming out’ to take in the full body, from foot on one side to wrist on the other, to feel the connection between these two actions, through the torso. The torso rotation empowers the entry and extension to the target. The press of the leg supports the torso rotation. Therefore, the press of the leg helps empower the extension forward.
This is often the last sync combination to practice because the other synchronization combinations are set up to support this main action of extending farther forward on each stroke. This LE synchronization is what will make your stroke as long as it can be optimally. It is what creates the acceleration you seek on every stroke. So, take the time to establish the other connections, and they will enhance this one.
Instructions
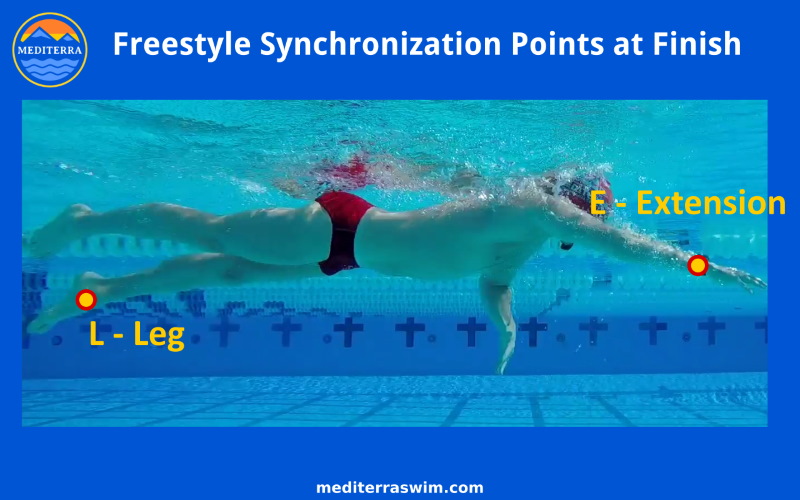
When the leg comes down to its finish position the entry arm is sliding into streamline position.
Just as you practiced pressing the leg more slowly, with a steady pressure to match the torso rotation, aim to match the pressure and rate of speed of the extension also. As noted previously, it is tempting to ‘snap’ the foot for an abrupt kick, but this sends a wave of force too quickly forward, before the extending arm is ready to absorb and apply it to extend further. Keep the press of the leg as steady and smooth, matched to the torso rotation, and thereby matched to the entry/extension. The more closely these two are matched and kept proportional in speed, the more the press of the leg can assist that extension, the more you can feel it assisting. The leg will move faster and get to its finish position before the extension finishes, but aim to make that press last longer.
There is some room to adjust the timing of the press to the tempo. At slower tempos, have the press of the leg come about half way into the entry, with the intent to use the press to help finish the extension to the target. At very fast (sprinting) tempos, it may be more helpful to have the press of the leg come right as the hand is entering in order to drive it more powerfully and more quickly to the target, since the fast tempo allows so little time to get there through the water resistance ahead.
Remember to keep all actions smooth no matter how much force is involved. You can be powerful, but in water, power must be applied smoothly, gradually building up, in order to create a more uniform (less turbulent) displacement of water molecules. Smooth actions keep drag to a minimum. As Coach Mat says sometimes, “Make the action like you are cutting butter, not like pounding meat.”
And, when you are feeling fatigued, or still have a long way to swim, this can be one of the more endurance-promoting focal points you can use. The default land-mammal reaction to fatigue is to start pulling back harder on the water. Resist this urge. Instead, put your dwindling resources into protecting this Send-Force-Forward emphasis in your stroke. Under fatigue, it will do more to reduce your loss of speed and extend your energy than just about any other emphasis.
by Admin Mediterra | Sep 24, 2020 | Synchronization
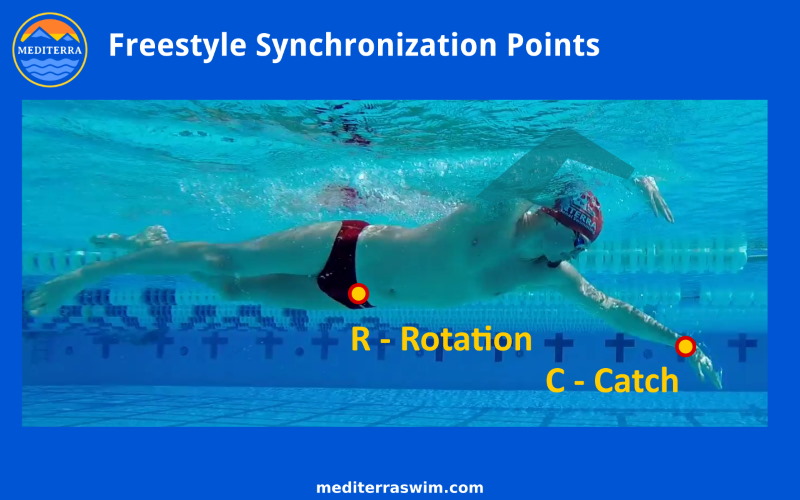
The Catch (C) and the Rotation (R) (sometimes represented by the Hip), are not often connected in the typical swimmer. This is where one of the biggest power leaks can be plugged.
Again, the rotation – with shoulders and hips tied together into one unit – may be represented by the hip.
Ideally, you will set the catch (initiate the start of the catch) at the moment the hip is beginning to turn. On the same side of the body, the hip will begin rotating upward, and the catch will begin pressing backward. But these can only happen together when the Entry is located and timed first. Remember that the rotation will always wait for the Entry. So if the catch must wait for the torso to turn, that means it must also wait for the Entry to start – then all three will happen together.
If E and C are synchronized first, then and only then can you work on the C and R synchronization. EC must be in place first.
The easiest way to isolate the connection of the Catch and the Rotation is to do a One-Arm Swimming Drill. This drill takes the other arm out of play, so as you move through the stroke cycle with only one arm, you will be forced to use rotation to empower the catch. It should make sense to your body to do it this way when you have only one arm, and it will be obvious how helpful it is to have the torso rotation create the main power of the catch. But the moment you put the other arm back into the choreography, you may notice that your catch no longer automatically connects to the rotation – often it will start pulling way before the torso starts turning! When the catch starts pulling before the rotation, this means that arm must pull with small shoulder muscles the whole way – the small shoulder muscles will tire so much more quickly than the torso muscles will!
You can test the timing of your EC arm switches by doing recovery and entry drills to make sure your entry hand reaches the entry position as the trigger for the catch to begin.
Instructions
The goal is empower most of the catch by the rotation. In other words, you want to shift more of the catch load to the torso (to the side and back of the body) and lighten the load on the smaller shoulder muscles. The sensation you are aiming for is to feel the pressure you apply coming from that side and back of your torso, where you do not feel acutely strained in any small muscles of the shoulder. It will feel easier to maintain a powerful hold on the water when you can hold with the whole side of your body.
Beware: Just because the catch and rotation are happening at the same time does not automatically mean that the loading has been shifted to the torso. You need to feel that you are holding mostly with the slide of the shoulder toward your hip – this will engage your lat muscles which you can feel easily. If you feel more loading in the small pulling muscles around the shoulder and little or no loading on the back and side of your torso, then you have not transferred enough of the load to the torso.
This is easier to notice and improve at slower tempos. Start slowly to tune up this pattern then gradually increase tempo to normal rates as the pattern gets familiar to your nervous system.
It may be helpful to imagine an elastic band connecting your (catch side) wrist to your hip. As the hip rotates upward, it pulls the wrist backward through this imaginary elastic band.
Keep the rate of the hip turn about the same as the rate the catch/hold is pulling back on the water. Do not pull abruptly on the water. Nor should you try to rotate abruptly. You can be powerful, but apply that power gradually, and smoothly.
These two moving parts of the body should feel instantaneously connected in the same unified action, on this side of the body.
Try disconnecting CR and count strokes, then connect CR and count strokes. You should notice a clear difference in SPL between the two.
by Admin Mediterra | Sep 24, 2020 | Synchronization
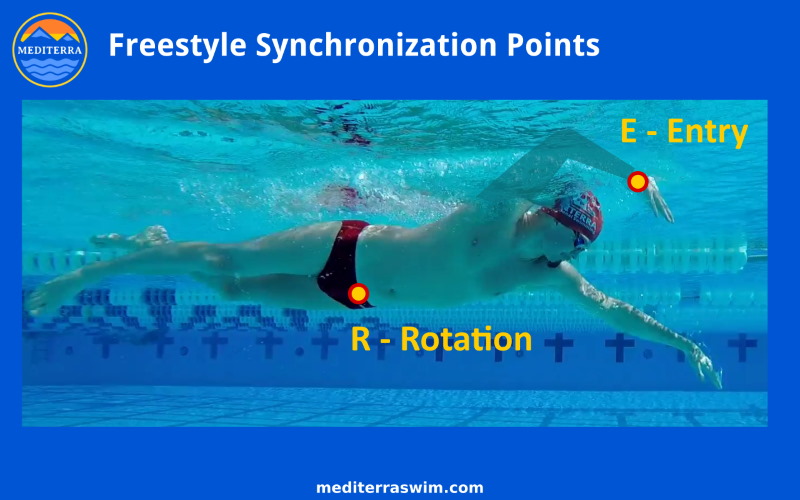
The Entry/Extension (E) and the Rotation (R) (sometimes represented by the Hip), is the easiest connection to study because on virtually every swimmer the rotation will wait until the recovery arm has come all the way forward and is ready to enter the water. That side of the body is held up in the air by the rotation until the entry arm is ready to slide down into the water. The drop of the shoulder allows the arm to drop into the water. Without even having to think about it, your Entry and Rotation are likely, already approximately synchronized.
This is an automatic pattern that swimmer don’t often notice because it is already happening. But now you are going to pay attention to it because you can make that synchronization even better.
Instructions
At slow and moderate tempos you can allow gravity to initiate your rotation – the high side is being pushed downward, so when the arm swings into entry position, you can just let gravity pull the arm downward and rotation happen together. This is the most economical way to engage rotation power, obviously.
Initially, it can be easier to imagine an line connecting your wrist, arm, shoulder, and side of torso down to the pelvis as one unit that moves together. So, when you examine the connection between the Entry and the Rotation, you can more pay attention to that entire side of the body moving together. These two moving parts of the body should feel instantaneously connected in the same unified action, on this side of the body.
Practice ER where you emphasize using the Rotation to help push the Entry (E) into Extension to the target, as if connected with an extending mechanical rod.
Practice ER where you emphasize using the Extension (E) to pull the torso behind it, as if the wrist and the hip were connected by an elastic band.
Which one creates a more pleasing internal effect for you?
Which one produces a longer stroke (a lower stroke count) for you?
by Admin Mediterra | Sep 24, 2020 | Synchronization
You’ve worked on building each section of the stroke – the entry, the body rotation, the catch, and the leg press – section by section. They are intended to work together as a harmonious whole, not separately. Eventually, you need to practice connecting these parts and then refining those connections to create a smooth and powerful whole-body propulsive movement.
Why Synchronize?
When these parts are connected and timed well, they do not merely add up, the magnify the power you can utilize in each stroke. When the propulsive movements of the body are coordinated in this way, they provide a thrilling sense of acceleration on each stroke!
When these parts of the stroke are not connected well, it causes what we call ‘power leaks’ in your propulsion. You may be harvesting free force from gravity, you may be generating momentum with the recovery swing and the torso rotation, you may be anchoring your catch hand, but if all these parts are not connected together and timed well, a great portion of the force generated in one part of the body cannot be transferred to another where it would be used – it is burned up as friction or stress inside the body and wasted in moving water around rather than moving your body forward.
Synchronization practice will help tie each piece of the movement together, and plug those power leaks.
Full Time Sync Work Ahead
Synchronization practice is something that may likely occupy most of your training attention in your advanced stages of development. When there is any change in speed, intensity or in the conditions of your swim, there will likely be a need to adjust and refine your synchronizations to fit those precise conditions. There is only a perfect synchronization arrangement for this moment right now. When the conditions change you may feel a need to make fine adjustments to the synchronization to feel smoother and more efficient in that unique set of conditions. That is why it becomes a frequent focus in one’s advanced training. It is infinitely improvable and it is always rewarding to make synchronization a little better so it becomes a perpetual source of interest and pleasure.
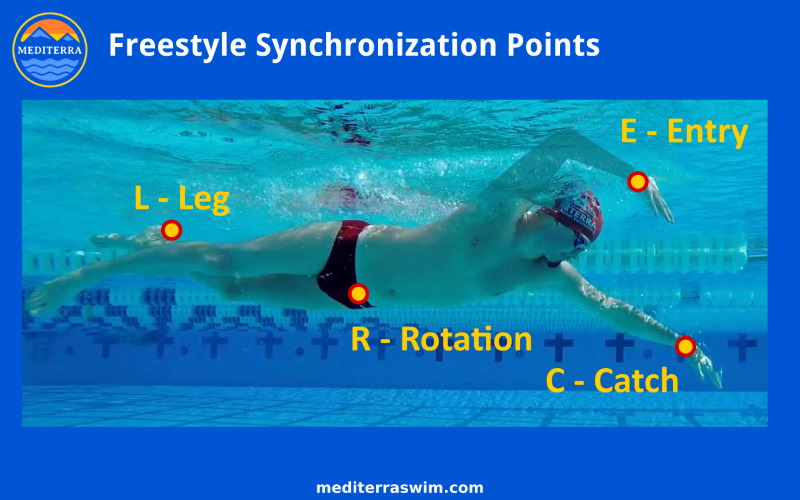
Four Propulsive Parts
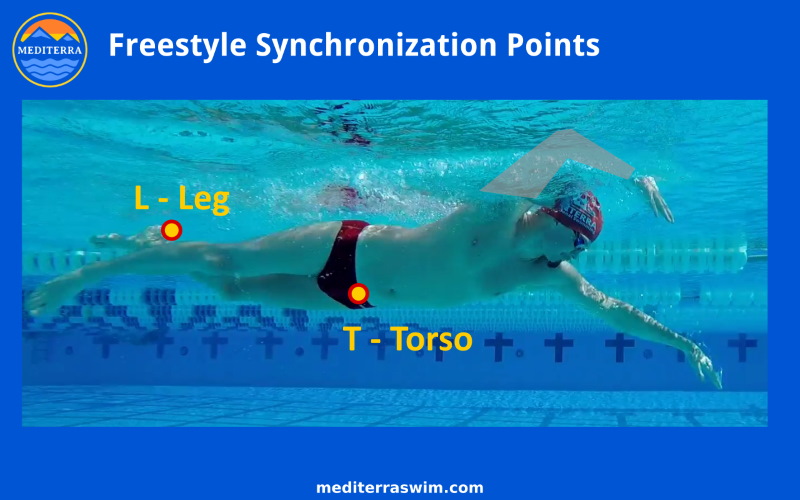
We divide the body into four main propulsive parts and work on synchronizing all four of them together to create this one smooth, harmonious whole propulsive movement on each stroke.
- E – Entry and Extension
- C – Catch
- R – Rotation
- L – Leg Press
However, it is hard for the brain to focus on all four of those at once. Instead, we work on synchronizing just two of those parts at a time, and work around through each combination over and over again, gradually bringing all of them into better harmony without having to focus on all four together at the start.
Sync Combinations you will practice:
Later on, as the nervous system grows familiar and the synchronization of each combination becomes more autonomous in the brain’s control, you’ll find you can zoom out and hold in attention more parts at one time, like ERC, LRC, and LRE.
by Admin Mediterra | Sep 24, 2020 | Advanced Skills
In most of our training plans in the Dojo and in live training sessions we will be working with tempo (a form of stroke rate) and controlling it using a device known as a Tempo Trainer Pro, made by Finis.
What is Tempo?
Tempo is the rate at which your arms (or whole body) are moving through the stroke cycle. For convenience in pool training, we measure tempo in units of ‘seconds per stroke’. Over many stroke cycles to get a more accurate average, we can measure from the time between each rotate of the torso, or we can measure the time it takes after one arm has left a position in the stroke cycle for the other arm to reach that same position . For example, we could measure the time between the left arm coming to the entry point and the right arm coming to the entry point in the stroke cycle.
What is the Tempo Trainer Pro?
A Tempo Trainer Pro (which we often abbreviate as “TT”) is a small, waterproof metronome we use for swimming. You can read more about this in Tempo Trainer Pro Basics.
Why Train With Tempo?
The first objectives for training with a TT is to provoke the brain to refine control over the precision and consistency of your movement patterns. The Tempo Trainer helps build your focused attention and sense of timing, helping the body ‘memorize’ the movement deeply. When you train enough with the TT, you’ll eventually not need it any more – just like a musician would use a metronome to perfect timing then set it aside for the concert.
There are three ways we may have you first start to use the Tempo Trainer:
- Using a comfortable tempo, set a steady rhythm to the stroke and train the brain to memorize that rhythm.
- Using a comfortable tempo, call your attention to a particular point in the stroke cycle, stroke after stroke.
- To expand your comfortable tempo range by working on the edges of what is uncomfortably fast tempo and what is uncomfortably slow.
By first working with a comfortable tempo you can give the brain a chance to organize and smooth out the motions under the constraint of a fixed time interval.
Then you can begin working with slightly uncomfortably-slow tempos to challenge your balance and streamline skills. Then you can begin working with slightly uncomfortably-fast tempos to challenge your precision under the stress of faster movements.
There are more ways to use it once we get into advanced training, but these are where we like you to start. Later on we use TT training, in conjunction with stroke length training, to bring your stroke rate down to the range suitable for your pace goal. Tempo work is recommended only after you have the four fundamental features working in your stroke.
Using a Tempo Trainer adds a new level of challenge to the brain while training your stroke technique. For this reason it takes some time and understanding to learn to use one, and to enjoy using one. Some people love it immediately, and sense it will help them focus. While some people find it annoying at first. If so, don’t worry. That may be a sign your nervous system is not ready for it yet. But that annoyance could also mean that your brain just needs some time working with it to get used to a new form of stimulation and start to appreciate it.
by Admin Mediterra | Sep 24, 2020 | Advanced Skills
Stroke counting is not the only, but it is one of the first, most convenient and important ways to measure your skillfulness in the pool.
While you are taking strokes, your body slides forward some distance on each stroke. The farther you slide on each stroke the closer you come to the other side. The farther you slide on each stroke the fewer strokes it will take to get to the other side. By counting the number of strokes you are taking, you get a measurement of that distance you travel. You can travel farther on each stroke by either increasing effort or decreasing drag (water resistance). Strength is important to move forward, but shape is more important. As you improve your skillfulness in the fundamental and advanced skills your stroke will get longer as a result.
Now, one can try to pull much harder, use more effort and travel farther, but that approach has very limited potential without at least as much skill in place to support it. And, it is possible to try to slide too far on each stroke, to overdo the rotation and strain the body in an attempt to go father, but that will not be comfortable, it will not be sustainable, and it is rarely a problem we see in the first stage of developing the stroke.
Some people complain that they are concentrating too much on some aspect of their stroke to be able to count strokes at the same time. This might be the case at the beginning stage of learning a when the level of concentration on a newly introduced skill is high. However, the process of turning skillful swimming into something you can do without thinking about it will require dividing your attention. By counting, you get to occupy both sides of the brain – one side is focused on a quality in the stroke and the other side is focused on counting. Counting strokes gives you immediate feedback about what your stroke is producing, right there in that moment. If you are concentrating so much on making your body move forward better, then seeing how far you travel is a logical and convenient way to monitor how well your body is moving forward. You will only get comfortable with stroke counting by doing it more and more.
by Admin Mediterra | Sep 24, 2020 | Advanced Skills
Once you have established the foundation of the freestyle stroke in Freestyle Fundamentals, you are ready to build the skills for more effective whole body propulsion upon it in Freestyle Advanced. In his course you’ll learn how to form a more effective catch to get a better grip on the water, then to connect this to the power of the torso rotation, and smoothly transfer force from the catch-side of the body into the streamline-side of the body. You’ll learn how to connect the action of the legs to support and enhance the torso rotation, to complete the whole body propulsive system.
In addition, you’ll learn how to start using basic forms of metrics – stroke counting and tempo – to begin training in a logical, measurable way toward a specific skill or achievement goal.
Preview of the Catch and Hold
It is commonly believed that the underwater stroke – the arms pulling on the water – is the main action of the freestyle stroke; hence, the old name for this was the ‘crawl stroke’ after all. What the arm does underwater is important, but it only has its intended effect if that action is coordinated with what the rest of the body is doing. In fact, the catch is not the main action, but a supporting action. The main action of the stroke is channeling force into the streamline position so that your body slides forward, and does so most efficiently.
Like getting traction under your shoe, you are aiming to get a solid grip on the water in order to rotate around that point and lever the streamline side of the body forward. It is not about pushing water back, but about sliding the body forward – a seemingly small, but profoundly important difference in how your body directs its energy.
Preview of the 2-Beat Press
And, once you have learned the skill of creating balance in the body (keeping it parallel to the surface) using the entire body as frame, you’ll not need to use the legs for lots of kicking to hold the rear of the body up at the surface. The legs take on new roles: first (as you’ve learned in the Freestyle Fundamentals course), the legs are an extension of the torso, a long fuselage that holds its shape firmly; second, the legs can move in a way that coordinates with and enhances the power generated by the torso rotation.
Your work on these two skills – the catch and the leg action – have been waiting until the fundamental skills are in place so that these each can support what those fundamental skills are intended to achieve in your swimming. The stronger you are with those fundamental skills the easier it will be to work on these advanced skills and get the effect from them that you seek.
Preview of Synchronization
Now that you have all the main features of the foundation and propulsion in place, it is time to connect the moving parts into a finely synchronized whole. In this lesson you will practice connecting and timing the entry action, the catch action, the torso rotation and the leg action. Synchronization offers the most satisfying discoveries and improvements in the smooth efficient flow of force through the body, resulting in more acceleration on each stroke.
Preview of Basic Metrics
As you continue work on the catch, the legs and synchronization, you’ll be able to measure your progress in more nuanced ways than just seeing if you are ‘swimming faster’. Your stroke count – the number of strokes it takes you to get across the pool, is an important indicator of your skillfulness and efficiency. There is an optimal stroke count that you’ll be ultimately aiming for, and over the weeks, months and years ahead, you’re developing skills and fitness will bring you into that optimal zone. And, as musicians train with a metronome to hold a steady beat, at tempo appropriate to the type of music they are playing, your skill and efficiency in movement will improve greatly when you add the use of a swim metronome to your training activities. This will provoke great refinements and automation of your movements – you’ll build great neural fitness.
by Admin Mediterra | Jun 1, 2020 | Advanced Skills
In conventional swimming, the underwater part of the freestyle stroke is called the pull (or pull/push) phase because in that tradition, the emphasis of the whole stroke is about pulling on the water to move the body forward. We prefer to call it the ‘catch and hold’ phase because our orientation is about holding a point in the water and sliding the body forward, past that point. Our emphasis is on the body moving forward, not on pushing water backward. In this view, the main emphasis of the stroke is to Generate Forward Momentum delivered into the Streamline side of the body, while the catch is in a supporting role.
We have waited until the Freestyle Advanced series to present this skill because the Catch and Hold is meant to serve what the body is doing in those fundamental skills. Those skills need to be in place so that the Catch and Hold can have the intended effect.
Explaining the Catch and Hold
As noted above, the Catch and Hold does not work well apart from its coordination with other parts of the stroke. When the catch is connected to the torso rotation, the force of that catch can be transferred into the torso. When the torso is connected to the entry and extension arm, that force can be transferred into that side of the body, producing better forward motion. All three need to be tied together in a smooth choreography, and when they are, you feel a wonderful acceleration in each stroke.
In the Generate Forward Momentum lesson you developed the First Connections, which includes the optimal arm switch timing – this timing is necessary in order to transfer that force from the catch side to the entry/extension side of the body, through the torso rotation. If the timing of the arm switch timing is too late or too early, then less of that force can be transferred from one side to the other.
Three Components
This effective forward propulsion depends on the three components each doing their part and being well-synchronized with the others:
- the Catch generates a wave of force
- the Torso Rotation transfers that wave of force from the catch side to the entry/extension side of the body
- the Entry/Extension into Streamline Position receives and delivers that wave of force into forward motion
In the Catch and Hold lesson you are learning to form a more effective catch to generate more force, then connect that to the torso to transfer that force from one side of the body to the other, and connect that to the entry actions to transform this into forward motion.
Skills for Catch and Hold
The better you perform the catch and hold, the bigger the wave of force you may transmit to the other side of the body.
The quality of this wave depends on:
- The shape of your catch arm in order to get a bigger grip on the water
- Loading the torso muscles, more than shoulder muscles
- The pathway that catch action follows
- The pressure applied – steadily through the motion, not too abrupt, and not too weak but just right
The cues below will help you create and improve these three features in your catch action.
Creating the wave with an arm is not enough – it must be tied into the torso rotation so that the torso is doing most of the work of holding the water, which mean it is transferring that force from the catch side to the streamline side of the body. So, the lesson starts with a focus on only the catch arm and torso, and eventually adds the other side of the body, completing the full choreography.
In this lesson you will work through a series of drills to help you:
- Build better catch shape to generate more resistant force
- Empower the catch/hold with the torso rotation, so that the torso muscles do more of the work
- Improve the catch pathway – straight back so the body slides straight forward
- Improve the smooth, steady sense of pressure through the whole motion
Useful Imagery For Catch and Hold
During the lesson you will likely be given these images/analogies to work with:
- the ‘beach ball’ of water molecules (or ‘swiss ball’, or ‘pilates ball’ if you prefer)
- the underwater aluminum ladder, under your body, parallel to the surface
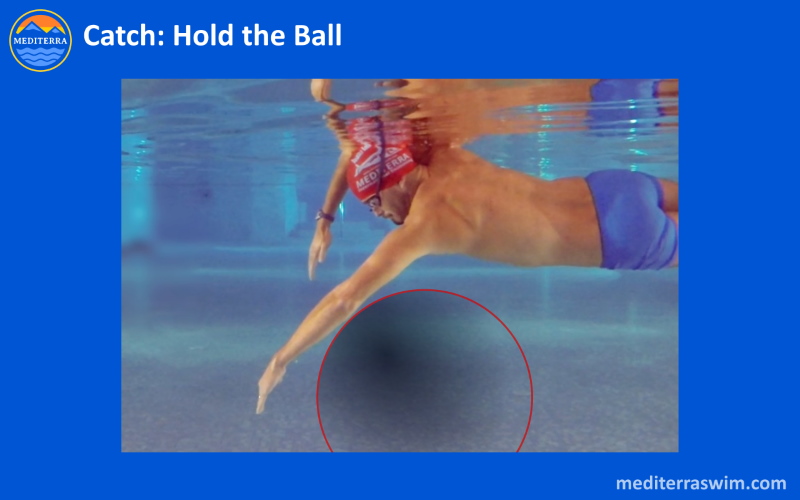
The Beach Ball
The beach ball of water molecules represents the pressure zone of water you create and direct with each underwater stroke. When you initially form the catch shape, you are gathering water molecules – or more specifically, you are creating a ‘traffic jam’ or ‘pressure zone’ of water molecules against your arm, and this pressure zone which offers resistance to your arm. You form this pressure zone of water, and by pressing on it, you leverage your body forward through the rotation.
Another way of viewing it, is that you press and send this ball of water under your body, and your body rides over the top. More specifically, you create a layer of pressurized water and slide your hip and leg over the top, helping them stay up near the surface.
The Ladder
The ladder gives you a directional grid, it gives you fixed locations in the water, to set the position and trajectory of your movements.
The two rails correspond to your two arm tracks. Your lead arm extends forward on that rail, while your catch hand holds a fixed point – a rung – on the rail. The rungs represent the point ahead where you set your catch (get a grip on the water).
The depth of this imaginary latter is set at the depth of your catch, in the layer of water just below your body. That is where you want to get a grip on the beach ball. That is where you want to create the pressure zone of water that the frame of your body can slide over.
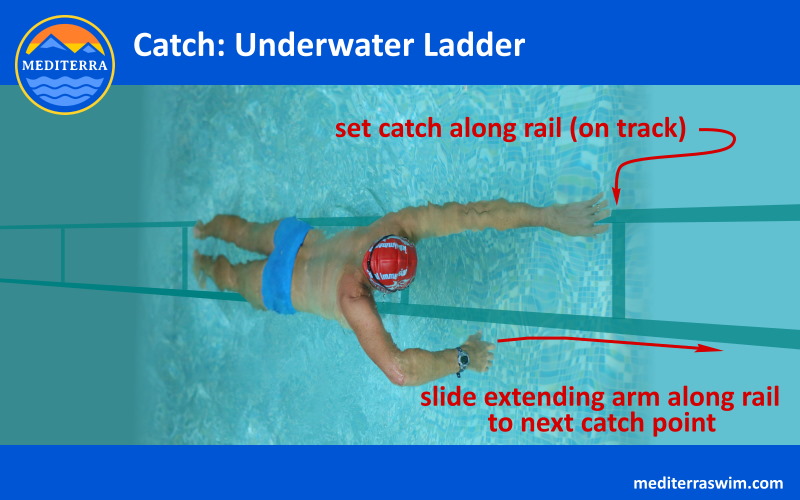
Imagine if there really was a ladder in the water underneath you. Imagine reaching ahead, getting a grip on a rung, and then pulling on it in order to slide your whole body forward past that rung. Your pulling hand would be fixed – it would not slide to the side or up/down. It would stay at the same depth, on the same track, while the body rotated around it, smoothly sliding forward, up the ladder, with your lead arm reaching for the next rung. Likewise, your body would not be sliding to the side or up/down, but stay parallel to the surface and to the ladder, simply sliding forward in the opposite direction of your pull.
by Admin Mediterra | Jun 1, 2020 | Fundamental Skills
Integrate Breathing Introduction
In order to work on Breathing skills, we have first worked on establishing the Four Essential Features of the freestyle stroke:
1. Build The Frame
2. Form Streamline Shape
3. Generate Forward Momentum
4. Make First Connections
These four features create the foundation upon which you may perform easier breathing.
Previously you learned how to pause the stroke and roll onto your back to breathe in the Interrupted Breathing position. In Integrated Breathing, you turn only half-way, where the here the breath is integrated into the stroke rhythm rather than pausing or disrupting the stroke.
Though absolutely necessary to swim more than a few seconds, breathing is an advanced skill because it is a dependent skill. It is dependent on the foundation features of The Frame, the Streamline Position, and the First Connections. When these features are in place learning to breath rhythmically is much easier. When these are absent breathing will challenging to learn.
Integrated Breathing
There are a lot of little details to making breathing rhythmic and easy – there are so many details it can feel overwhelming to work on all at once. To make it more manageable we’ve arranged them into 3 categories and you work on them in this order of priority, so the skills come together more easily.
Skill Categories for Integrated Breathing
1. Positioning of Head and Lead Arm
2. Timing of Turn
3. Air Management (exhale/inhale)
Positioning
The two main features of Positioning are the head position and the lead arm position.
Head Position
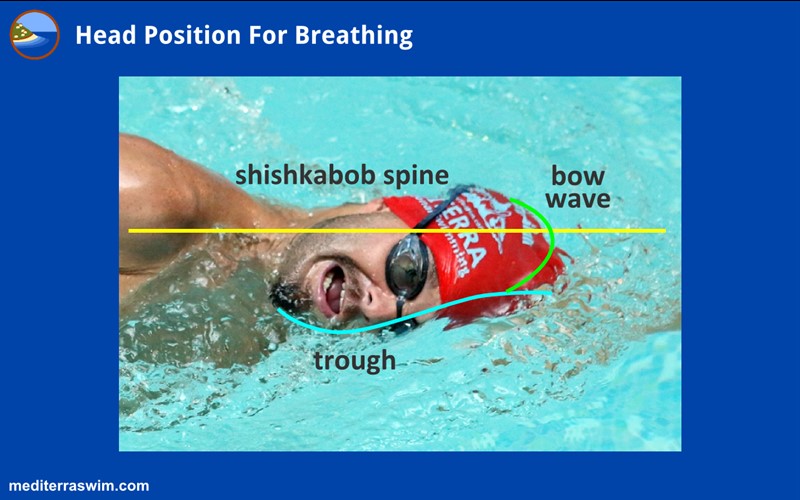
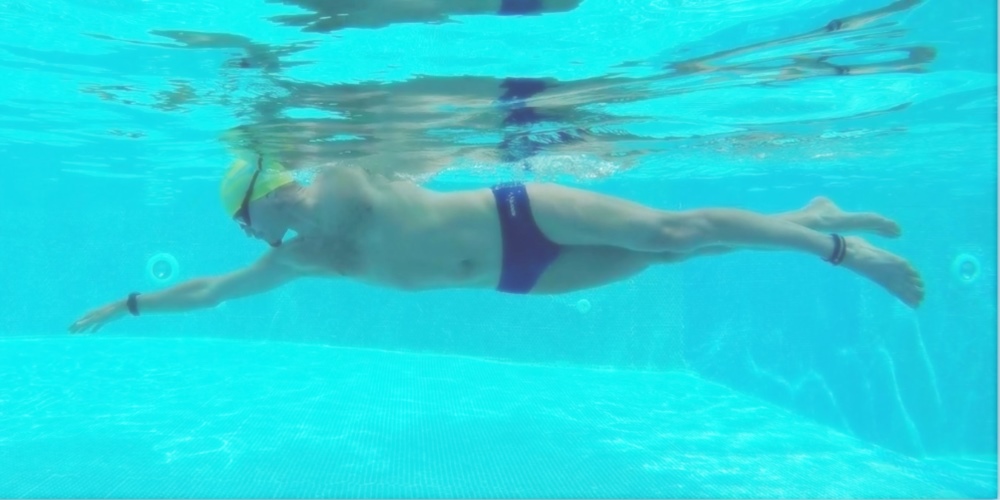
Head position is absolutely critical – the more you trust and lay that head down flat, the easier it is to get the mouth to air. This is counter-intuitive to the land-mammal brain, which urges you to tilt the head up above the surface of the water. But you don’t need the head to be out of the water to breathe – actually you just need the side of the mouth to reach up into the air.
The more of the head you can down in the water, the less you provoke gravity, the less drag created from the act of breathing. And more, by keeping the head down in the water (as seen in the image above) the head pushing through the water creates a bow wave which then creates a trough, or dip in the water right where the mouth is so that you can actually keep the mouth even lower. This is called ‘sneaky breathing’.
However, this is an all-or-nothing situation – if you tilt your head even just a little bit, that removes the bow wave and the trough and then you have to lift the head even higher out of the water to get the mouth clear. In our lessons we work on getting you into that sneaky breathing position. If it is too difficult at first to get into this position, then we’ll help you keep the head low in the water and turn the face farther up, toward the air, rather than tilt the head up.
Characteristics Of Best Head Position
• Head is in line with the spine (no tilt)
• Side of head is laying on the ‘water pillow’
• Half the face is underwater while turned
• The chin and mouth are reaching farther sideways, above the surface
Lead Arm Position
And, while turning to breathe and returning the head to face-down position, the body remains extending in Streamline Position. In particular, you must keep that lead arm extending forward. Again, the land-mammal instinct is to push down on the water with that lead arm in order to push the head up above the surface. The drills are meant to give you the opportunity to resist and override that old instinct.

Timing Of The Turn
The turning of the torso creates the window of opportunity for turning the head to that side to breathe. But that window is much wider than you need. You could turn early in that window of time, in the middle, or later. The best moment to turn is as soon as possible, and come to the surface as soon as possible, and return to face-down position as soon as possible – to take advantage of the moment of the stroke where there is the most acceleration, the most lift.
The later you turn, or the longer you stay, the more problems there will be because later in that window there is no more propulsion, the body is decelerating, the body is dropping lower in the water and the recovery arm is starting to come over the body, increasing the press of gravity on the body.
Characteristics Of Head Turn
• Begin turning right with the start of the catch
• Turn a bit more aggressively than the torso is turning (but not ‘whiplash’!)
• Touch the air with the mouth just long enough to make a quick sip
• Return the head immediately to face-down weightless position
Air Management
In freestyle there is an asymmetric pattern to breathing, which is not normal for humans. There is a long period of time in the non-breathing strokes where you are exhaling, and then a very brief moment where you inhale and refill the lungs.
You need to avoid two extremes:
1. Holding the breath on the non-breathing strokes (no exhale underwater)
2. Massive exhales (or emptying the lungs completely)
Rather, to stay most comfortable, aim for a partial air exchange, using only about 1/3 to 1/2 of your perceived lung volume. Always keep a portion in reserve. The goal is to take smaller but more frequent breaths, so that you could afford to skip one from time to time as interruptions in your access to air is common in pools and open water.
As breathing skill increases, it will feel easier to get to air, and it will be less disruptive to your stroke rhythm so you will feel like you can afford to take breaths more often.
Three Parts Of Breathing
1. Exhale underwater
2. Clear The Airways
3. Quick Sip Of Air
Exhale Underwater
You control the volume through the exhale underwater. When swimming is light to moderate in intensity, you aim for exhaling from the nose only, mouth closed. As intensity increases you may add exhale from the mouth as well.
On the first non-breathing stroke, you may hold the breath for a moment or give the smallest bubbles from the nose. Then as you take the second and third stroke, anticipating the upcoming breathing stroke, you may start to gradually increase the intensity of the exhale, measuring it so that you come to the right volume just as your face breaks the surface to begin inhaling.
Clear The Airway
Let’s use a little technique from our aquatic cousins.
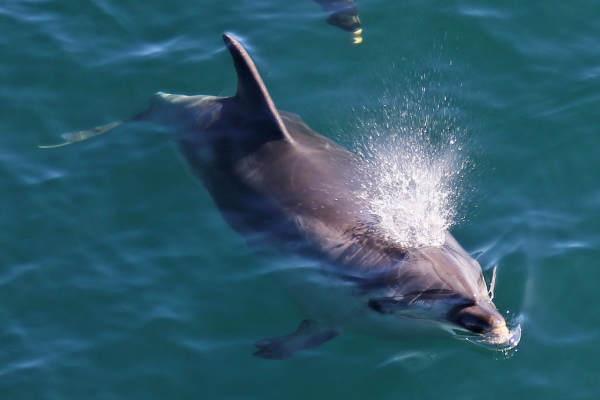
As the face is turning toward the air, right at the moment the nose and mouth are about to break the surface, you compress the diaphragm to send a blast of air out the nose and mouth to push water away from those openings.
This will help the brain feel more comfortable immediately taking an inhale. The compression of the diaphragm will prime the lungs to immediately start pulling air back in without you having to forcefully do it.
Quick Sip Of Air
The time that your face is out of the water is brief and precious. Do not waste any of that time exhaling, since you can do all of that underwater. When the mouth clears the water, everything needs to be ready to inhale immediately.
And, you are aiming to take just a quick sip of air, to top off the lungs… if you’ve carefully exhaled just a partial amount. Then turn the face back down immediately. Do not linger with the face at the surface.
Keep in mind that the farther you turn your mouth away (above) the surface of the water, the farther the head turns, the longer it will take to turn the head up and the longer it will take to get the head back to face-down weightless position. If you need to take a longer inhale, you may turn the face farther up toward the air, and be aware that you may need to pause the stroke briefly to allow for this extra time, without disrupting the stroke overlap once you resume the arm movements.
by Admin Mediterra | Jun 1, 2020 | Fundamental Skills
Form Streamline Shape Introduction
This introduction refers to the second of our Four Essential Features of the freestyle stroke: Form Streamline Shape.
The Streamline Position
Streamline Position is the start and the finish position for every stroke in freestyle. This position is the most hydrodynamic (low drag) shape you will be in during the stroke cycle, and the moment you will experience the most forward movement. Streamline Position is how you deliver the flow of force through the body into forward motion. In this position, your body line most easily parts water molecules ahead so that your body can occupy that space instead. The more smoothly, the more uniformly and therefore the more quickly those water molecules move out of the way, the faster you will travel forward.
Streamline Position is the most important skill of all because it is determines much of how well you convert effort into forward motion and it is the platform on which you swing the recovery arm forward and the platform on which you take an easier rhythmic breath. You cannot practice Streamline Position too much because there are so many ways to make it better, stronger, more stable.
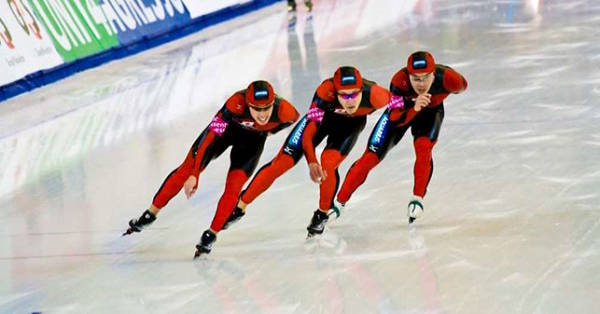
Imagine how a speed skater places her weight confidently on the skate and transfers the wave of momentum into that skate to accelerate forward. That skate blade is long, straight, sharp, and stable. It receives the wave of force and conducts it onto the ice and the skater slides forward. The skater is holds herself with stability on that single skate, over one side of the body, while drawing the other leg forward, getting ready to unleash another wave of force into the other skate on the other side. Stability in this position is crucial to maintaining rhythm and momentum.
The Streamline Position has some lessons we can learn from this action in ice skating. At this moment in the water, you are shaped into your most streamline position, holding a slightly rotated angle, while leaning (laying your weight) onto that streamline side of the body. That streamline side of the body receives the wave of force you generated in the stroke and conducts it forward into the lead arm and leading edges of the body to put that force to work parting water molecules ahead. You hold this position with stability that comes from core muscle strength and control, while the other side of the body brings up the recovery arm to prepare to unleash another wave of force into the Streamline Position on the other side.
A good streamline position is:
• slightly rotated (about 30 degrees)
• a straight line from wrist to ankle (as seen from above)
• stretched (without twisting or tilting the spine) from wrist to ankle, especially from shoulder to hip
• stable for at least 2 seconds
In your lesson you will learn how to form this streamline shape and learn how to hold it with stability for a few seconds, long enough to be able to swing your recovery arm forward in a relaxed and controlled way.
This position is critical – everything else you do in the stroke will depend on your ability to slip into the position immediately and hold it steady while other actions are taking place.
