
Self-Coaching 101
Learn how to design a series of practices customized for you.
Instructions
Overview Of Self-Coaching 101
The purpose of this course is very simple: we want you to learn how to compose a series of practices for yourself that will reliably improve your fitness and technical abilities.
It might seem complicated to try to do this at first, but by going through this design process systematically, with simple explanations and instructions, we believe you can do it.
You may go slowly the first time, but once you feel how it works when you try your own practices, you’ll quickly internalize the principles and become more confident about designing practice series to solve specific skill and performance needs you have.
Why Teach You How To Coach Yourself?
Designing intelligent practice plans is what most people hope their coach will provide for them.
Why then would we give you this information rather than keep it a secret and keep you dependent on us?
Coach Mat formed Mediterra Swim to liberate athletes from boredom, injury, and needless dependencies on systems that don’t consistently produce good results. He learned from a long and painful route how to listen to his own body, to take care of it and train to his healthful potential. He wants to help people like you more quickly get into that position where you can take care of your own basic health and training needs as an athlete. No one is in better position to take care of you than you are. Mediterra’s training events and online programs like this one are all aimed at helping set you up to coach yourself.
Even the best athletes in the world still train under the guidance of a coach, but each athlete should understand how training works so they can cooperate with it better, allowing the coach to take them even farther. You will continue to benefit from experienced coaching (which follows your value system), but the foundation of your well-being as an athlete comes from your ability to maintain your own body and have at least a basic understanding of how to train yourself to achieve specific skill and fitness goals.
While you are studying these concepts we continue to study and practice too which keeps opening up new depth and breadth of things to teach you. So, we are not worried about running out of ways to add value to your athletic experience.
We are still here designing advanced training plans to spare you the time – even after acquiring this understanding you may still want us to provide such services to you. But with this understanding for how training works you will be able to cooperate with those principles and plans to a much greater effect.
From this course we hope you will become familiar and comfortable with the basics of the training process to design plans for yourself, if you would like to. If you are content with what you have learned from this, and ready to swim away and train on your own, we are totally pleased. If this new understanding makes you pleasantly discontent and want to learn even more about advanced training, then we have our excuse to keep working together.
How To Work Through This Workbook
The course is intended to provide you with a ‘brief’ tutorial on how to coach yourself through a series of practices toward a specific skill and performance goal.
Intelligent training includes quite a few inter-related subjects which all add up to a rather complicated situation for athletes to figure out on their own. We can reduce that complexity only so far before beginning to undermine the intelligence behind it. Yet, we want to save you the time and effort of trying to figure all of this out on your own.
This course is attempting to provide you with that ‘brief’ tutorial. We have stripped down the complexity to some summary explanations, then provide you with links to read more about the topics in our online library if you would like to.
Your Assignments
There are only a few assignments given throughout this course, but they will be very valuable to you. The assignments are not about getting a grade – we don’t offer any. Rather, when you do the assignments you produce something you can immediately use in your own training. That is the point.
If you do the assignments at the time they are presented in the course, by the end you should have fairly complete intelligent practice plan for achieving one of your short-term goals.
For this purpose, we urge you to be ready to work on the assignments when you study that section. You will need either a paper notebook or training journal set aside for collecting your assignments and notes, or set up a system on your favorite digital device for doing this (such as using Evernote).
Where ever you choose to take notes and write out your assignments, keep it in a special place that is convenient for you to use.
Follow The Examples
As you work through this course we will periodically provide examples to demonstrate how you could apply the concepts at different levels of challenge.
We urge you to follow the examples which will challenge your weakest area rather than choose the example that allows you to lean upon your strengths. This is primarily what training is meant to do – strengthen that which is weakest. Your performance system will only be as strong as the weakest part of that system.
This involves a discipline that comes with a mastery mindset. When you feel a disparity between your technical skill and your fitness you need to aim your training at that weaker part which is holding you back – and the mastery mindset is what leads you to enjoy practice like this rather than be frustrated by it. Use the systematic approach outlined ahead to work on your weaknesses in practice and enjoy the process.
Use The SC 101 Forum
We have set up a Self Coaching 101 forum topic for this course that will be accessed by other students in the course and monitored by our staff.
Please use that forum topic to leave all kinds of questions and feedback about the course, such as…
- What topics or explanations need improvements or more elaboration, or more examples?
- What additional subjects related to this course might be helpful to add?
- What subjects or ideas do you personally find most useful?
- Do you see any bugs in the function of the course or website?
- Are there any links broken?
- How is this course changing your view of swim practice?
Instructions
There are two main areas of instruction:
- how to execute the practice set, and
- how to make decisions in the middle of the set and about the next practice you will conduct.
Each practice set has particular objectives in terms of accomplishing certain qualities and quantities. You will work towards those objectives. But your performance will depend on your strength of attention (something you control directly), and upon rate of development in your brain and muscles (something you do not control directly) – so during the practice you will need to observe and assess your performance, listen to your body, and make decisions about whether to go forward, pause, step back, or stop the practice in the interest of supporting that development in the healthiest way.
Section 1: Choosing A Short Term Goal
Section 1 Intro
There are endless possibilities for what you might improve in your swimming. How do you sort through all these possibilities?
With respect to your biggest goals, we recommend that you master the fundamentals first and set short-term training goals that require you to master these skills. This course is laying out the principles for practice which apply to all levels, but the examples given will focus upon Level 1.
“Short-term” in this regard means skills that you can integrate (turn into habits) in approximately one to three months.
These fundamentals of Level 1 include the internal skills that permit you to control your body position, your movement patterns, and how you expend energy. In terms of fitness at Level 1 it would be good for you to be capable of comfortably swimming shorter distances skillfully before you try to work on goals that require advanced skills and fitness.
Master Level 1 Skills First
This course is emphasizing Level 1 skills. You may read about how Mediterra organizes these skills into Levels Of Proficiency.
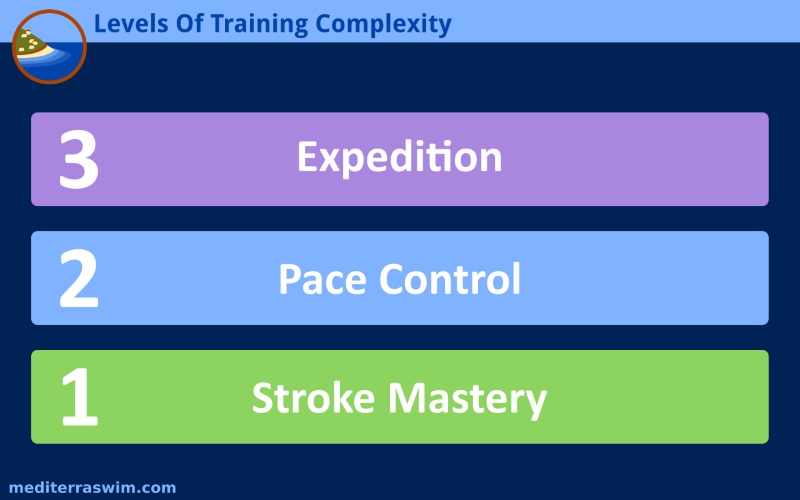
There at Level 2 and Level 3 skills, as well as skills specific to open water swimming. Those are covered elsewhere. Your mastery of these Level 1 skills will put you in position to more easily develop the advanced skills, and make swimming so much more enjoyable.
Level 1 Technical Skills
The internal technical skills represent your ability to control your own body, to put it into position, to hold that position, and to create precise movement patterns. As these skills get stronger, they will – over weeks, months and years- enable you to achieve more externally – to swim easier, to swim farther, to swim faster.
We are confident that you can learn to swim so much farther and faster than you imagine, but still you should start with small goals on the fundamental level and work your way up.
Level 1 Distance Achievement
People are beginning swim training at so many different starting points – each has a different history, a different body, a different set of personal conditions which affect their potential. For those starting from zero we recommend working through a Level 1 series of skills and distance achievement goals. Your skills, your fitness, and your confidence will grow together as you do.
- First goal: 1 length of marvelous strokes
- Second goal: 100 meters of marvelous strokes
- Third goal: 400 meters
- Fourth goal: 1000 meters
Of course, if your fitness and swimming experience already enable you to swim one of these longer distances with your old stroke pattern, consider setting new distance goal according to only how far you can swim if you set a much higher technical standard for yourself – when you raise the standard, you may not be able to go as far at first.
In this way, when you combine a technical standard (qualities) with a fitness standard (quantities) this will likely urge you to consider a shorter distance for your short-term goal. Rather than think about how far you can go, think about how far you can go with higher quality than you have ever had before.
Examples of Goals
Here are a few examples in terms of quantities.
Example A
- I will swim further than 200m without stopping.
Example B
- I will swim 400m faster than I did last year.
Example C
- I will swim 1000m in 18 minutes.
Assignment: Choose Your Achievement Goal
For this assignment you are going to design your short-term training goal. As you go through the course you may revisit this goal and modify it when you get more insight. That is expected. But start with a first draft now.
Considering the technical skills we should master at Level 1 – which two or three skills do you feel are highest priority for your to work on right now? Which skills are weakest for you?
Describe specifically what those would look like and what those would feel like when you have mastered them to a new level. What will they feel like and look like when they have become a habit for you?
Consider the distance achievements you could aim for at Level 1, if you were to do it at a higher technical standard. What distance should you set for your first goal?
Your First Speed Skill Goal
Achieve Suitable Stroke Length
In the pool we measure stroke length by counting strokes on each length, in terms of Strokes Per Length (SPL)
By far, most people who are starting to train have a stroke that is too short, and therefore inefficient in the use of energy. very few people start with a stroke that is too long.
No mater what side you start on, you will aim to improve your stroke length, moving it toward an idea (or optimal) length that is suitable to your body, and your event. You should use shorter repeats for this work, and gradually increase the distance as you control over stroke length improves.
To measure your stroke length and keep track of it, you simply count strokes on each length of the pool. For encouragement on counting strokes you may read:
And, what is an ideal stroke length (or SPL) for you? Read about your Green Zone SPL.
And, then you should consider if there are some reasons to adjust your expectations for how long your stroke should be. For more you may read When To Modify My Green Zone Range?
Achieve Consistent Stroke Length
The next skill objective is to maintain a consistent stroke length, or in other words maintain the same stroke count on every length of the swim.
- Can you do that for 2 consecutive lengths?
- Can you do that for 100?
- Can you do that for 400?
- Can you do that for 1000?
You might be capable of swimming this distance in terms of fitness, but when you add a higher technical standard, can you accomplish this same distance with that higher standard of quality?
Increase Distance
Once your capabilities have improved so that you are able to use an SPL within your Green Zone, or at least improved your stroke length in that direction, and once you can consistently maintain that same stroke length over that entire distances you are training for, you may now consider increasing the challenge by increasing the distance you need to maintain that skill over.
Assignment: Choose Your SPL Goal
Now that you’ve read the description of each level of control over stroke length, which objective should you train for right now?
Add this specific detail to to your short-term goal.
Your optimal SPL range might require a massive jump in capabilities from the SPL you are capable of right now. You may consider the strategy proposed in Making Progress Toward Longer Stroke Length.
Combining Quantities And Qualities
These kind of challenges for achieving and maintaining stroke length are designed to combine both a quantitative requirement and a qualitative requirement together.
- Quantities = What did you accomplish?
- Qualities = What did it cost?
This is how you gain control over your efficiency – you train your body to achieve speed in very specific and efficient ways. It will not naturally choose to swim this way – it must be trained to do this through your intelligent training process.
As you progress in your technical skill and fitness, you will continue to be challenged to maintaining both together as you add tempo control to this equation in Level 2 training. Because energy efficiency (at any chosen speed) is your primary value this principle of combined ‘Quantities + Qualities’ will permeate all of your practices and become a habit for you.
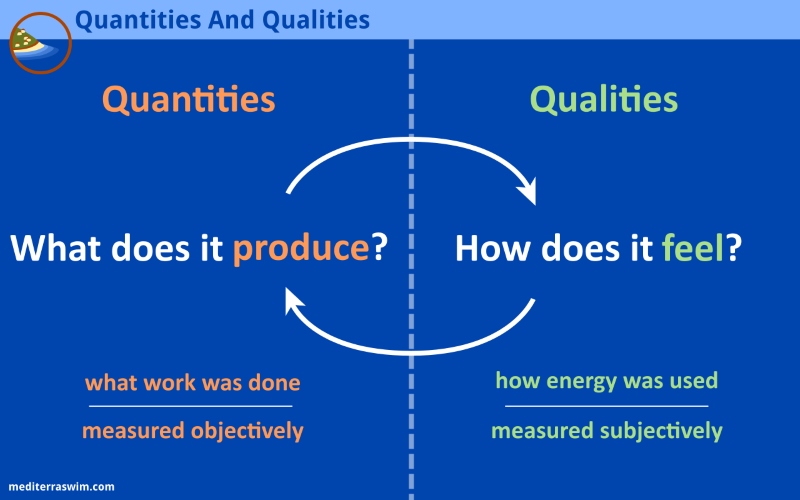
Quantities are what we produce – in terms of speed, distance, stroke length, tempo, ect. – while Qualities reflect the way we use energy to accomplish those.
Both of these should matter to the swimmer who not only wants to swim farther and faster, but to the swimmer who wants to keep swimming for the rest of her life.
Examples Of Quantities And Qualities
Example A
- I will swim further than 200m (quantity) without feeling out of breath (quality).
Example B
- I will swim 400m (quantity) faster than I did last year, and better. I want to achieve an ‘even pace’ (quality) of 2:00/100m (quantity) for the entire swim
Example C
- I will swim 1000m in 18 minutes (quantities) and feel like I could keep going another 1000m (quality).
Assignment: List The Qualities You Seek
Take a moment now to clearly describe in a few sentences how you wan to feel inside your body when you are swimming the way you intend to swim.
Also, describe the sensations you don’t want to feel when you are swimming this way. Make a list of what “I want to feel…” and “I don’t want to feel…”.
This list of sensations you are aiming for, and sensations you are working to remove can guide you in how you evaluate progress during your practice. These are some of the most important qualities you want to achieve.
Section 2: Designing A Set
Section 2 Intro
Before we zoom out to view how a series of practices works together, we will first zoom in to look at how to build a single practice.
We will start with examining how to design a single set within that practice.
Choose The Skill Project
In our form of practice when we train with quantities (such as distance or speed) we always always combine those training qualities (technique). This is how we train the body to be efficient in how it uses energy – not just moving muscles but training those muscles to prefer a certain way of moving.
So, the first things to identify when planning your practice set is what specific technical skill you will work on.
You may want read more about the segments of the stroke in The Sections of the Freestyle Stroke.

Consider what part of the body or stroke section you want to work on, such as the head position or recovery arm.
Choose one skill project for each practice set.
Even if the main purpose of the set is for fitness conditioning, consider what part of your stroke is most vulnerable to deterioration under the stress of this set and make that your skill project. Every stroke, especially when taken under fatigue, is programming your brain to swim this way under similar conditions.
Choose The Focal Points
For the skill project you have chosen, within that part of the body or stroke section choose the specific focal points you will use during this set.
You may choose up to three focal points, but we do not recommend that you try to work with more than that. The brain can only handle so many things at once. By having one to three focal points you may strike a balance between taking enough time to train each one and having some variety in how you apply attention during this set.
For more on this you may want to read What Are Focal Points?
For your live training experience or your copy of one of the TI videos you may have a list of focal points that you have already practiced using.
You may find an outline of the standard TI drills with list of standard focal points of TI’s Perpetual Motion Freestyle series and the Ultra Efficient Freestyle series on our Freestyle Drill Resources page.
And you may enjoy sampling the additional focal points we have created and collected on our 101 Focal Points page.
Assignment: Choose Your Skill Project
Related to the training goal that you have stated already, with its quantities and qualities, choose a skill project of higher priority that you feel you need to work on.
And, for that skill project list up to three focal points that you will use for it – focal points A, B, and C.
Choose The Activities
There are several ways to train your body to swim as your intend. We will list the main activities we use, in their order of increasing complexity for the body and brain.
There are links to read more about what these are, if you are not already familiar with them.
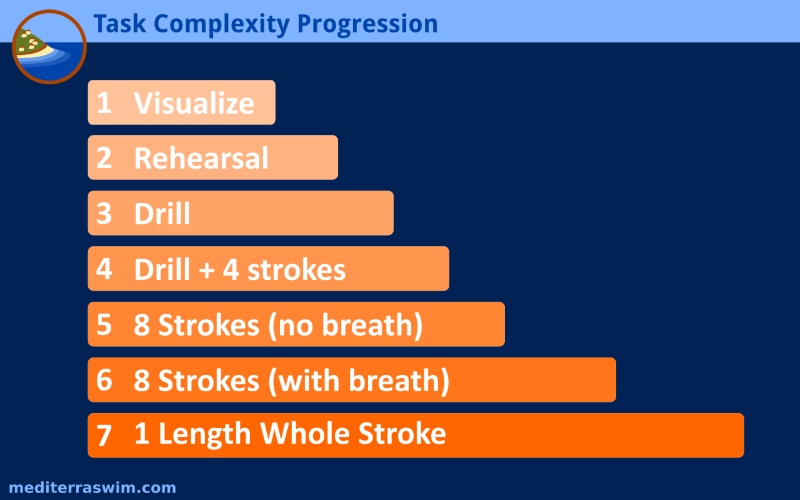
Visualization
You may or may not have experienced or read about the power of visualization training.
In visualization you are not moving your body at all, you are just using your brain to image yourself moving through a part of the stroke of the whole thing.
If you are not familiar with this, you may read What is Visualization?
Visualization can be just a minute or two. You can do it just like you do intervals of drills.
For example, imagine taking 20 strokes (cont them!) and then rest for 10 seconds. Repeat 3 times.
Rehearsal
If you have attended a TI workshop or series of lessons, most likely you have practiced using rehearsals.
A rehearsal is done standing on the deck or in shallow water. You are standing up, working under gravity rather than laying in the water where you have to float and hold balance. In this position you can only work on some parts of the upper body or some rotation movements.
If you are not familiar with rehearsals, you may read What Are Rehearsals?
Rehearsals can be done in for 5 to 10 repeats with rest or a drill between. Plan to rehearse on both sides of the body.
Drill
If you have been training with TI you know what drills are, or what we intend for drills to be like.
Drills have you laying in the water. They can be nearly stationary in the water, to moving slowly, to moving just part of the body, to whole stroke.
If you are not familiar with them, then you may read:
Drills can be very short – just 3 or 4 seconds, or 3 or 4 strokes. They could be up to 8 strokes, about the comfortable limit for holding your breath. And they could be a full length (with interrupted breathing or rhythmic breathing).
Be careful not to turn it into an exercise for getting to the other wall! It is about training precision, not accomplishing distance.
Drill Plus Strokes
You might also do a more stationary or passive drill (like Torpedo, Superman or Skate) for 3 or 4 seconds then take 3 or 4 more whole strokes while holding the same focal point. This also should fit within your comfortable limits for holding your breath.
8 Strokes
You may take just 6 to 8 strokes, again within the comfortable limit for holding your breath.
Why hold breath? You probably should exhale gently while doing the drill so that your body does not get so uncomfortable with the buildup of carbon dioxide. But, if it is not the purpose of the drill, turning to breath can be disruptive to the body and it often takes 2 or more stroke to reestablish best balance and stability. That will use up a lot of precious drill time.
These short segments of strokes will take you only about 10 meters, just a fraction of the length. You might do a drill out past the flags then turn around to do the drill back to the wall, if lane sharing with other swimmers permits.
You may then increase this short segment of strokes by inserting a breath into the middle. Set up with 3 strokes, then turn to breathe, then reestablish your best body position as quickly as possible.
1 Length
The next increase of complexity is to swim whole stroke for a single, full length. This will require some form of breathing, either interrupted breathing or rhythmic breathing.
If you are not familiar with this, you may read What Is Interrupted Breathing?
The idea behind ‘one length’ is to swim just one length and rest or do a drill before doing another length.
Multiple Lengths
Why take all those baby steps before swimming multiple lengths?
If you need a reminder you can read Why Work In Small Pieces At First?
Eventually, you will be ready to swim multiple lengths continuously because you were able to swim single lengths consistently with your best form – reaching the quality standards you have set for yourself.
Now you can choose a number of lengths that correspond to your weakest point of performance. If fitness is weaker than technical control then set the distances of the repeats around that limit. If technical control is weaker than fitness, then set the distances around that limit. You need to bring the weaker system up to proportional strength with your strong systems, then challenge them together.
If you would like some examples of ways to arrange intervals of multiple lengths you may read Try Different Interval Patterns.
~ ~ ~
Choose The Rest Intervals
Between each of these activities and each of the repeats you will take some rest.
But what kind of rest? And how much?
You may read about Passive Rest Intervals, Active Rest Intervals, and Nasal Breath Intervals. In addition, you may read about Work:Rest Ratio and How Much Rest Should I Take.
Keep in mind what systems you are challenging and how recovered you want those to be when you begin the next repeat.
For some sets you want to be completely recovered so you have all resources available for the next repeat. And for some sets you don’t want to be completely recovered because you are training your body to maintain quality in the midst of that fatigue.
There may even be sets where you will not allow yourself any rest so that you must exercise under the challenge of increasing fatigue or waning attention.
So, the training purpose of the set should influence what kind of rest you choose and how much.
~ ~ ~
Assignment: Design Your Practice Set
For this assignment you need to design a single practice set.
First, consider how much time you may need for this set, then consider how much distance, including rest time, that you can fit into this amount of time.
Or, you may consider this in reverse – how much total distance do you want to cover, how will you divide up that distance, how much rest and then estimate how much time it will take to do this set.
Of the seven activity types you have just studied in 2.03, we recommend that you choose up to three of them and do them in the order of their complexity, starting with easiest to hardest.
You might also use an easier activity as a form or active rest between more challenging activities.
Examples Of Practice Sets
Example A
- 3 Rounds
- Choose one focal point for each round (A, B, and C)
- On each round do:
- Visualize – lead arm on target
- Rehearsal – lead arm on target
- 4x Skate Drill for 8 seconds (2x for each side)
Example B
- 2 Rounds
- Choose one focal point for each round (A and B)
- 2 Cycles
- One Cycle for each side of the body
- Rehearsal – Recovery Swing
- 2x Drills plus 4 strokes
- 2x 25 whole stroke
Example C
- 2 Rounds
- Choose two focal points (A and B)
- Alternate focal points each 25 during swim
- 50 + 100 + 150 + 200 whole stroke
- Use 10 seconds of Skate Drill as active rest between repeats
Choose The Measurements
In order to improve certain features of your skill, you need to measure them. When your goal is written in terms of certain quantities and qualities taking regular measurements in practice and conducting swim tests will show you where precisely where you are making better progress and which areas are weaker and need more emphasis in practice.
Quantity Measurements
Quantities are the easiest things to measure and therefore commonly receive the most attention.
Here are the primary quantities that are measured in swimming performance:
- Time (how long it took to complete a certain distance)
- Distance
- Speed (a function of time distance/ time)
- Pace (a function of distance/ time)
- Stroke length (SL) or stroke count (SPL)
- Tempo or Stroke rate (SR) (the frequency of stroke)
- Rest Intervals (how much rest was taken compared to how much work)
The latest swim watched can measure many of these. A simple chronometer watch is sufficient to measure time.
We do recommend that your practice counting strokes on your own, rather than rely upon a watch. The instantaneous feedback of stroke count in the middle of your swim is far superior to getting the number from your watch later. If you wonder why you may read Why Count Strokes?
Quality Measurements
If you need some encouragement to increase you emphasis of qualities in swimming your may read Why Measure Qualities?
You may also read Technique And Fitness Unite, as well as do a search on our blog for this word ‘qualities.’
Qualities that you may measure using your senses during your practice set include:
- Sense of ease
- Sense of relaxation (in those areas that should be relaxed)
- Sense of balance (head to toe)
- Sense of stability (especially coming into Skate Position)
- Sense of streamline (lower water resistance, easier slide)
- Sense of precision
- Sense of solid grip (during the catch)
- Sense of pressure (during the catch or kick)
- Sense of acceleration (during entry and extension)
- Sense of momentum (during the catch or kick)
- Sense of smooth flow of force (transferring through the body)
- Sense of rhythm
- Sense of synchronization (moving body parts timed well)
- Sense of effort (using the RPE scale)
Examples of Measurements
We recommend that you choose up to three forms of measurement to consciously track during a practice set. These may be a combination of quantities and qualities.
Example A
In a simple practice you may have just one measurement that you are tracking such as distance or sense of relaxation in one specific part of the body.
Because the development or protection of qualities is our priority in efficiency training, you need to always have at least one quality measurement in mind for a practice set. It may not be a dominant variable, but you are keeping some part of your attention on it to make sure it does not deteriorate.
By default, nearly every whole stroke activity has a specific distance assigned. This is a measured distance. Distance may not be the main thing you are focused on measuring during the swim, but as you swim along, you may encounter a point where some internal quality changed (for better or worse) and you should note the distance at which that occurred. This is important information.
So, in reality when doing whole stroke swimming, you wont’s often be making only one measurement. in short drills work (of a few seconds or meters) you may often be measuring just one thing.
Example B
In whole stroke swimming and in intermediate drill work you may have two measurements that you are tracking – you might hold both of them steady, or you may hold one you are holding steady, and the other one you are changing incrementally as you go through the practice.
For, example, you may choose stroke counting (quantity) and monitor the shape and grip of your catch on the weaker arm (quality).
Example C
Eventually, you will get into whole stroke sets that have you measure three variables such as stroke count and temp (both quantities which compose pace), and a feature of your stroke such as lead arm position while breathing to your weak side (quality).
Assignment: Add Qualities
In the practice set that you designed already, with its various activities, distances (quantities), now add to it the one quality that you want to monitor or measure during the practice set.
Set The Complexity Level
This is where it gets more complicated. Please take time to study this section because we are getting into the heart of how this kind of mindful practice works to create genuine efficiency.
In order to have the positive affect on the specific part of your technique and fitness you want to challenge and then choose the right amount of challenge, not too much and not too little. The principles ahead will guide you close, but you are in the best position to test and decide where that sweet spot of challenge is for you.
Note: throughout our course and in our materials we may use the words ‘complexity’ and ‘challenge’ interchangeably. Complexity refers more to what’s happening in the brain and motor control, while challenge is more general to what’s happening for the whole body. We will more often just use this word challenge because it is more commonly understood.
What Will You Challenge
In our manner of training you are always developing fitness and technique together. But in each practice design you may be emphasizing development of one or the other, even while both are working. It’s a matter of conscious emphasis and measuring.
One could design a practice set that challenges everything at once so that everything fails. One could design a practice set that challenges nothing so that nothing gets improved. You don’t want to challenge everything at once, and you don’t want to challenge nothing and waste your time.
Since you can’t develop everything at once, choose just one or two features (at most) to challenge during the set. One of these should always be a quality.
I encourage you to stop here and read about Self-Limiting Practice Sets to get a better idea how practices need to be designed.
To get started with this, we will make this simple with three main variables in the set: distance, intensity, and skill.
You can design your practice set in one of these basic ways:
- Hold distance, hold intensity, hold skill standard
- Hold distance, hold intensity, increase skill standard
- Hold intensity, hold skill standard, increase distance
- Hold distance, hold skill standard, increase intensity
For a bit more explanation about how to choose what type and how much you may read Basic Practice Set Challenge.
Choose Repeat Distances
The first consideration is what is the total time or total distance you want to work with in this set. You may have a limited amount of time or a limited amount of energy available for this set.
The second consideration is what is the longest repeat length you want to work with. Your weakest system should influence this decision, because you might be capable of swimming far or fast with poor technique but that is not what you are engaging in this kind of training to do. You need to sue most sets to strengthen the weakest systems until they can hold up to work your stronger systems can do.
For example, if your motor control can only hold up to about 150 meters before you lose precision too much, or if your attention wanders after 25 you should consider working up to and just barely past those limits.
You also use rest intervals (between the repeats) to give your body and mind time to recover so that you can possibly work farther on each repeat.
If you would like more explanation about intervals you may read How Distance Intervals Work and Work:Rest Ratio.
You can further organize your repeats to accommodate more features in the set.
Example of Repeat Arrangements
Example A
For a simple set you would just make one round with some selection of repeats:
- 5x 100
- 2x (drill + 4 strokes), 2x 8-strokes, 1x 25
- 100 + 150 + 200 + 150 + 100
For more ideas you may read Try Different Interval Patterns.
If you are ready to work on 1000m swim you may read Intervals Progression for 1000 Meters.
Example B
To give attention to both sides of the body you may divide into two cycles, using the same focal point on each side:
- 2 cycles of (1x Drill + 4 strokes, 2x 8-strokes, 2x 25 whole stroke)
- Work on recovery arm swing
- Cycle 1: Concentrate on right arm
- Cycle 2: Concentrate on left arm
Example C
To take time for a few different focal points you may divide into two or more rounds:
- 3 rounds
- Choose one focal point for each round (A, B, and C)
- On each round (4x 25 + 2x 50 + 1x 100) whole stroke
Assignment: Design Your Ideal Challenge
Now it is time to apply what you have just studied about setting the appropriate challenge level for yourself using an arrangement of distance, intensity and skill requirements in your set.
Review your practice set with its quantities and qualities, and look at the features of the assignment to identify which variable should be held in the green, which should be subject to a little stress, and which should be challenged near the failure point. Adjust the way you’ve written the set so that you feel more confidence that it will take you into your sweet spot of challenge.
~~~
Section 3: Designing A Full Practice
Section 3 Intro
In the previous section you studied how to design a single practice set. Now you will look at the components that go into an entire practice session.
Sections Of Practice
There could be a lot of ways to organize a practice, but here is a logical way to organize your time.

Divide the practice into three sections: the Warm-Up, Main Sets, and the Cool-Down.
The Warm-Up is where you prepare the body, brain and mind to work, and to work together harmoniously. We will repeat this later – the higher the quality of your warm up the more productive your main set can be.
The Main Sets are where you present the main challenges for your skills and fitness and work to solve those.
The Cool-Down is where you review what you have just done and prepare your body to leave on a positive note.
~~~
Design The Approach
Before you even get in the water, let us point out that you can further increase the quality of your practice time by creating a routine to follow on the way to the pool – this routine would prepare you to be fully present and engaged in your practice time. Your approach will affect your experience in practice.
The idea is to form a Swim Preparation Habit that sets you up for the most positive and productive practice time.
To be inspired about this further you may read Your Swim Prep Habit.
The fact is, you may have a routine already. But have you thought through that routine? Is it carefully planned out? Are all the things you do chosen for how they contribute to your practice? Some are and likely some are not.
Consider the activities that may be a part of anyone’s routine on the way to the pool (all the way to entry into the water):
- Gathering your swim gear from their exclusive drying spot.
- Checking supplies in your swim bag.
- Restocking supplies in your swim bag.
- Reviewing your results from last practice.
- Reviewing your practice plan for today.
- Setting your main intention or objective for this practice.
- Envisioning your upcoming practice on the way to the pool.
- Choosing silence or special music to prepare you for practice.
- Choosing your locker or spot in the changing room.
- How you fold and store your clothes.
- How you put on your swim attire, in what order.
- Before you get in the water who do you talk to, what about, and why.
- When and how you rinse in the shower before entering the water.
- How you arrange your gear beside the pool.
- How you breathe before you enter the water.
- What you focus your attention upon before you enter the water.
- How you enter the water.
- How you begin your first length.
Assignment: Improve Your Approach Routine
This assignment has a few parts.
Step 1
Practice awareness. Think through all the moments that happen in a typical approach to practice. Simply take inventory of those events.
Step 2
Consider which events have a negative impact on your practice. For each one come up with at least one way to either remove or reduce this stress.
Step 3
Consider which events have a positive impact on your practice. For each one come up with at least one way to protect or improve this part of your routine.
Step 4
Consider anything you could add to your routine that would make it even better.
Step 5
For at least the next 4 weeks, for each week, choose one of these improvements and apply that to your routine for the entire week. The following week, keep that improvement going and choose another improvement to make to your routine.
~~~
Design The Warm Up
We need to stress the importance of the warm-up time. The better your warm-up the more productive you can be during your main sets because your brain and body will be prepared to work at a much higher level. Please do not be impatient; do not take short-cuts with your warm up time.
For more encouragement you may read these articles:
What if you are not feeling so eager when you get to practice?
For encouragement and a recommendation on how to work with this, you may read How To Leave The Pool.
Here are some activities that we recommend for your warm up time:
- Silent Swimming
- Slow-Motion Swimming
- Switch between alternative strokes (breast, back, fly)
- Fist Swimming
- Alternate short distances of slow-medium-brisk swimming
- Skate Position kicking with short fins
- Backstroke Skate Position kicking with short fins
Here are some general recommendations – you may think of exceptions to this, but in general these may help you:
- Start as gently as possible and keep it gentle until you feel energy increase and feel your body ‘pulled’ into more energetic movements.
- Keep motion within comfortable range of motion (passive flexible range). Don’t force your joints to stretch – let tissues lengthen and joints open up naturally through gentle rhythmic motion.
- Use breathing, and particularly use the exhale as one of your initial focal points.
- Add some variety of movements like switch between different strokes that you can do gently and comfortably.
- After 5 minutes or so, add a variety of intensity.
Examples For Warm Up
Example A
- 6x 50 whole stroke – gentle
- 2x (50 breaststroke + 50 backstroke)
- 4x 25 Skate Position kicking with fins
Example B
- 300 Silent Swim
- 3x (50 fist + 50 hand)
- 2x 100 Slow-Motion whole stroke, new focal point on each round
Example C
- 600 Slow-Motion whole stroke
- 3x (50 slow + 50 medium + 50 brisk)
- 3x (100 focal point swim + 50 breaststroke), new focal point on each round
Design The Cool Down
The Cool-Down is where you let your body systems slow down, the waste products to more easily be drawn out of your muscles and let your mind reflect on what you just accomplished and how that should influence the next practice.
Physically, the cool down activities should correspond to the kind of work you did in the main set.
Move your body gently in the same movement pattern as the main set, allowing those muscles and joints to dissipate the waste products.
Move your body gently in the counter-movements to loosen tissues that might have tightened in support of hard, repetitious work in the main set. For example, swimming in backstroke moves the shoulder join in the opposite direction as freestyle. Swimming in breaststroke moves the shoulders and hops in ways very different than freestyle and backstroke.
At the very end, move in a way that is very pleasant. Leave the pool with positive physical and mental sensations flowing through you.
Some activities that we recommend for cool down:
- Silent Swimming
- Pure Pleasure Swim
- Backstroke Skate Position kicking with fins (continuous breathing)
- Underwater dolphin (well within comfortable breath hold distance)
- Pool skills work (discussed in a later section)
Use this time to reflect on what you intended to accomplish, what you actually accomplished – including points of improvement and points of failure. Think of ways today’s results should influence your next practice plan. Set a new intention for your next practice while the sensations are fresh and strong.
The Routine Sandwich
An amount of variety and choices in your practice week is a good thing, but too much can have negative effects.
Think of your practice as a sandwich. The warm-up and the cool-down represent the two pieces of hearty, healthy bread – it stays fairly steady from practice to practice – while the filling is the main set – which may be different from practice to practice. For consistency keep just two or three warm up and cool down routines in your list of options, then allow the variety to come from the changes in your main sets.
As a matter of fact, for a period of weeks we may recommen that you keep your warm up fairly similar from practice to practice. When you do this you have a very consistent situation at the beginning of each practice in which to scan your body and mind and notice any differences between the previous practice and today. By keeping the conditions of your approach and warm-up routine the same, internal differences in your body and mind will become more pronounced when they are unusual.
This will allow you to make better interpretations as to what is causing the difference in how you feel today. If it is a positive thing, then you can consider what you may do to protect this cause and replicate it. If it is a negative thing, then you can consider what changes you may make to avoid or prevent it again.
So, make your warm-up fairly routine from practice to practice, with occasional variations in some part of it. Plan your cool down to match the kind of main set you have done. You may have a cool down routine for each of your practice types (we discuss those types in the next section).
Assignment: Design Your Warm Up and Cool Down
Looking at the activities and guidelines given in this section design 2 different warm-up routines and 3 different cool-down routines.
Warm-Up
Aim to make your warm up last at least 10 minutes long (of continuous movement) and perhaps up to 15 or 20 minutes long. The total distance could be 500 to 1000 meters.
Let these warm up routines include both gentle movement in your main stroke style and either add some variety with other stroke styles or add short pieces of varied intensity.
Cool-Down
You will come back to this assignment to revise it once your have some additional insights from the next section. But start your design now.
Aim to make your cool down at least 5 minutes long (of continuous movement). Let one activity gently move your body in the same stroke style of your main sets.
Let one cool down routine include movements counter to the main stroke style or very different to it.
Let one cool down routine include some kicking in Skate Position – backstroke or face-down Skate Position
Let one cool down routine include a Pure Pleasure swim.
The Minimum Practice
What do you do on those days you don’t feel you should do a full practice, or you happen to be recovering from illness?
Combine your favorite warm-up and cool-down routine and use that as your default minimum practice. Those activities should be designed to be gentle on the body and pleasing to the mind so they may feel good to you even if you don’t have so much energy.
If your warm-up is 10 to 15 minutes and your cool-down is 10 to 15 minutes you have 20 to 30 minutes of activity that is gentle, positive and productive.
You may also derive some encouragement from this article Alternatives On A Rough Day.
Design The Main Sets
Rather than trying to fit a little of everything into every single practice, we recommend creating three or four practice types, where each practice address a specific training need. When you rotate through these practices over the course of the week and over the course of the training cycle you are able to work on your full range of training needs. The idea here is, in a single practice, do a little bit less (in terms of topics), and do it better.
Types of Sets
Let us introduce the four main types of practice: Attention, Distance, Tempo, and Pace Practice.
First, let’s review the theory behind this division. Speed, endurance, and enjoyment in swimming is foremost dependent on your skill. Whether you swim for fitness, pleasure, or performance they all involve speed and endurance that is appropriate to the kind of swimming you want to do.
Speed is a skill. Endurance is a skill. Enjoyment is a skill.
So, rather than separate skill work from fitness work, every practice is going to combine skill and fitness work together.
Arranging Practice Types
In any practice you can mix and match the types of sets that you do:
Example A
- Warm Up
- Main Set 1 – Attention
- Main Set 2 – Tempo
- Main Set 3 – Distance
- Cool Down
This approach tries to do a bit everything in each practice. You may take one skill project and work on it in these three different modes.
However, we recommend that you make each practice devoted to just one type of practice and then rotate through practice types in each weekly training cycle.
Example B
- Warm Up
- Main Set 1 – Attention Set 1
- Main Set 2 – Attention Set 2
- Main Set 3 – Attention Set 3
- Cool Down
This approach concentrates on developing one part of your performance system more thoroughly, then changes emphasis to another part of your performance system in the next practice.
This will be explained further in the next section on How to Design A Series Of Practices.
Attention Sets
These are called Attention Sets because the main objective is to deepen your awareness of signals in the body and improve your responses to them. The stronger your attention skills are the stronger your body control can be.
Attention sets are appropriately placed at the beginning of your 11weekly practice cycle because this is where you tune up the skills you will use for the other practices for the week.
These sets have the lowest physical difficulty, yet assign the highest attention requirements. This is time you use drills and whole stroke to identify problem areas and work on solutions. You take notes on what to pay attention to during the other sets and practices in this week’s cycle.
These are also good sets to use for a lighter, recovery activity. Your brain will still need to work at a high level, but you can keep the demands on muscles and metabolism lower.
The main internal measurements in attention sets are reading the sensations coming from the body as position and movement is adjusted – what does it feel like? Butter or worse? When the body is positioned well and working the way it should, when energy and force are flowing smoothly it will feel good.
And the main external measurement is stroke count (SPL) – how many strokes did I take? Better position, better stability, better movement patterns should result in sliding farther, sliding easier through the water.
Sometimes you may add a tempo requirement with tempo set to your comfortable tempo – using the BEEP to call your attention to a point in the stroke.
Examples Of Attention Sets
Here are some examples of how a main set in an Attention Practice could be designed.
Example A
- 3 rounds
- Choose 1 skill project
- Choose 3 focal points
- Assign one focal point to each round
- 2 cycles
- Cycle 1 – emphasize left arm
- Cycle 2 – emphasize right arm
- 2x drill for 8 seconds
- 2x drill + 4 strokes
- 8 strokes
- Passive rest 10 seconds between drills
Example B
- 2 rounds
- Choose 1 skill project
- Choose 2 focal points
- Assign one focal point to each round
- (4x 25) + (2x 50) whole stroke
- Active rest 2x drill for 8 seconds at start and between rounds
Example C
- 3 rounds
- Choose 1 skill project
- Choose 2 focal points
- 2 cycles
- Cycle 1 – breathe on strong side, at 2 and 4 strokes
- Cycle 2 – breathe on weak side, at 2 and 4 strokes
- 25 + 50 + 75 + 100 whole stroke
- Optional: set TT to comfortable tempo TC
- Passive rest 15 seconds between repeats
- Passive rest 20-30 seconds between rounds
Distance Sets
First, let’s point out that stroke length (SPL) makes up the first part of the speed equation.
SPL x Tempo + Pace (inverse of SL x SR + Speed)
Stroke length is more difficult to train than tempo, and more important to establish first. Over the distance, the more consistent you are with an appropriate stroke length the better you will be at holding your pace.
The term ‘distance’ in Distance Sets refers first to stroke length, the distance you travel per stroke, and secondly to how far you swim. Distance Practice is aimed at training your to cover the total distance with consistent stroke length.
So, your first objective in Distance Sets is to achieve certain stroke length, measured in stroke count (SPL).
Your second objective is Distance Sets is to do as much of the assigned distance with consistent stroke count. This applies to training for extremely short sprint distances as well as to long distances swimming.
It may be good to review What Is A Failure Point?, What SPL Should I Use?, and Optimal Stroke Count Green Zone. And you may review Making Progress Toward A Longer Stroke.
Examples Of Distance Sets
Example A
- 3 rounds
- Choose 1 focal point for each round
- Set N at your optimal SPL
- 3x (25 + 50 _ 75) whole stroke
- Maintain consistent SPL
Example B
- 3 rounds
- Choose one focal point for each round
- Whole stroke on each round
- 50 at N+1, 100 at N, 100 at N-1
- Switch SPL gear precisely, then hold consistent
Example C
- 5 rounds
- Set N at your optimal SPL
- On each round alternate SPL N+1 and N
- Round 1: 125 at N+1, 25 at N
- Round 2: 100 at N+1, 50 at N
- Round 3: 75 at N+1, 75 at N
- Round 4: 50 at N+1, 100 at N
- Round 5: 25 at N+1, 125 at N
- Switch SPL gear precisely, then hold consistent
Tempo Sets
Tempo Sets
Tempo makes up the second part of the speed equation.
SPL x Tempo = Pace (inverse of SL x SR = Speed)
Tempo is flexible, and it is relatively easily trained, compared to stroke length which (once you reach you optimal range) stays fairly constant and is much more difficult to train. Tempo is something you may adjust over the year, using a slower tempo range for some events and faster tempo range for others.
The main purpose of tempo sets is to train your body to maintain consistent precision and consistent timing – which will combine with consistent stroke length (SPL). Tempo only has meaning when it is combined with a well-trained stroke length, therefore it is secondary to training for stroke length.
Here are four ways to use Tempo:
- Use tempo at a comfortable setting in order to help you build better precision and coordination of movements. The BEEP draws your attention to the orderly rhythm of the movements, and the timing of certain body parts in relation to each other. Like a dancer or a musician, the efficient movements must timely and coordinated through the whole body. The regulated BEEP compels you to learn this timing. Keeping a consistent tempo is a critical piece of maintaining control over energy expense.
- Use tempo at a comfortable setting for longer distances in order to memorize tempo. By using Tempo Trainer to set the strict timing, you have the opportunity to imprint a preference for steady rhythm into your nervous system so that you are not dependent on a Tempo Trainer to maintain it – like a musician would learn to keep timing with a metronome in order to play the music flawlessly without it.
- Use faster-than-comfortable tempos to challenge your precision and timing. You may read more about Tempo – Speed It Up.
- Use slower-than-comfortable tempos to find weaknesses in your balance, stability and streamline shape and strengthen those areas.You may read about Tempo – Slow it Down.
If you are not familiar with tempo training yet, you may want to read these articles:
Examples Of Tempo Sets
Example A
A simple attention set…
- 3 rounds
- Choose one focal point for each round
- 25 + 50 + 75 whole stroke
- Set Tempo Trainer to TC
- Maintain focal points standard for each progressively longer repeat.
Example B
As Asymmetric Tempo Pyramid
2 rounds
- First round – 5x (2x 25)
- Start TT at TC, slow tempo by + 0.10 on each round, finish at TC + 0.40
- Count strokes on each length
- Aim to reduce SPL on each length
- Second round – 8x (2x 25)
- Start TT at TC + 0.35, increase tempo by -0.05 on each round, finish at TC
- Count strokes on each length
- Aim to prevent SPL from increasing on each length
- Try to finish set with lower SPL than you started with
Example C
- Faster -Tempo Ladder
- Up to 8 rounds
- 3x 50 whole stroke
- Start TT at TC – 0.10, increase tempo by -0.03 on each round
- Repeat round when encountering partial failure in precision
- Stop set when encountering too much failure
Pace Sets
Pace is the produce of combining a certain SPL with a certain Tempo.
SPL x Tempo = Pace (inverse of SL x SR = Speed)
The most difficult practice set is where you require yourself to maintain both a specific stroke count and a specific tempo. This is where you combine the skills you have built for SL and tempo.
Obviously, you will not be ready to do pace sets until you have first spent some time building the separate skills for consistent stroke length and consistent tempo. After some weeks of training for skills and building fitness conditioning pace work will be more attractive and more productive.
Less developed swimmers will achieve consistent pace at great cost by greatly increasing their tempo as stroke length falls apart over the course of a swim. More developed swimmers will achieve consistent pace at lower cost by keeping stroke length fairly steady and then also keeping tempo fairly steady over the course of a swim.
It is harder up front, to train your brain and body first for maintaining consistent stroke length and then for consistent tempo, but in the long run you become much more fit and capable swimmer. Pace sets are where you test that ability.
In the first level of pace sets you are working on holding a steady single SPL x Tempo combination. In the next level you may switch between pace gears. In the next level you may be gradually increasing difficulty with either SPL and Tempo.
You may view combinations for in a 25m (or yard)
You may read more about:
Examples of Pace Sets
Example A
1 round
- Set N at your optimal SPL
- Choose suitable Tempo Trainer near your fast-tempo threshold
- Choose one Pace Gear (SPL x Tempo Combination)
- 100 + 150 + 200 + 150 + 100
- Maintain consistent pace gear
- Passive rest 20 seconds between repeats
Example B
3 rounds
- Set N at your optimal SPL
- Choose suitable Tempo Trainer near your fast-tempo threshold for N SPL
- Gear 1: SPL N+1 x T-0.06
- Gear 2: SPL N x T
- Gear 3: SPL N-1 x T+0.03
- Round 1: 3x 50 at G1, 3x 50 at G2, 3x 50 at G3
- Round 2: 2x 75 at G1, 2x 75 at G2, 2x 75 at G3
- Round 3: 1x 150 at G1, 1x 150 at G2, 1x 150 at G3
- Passive rest 15 seconds between repeats, 30 seconds between rounds
Example C
Up to 5 rounds
- Set N at your optimal SPL
- Choose suitable Tempo Trainer near your fast-tempo threshold for N SPL
- 3x 100 whole stroke
- Round 1: SPL N x T
- Round 2: SPL N x T-0.03
- Round 3: SPL N x T-0.06
- Round 4: SPL N+1 x T-0.09
- Round 5: SPL N+1 x T-0.12
- Passive rest 20 seconds between repeats, 45 secounds between rounds
Assignment: Design Your Sets
For this assignment you need to design.
Two Attention Sets – one for a skill project that will be difficult for you to work on, where you need to set the complexity level low (more rehearsals and drills, with less whole stroke), and one that is easier for you to work on, where you may set the complexity level higher (less drills and more whole stroke).
One Distance Set – which uses repeat distances of a length that take you up to the limit of your weakest system – attention, quality control, or fitness.
Two Tempo Sets – one that has you work on the more difficult skill project at a steady, comfortable tempo, and one that has you work on the easier skill project and challenge that skill at either tempos that gradually move toward your slow-tempo threshold or move toward your fast-tempo threshold.
One Pace Set – which will focus on your easier skill project and have you work at a pace combination (a specific SPL x Tempo) that uses repeat distances of a length that take you up to the limit of your weakest system – attention, quality control, or fitness.
Record Your Results
Taking time to record your practice plans and results has many beneficial effects:
You build a catalog of practice plans.
You can see patterns emerge when you review the record, both of what contributes to your progress and what contributes to your setbacks.
As records build up you gain a stronger sense of accomplishment, of investment, of identity that you are a devoted athlete. You have documented that fact.
You feel more accountable for sticking to your practice routine and plan.
Here is some of the information that it would be helpful to record:
- the practice plan
- how you changed the plan in the midst of practice, and why
- the numbers (quantities) you assigned for the practice sets
- the qualities you assigned for the practice sets
- the results in terms of quantities and qualities – what did you accomplish, where did you fail?
- what did you learn from this practice that should influence your next practice?
This record should be kept somewhere convenient for you to access it. It could be:
- a designated journal book
- a note-taking app on your favorite device
It may work best to record your results immediately after practice as part of your routine so that the experience is most fresh.
Section 4: Designing A Series Of Practices
Section 4 Intro
Now that you have studied how to design the pieces of a full practice session, we will discuss how to compose a series of practices that work together to develop both skill and fitness, taking you toward your short-term achievement goal.
Designing A Progression Part 1
We will propose a couple ways you can create a series of practices that take you through an orderly progression to develop your abilities.
Straight Series
This involves a single practice type, peformed in a consecutive series.
For example:
- Day 1: Attention Practice 1a (progression step a)
- Day 2: Attention Practice 1b (progression step b)
- Day 3: Attention Practice 1c (progression step c)
- Day 4: Attention Practice 1d (progression step d)
In this series, you would design a single Attention Practice and then modify each set in one way for the subsequent practice, making it slightly more challenging each time.
By working through a straight series of practices, where you repeat the same practice with small, careful adjustments in the challenge level, you can really notice cause-and-effect and detect fine details of progress you are making.
The downside is that you are not working the other performance systems for several days while you spend several consecutive practices working in the same dimension like this. If you are just starting swimming, or just starting to rebuild fitness, this may be a good way to start gently – especially in using Attention sets which work the physical body more gently while building up the motor control required to safely handle higher work loads.
Cyclical Series
Another approach is to use multiple practice types, in a certain order, and repeat them over multiple cycles.
For example:
- Week 1: Attention Practice 1a, Distance Practice 1a, Tempo Practice 1a
- Week 2: Attention Practice 1b, Distance Practice 1b, Tempo Practice 1b
- Week 3: Attention Practice 1c, Distance Practice 1c, Tempo Practice 1c
Just as with the Single Series, you design each practice then create slight modifications for the next time you do that practice type, but during the week you work through a few different practice types.
By working through a cycle of practice types you can work on all of the performance systems, with each practice emphasizing a particular performance system.
Designing A Progression Part 2
Plan For Repetition
In both approaches to a series of practices you are establishing some repetition. You brain needs repetition in order to build the circuits for those skills.
And, repeated practices allow you can get familiar with how that practice works and how your body responds to it.
Rather than randomly bounce around from skill project to skill project, constantly changing what you work on and how, choose just one to three skill projects for the practice cylce and work on just those. There is room to be flexible and add some other things of interest, but be patient and persistent to work with repetition to acquire the skills.
Plan For Consistency
Be consistent about keeping to your practice schedule and routine. This consistency is what builds habits for how you live and practice, and this consistency builds habits for how you perform the training activities.
Practices need to be frequent enough and provide enough routine so that your brain can acquire the skills and strengthen them. By working on the same few skill projects consistently over a few practices, over a few cycles your brain has a much better opportunity to adapt and find more economical ways to apply that skill.
You may be in a situation right now in life where you can only manage to schedule 1 or 2 practices per week. If this is your situation, then let’s be grateful that you can schedule these practices and use that precious time well.
But, if you have the option we highly recommend 3 to 5 days of practice per week, with at least one full physical rest day.
Plan For Variety
The principle of repetition and consistency can possibly lead to some boredom and urge your brain to tune out of the training activity.
It is also important to combine variety with repetition. They are not necessarily opposed to each other. Rather than creating variety by changing the skill projects frequently (and thus reduce your ability to develop any one of them) you keep the same skill project and change the mode in which you are practice that skill. Work on the same skill with different practice types.
By taking one skill and practicing it in different modes over the cycle, you make that skill much stronger, more resilient under a wider range of swimming conditions.
Here is an example of how you could spread out a larger set of skill projects (A, B, C, D and E) over a 4 week cycle:
- Week 1 and 2: Three skill projects A, B, and C
- Week 3: Three skill projects B, C, and D
- Week 4: Three skill projects B, D, and E
You have room for only so many projects in a week. But you may work through some of those projects slower, and some faster than others. So, once you are done working on one project you can fill that space with another on your list.
Gradually Increase Intensity
Another way you will create variety while repeating or cycling through practice types is by gradually increasing the challenge of those practices.
Design the first practice set to just barely start to challenge your weakest performance system. Then if you feel you were fairly successful with that assignment, increase the challenge level by one increment the next time you do that practice set.
- Practice Set 1: Starting Challenge Level
- Practice Set 2: Starting Challenge Level + 1 step increase in challenge
- Practice Set 3: Starting Challenge Level + 2 steps increase in challenge
- Practice Set 4: Starting Challenge Level + 3 steps increase in challenge
You may increase the challenge level one week, but then keep it at the same challenge level the next week in order to give your body more time to adapt. You need to evaluate your progress is adaption to decide how soon and how much you can increase the challenge level and still stay within your sweet spot of challenge.
Designing A Progression Part 3
Change Just One Variable
To increase the challenge level in a ‘scientific’ way you should change only one variable of that practice set and keep the rest the same. This allows you to more easily notice the cause-and-effect in your results, from one practice to another.
If you kept the practice variables the same, but get a different (better or worse) result, then you can more easily search for the reason why.
If you changed just one variable, making the practice slightly more difficult, and you get the same positive result as last time, you may be encouraged that your abilities are increasing.
If you changed just one variable, making the practice slightly more difficult, and you get much more failure than you expected, you may realize that this was too much, too soon. You may need to get back to the previous practice plan and repeat it exactly as it is until you feel your body has had enough time to adapt and increase its abilities. Then try to practice with increased difficulty again for a test.
Here are the main variables you can change:
- Hold distance, decrease distance, or increase distance
- Hold intensity, decrease intensity, or increase intensity
- Hold skill standard, change skill focus, increase skill standard
Note: Intensity may be affected by changing the stroke length (stroke counting), and tempo, pace and perceived effort (RPE). Make any of these slightly more challenging and you have just increased the intensity of the set.
There are different ways you can increase the challenge of the set, from one practice to the next. If you are designing another set to follow the previous one you may want to …
- Hold all variables the same and compare to the results last time you did this set to see if there is progress.
- Hold most variables the same but change just one variable to make this set slightly more challenging than last time.
- Hold most variables the same but decrease just one variable because you experienced too much failure the previous time you did this set.
Example of Practice Cycles
Here is an example of a 7-Day Practice Cycle:
Day 1: Attention Practice, Strength & Conditioning
Day 2: Tempo Practice
Day 3: Strength & Conditioning
Day 4: Distance Practice
Day 5: Stretching, Rest
Day 6: Pace Practice
Day 7: Rest
Here is an example of a 9-Day Practice Cycle:
Day 1: Attention Practice, Strength & Conditioning
Day 2: Tempo Practice
Day 3: Stretching, Rest
Day 4: Distance Practice
Day 5: Attention Practice, Stretching
Day 6: Rest
Day 7: Strength & Conditioning
Day 8: Pace Practice
Day 9: Rest
Assignment: Design Your Series
Go back to your previous assignment where you designed two Attention Sets, a Distance Set, two Tempo Sets, and a Pace Set.
Look at each one and lay out a plan for creating a 4-step progression for each one of those sets. For each practice set decide which variables will stay the same, and which single variable you will slightly increase the challenge for over the course of that progression.
Now, consider how many week this series will need – it may be 1 to 5 weeks long.
Periodic Test Swims
If you are training for a specific swimming event, then you should include a periodic test swim that will allow you to measure your progress in skills and fitness for that event.
As a suggestion, the test swim might be done once a week, twice a month, or once a month.
This test swim might be the full swim under conditions as close to race conditions as possible. It might be an interval swim to test your performance in pieces. Or it might be a test of just some part of your swim event (especially, if you are training for an extremely long swim where full test swims are not practical).
Some of your regular practice sets will naturally provide some testing of your abilities, if you do those same practice sets periodically (without variation, so that results can be fairly compared to one another). But a specially-designed test swim may be more appropriate to get the kind of measurements you need to make better assessment of your progress.
For those with limited time, practical test swims might be up to an hour in duration.
You may want to use a conventional swim event distance like 100 meters, 200, 400, 800, 1500, or a 60 minute time trial (= how many laps you swim in 60 minutes).
You could do the full continuous distance (no rest), or any of these distances might be broken up into intervals like…
- 400 = 4x 100 with Y seconds of rest between each
- 1500 = 3x 500 with Y seconds rest between each
- 60 minutes = 3x 20 minutes with Y seconds of rest between each
When you do these test swim, the whole point is that you measure some features of your performance. Measurements that are helpful to make:
- Total Time
- Split Time (for each 100, or on some regular interval)
- Total Distance
- Stroke Count (for every length or for every 4th length or on some regular interval)
- RPE (as it changes over the duration of the swim)
- Attention (as it changes in strength over the duration of the swim)
- Sense of ease
- Sense of precision
Assignment: Design Your Test Swims
Looking at your main quantitative goal (distance) and with consideration for your current level of skill and fitness, design a test swim that would be appropriate for you.
Now, plan how frequently you will insert this test swim into your series of practices – once a week, twice a month, or once a month.
Rest And Recovery
There are people who consider themselves an exception, but you will need at least one rest day in a cycle. Beyond that the amount and the frequency of rest and recovery that you need from your practice series is related to how much volume and intensity you are doing. It would be nearly impossible for anyone to tell you what you need without knowing anything about your personal situation. Let us offer some guidelines instead for making that personal decision.
Daily Sleep
There is daily rest in the form of high quality sleep. Getting enough hours of sleep, getting quality sleep, and doing it consistently cannot be over-emphasized. This is your number one way of staying healthy and injury-free because this is when your body repairs and resupplies. Without this your body will eventually break down in some way.
Weekly Rest
Start with a plan for at least 1 or perhaps 2 rest days per week.
If you are doing 3 or less practices per week it is very possible that you have enough rest time on those days between practices. You may want to stay active in other ways on these days, even if you are not swimming.
If you are doing 4 or more practices per week, then you may need to think more carefully about planning a rest day after a physically demanding practice, or when fatigue usually builds up during your normal week.
It is also possible to set up a 9-day practice cycle rather than 7-day in order to give you more option in how to balance rest and work, but it is obviously more difficult to establish a 9-day routine when so much of live revolves around a 7 day routine.
A rest day can be in the form of no activity, light activity, or different activity. For active, but somewhat lighter, activity you may do…
- Stretching or yoga.
- Light strength and conditioning work.
- Alternative physical exercise that still allows your main swimming muscles and joints to rest.
Cyclical Rest
Once you start doing regular training, more than 3 times per week, week after week, month after month, you may notice that you feel stronger only after so many weeks and then you start to see less progress and start to feel not quite as strong, not as healthy. This is because you need recovery weeks inserted along the way. The more intense your training over time, the more you need those recovery weeks.
Start with a plan to insert a rest week every 4 to 6 weeks of your training season.
‘Weeks’ in this sense can refer to 3 to 7 consecutive days of little or light training activity. The higher your volume, the more intense (fatigue-inducing) your training, the more days you should include in the rest week.
These rest days may have…
- More sleep
- No ‘training’ activities
- Half the volume of regular training activities
- Lower intensity activity
- Enjoyable alternative activity that let you rest the main systems used in your normal training
These rest days need to be refreshing for both the body and the mind.
Adequate recovery can be sensed by many physical and psychological markers, including these two main ones:
- you feel physically strong and energetic
- you feel eager to get back to the training work
Assignment: Plan Your Rest Days
Look back at your assignment where you have designed a series of practices, consider whether your cycle will be 7 days or 9 days long.
Choose which days of that cycle will be rest days.
And, then choose the type of rest you will have on those days, whether no-activity, light activity, or alternative activity.
Assignment: Review Your Plan So Far
Let’s review everything for a series of practices you should have by now… if you have done the assignments while working through this course.
At this point you should have in your notes:
- The main training goal – the long-term achievement goal
- The short term goal – the smaller achievement you should aim for first
- A short list of high priority skill projects
- A short list of focal points for each one of those skill projects
- A routine for approaching the pool
- 2 different warm up routines
- 3 different cool down routines
- 2 Attention Sets
- 1 Distance Sets
- 2 Tempo Sets
- 1 Pace Set
For each practice set you have calculated the amount of challenge to start with:
- You have chosen a series of activities (1 to 3 activities)
- You have chosen duration or distances for the activities
- You have chosen intensities in terms of SPL, tempo, and RPE requirements
- You have chosen the type and amount of rest between repeats
- You have chosen which variable you can change in each set to incrementally increase the challenge level
And, you have a plan for a weekly (7 or 9 day) practice cycle:
- you have assigned certain practice types on certain days
- you have assigned certain types of rest on certain days
Lastly, you have a plan for a multi-week training cycle, up to 5 weeks long.
- You can repeat each practice type for 3 or 4 weeks, changing just one variable in each set from week to week.
- You have planned for a rest week (3 to 7 days) with certain kinds of activities which will refresh your body and mind, making you ready and eager to start a new cycle.
Do you have all that in your notes?
Section 5: Working Through A Set
Section 5 Intro
Now that you have a plan laid out for a series of practices, let’s consider how you will actually work through it.
It is almost certain that what you end up doing will deviate from the original plan. As a matter of fact, if you’ve designed the practices to take you into the sweet spot of challenge you will have weaknesses exposed and encounter failures which should cause you to adjust your plans.
In this section you will study how to practice in a more organic way – a way that is responsive to the signals your body is sending – allowing your observations and results to influence how you progress through each set.
Set Up Feedback System
What makes your practice have high quality, high productivity is the feedback system you have in place. Feedback tells you what is going well and what is not going well so that you can protect or correct that.
By using your feedback system you can test for your strengths and weaknesses and then design your practices to improve your weaker areas.
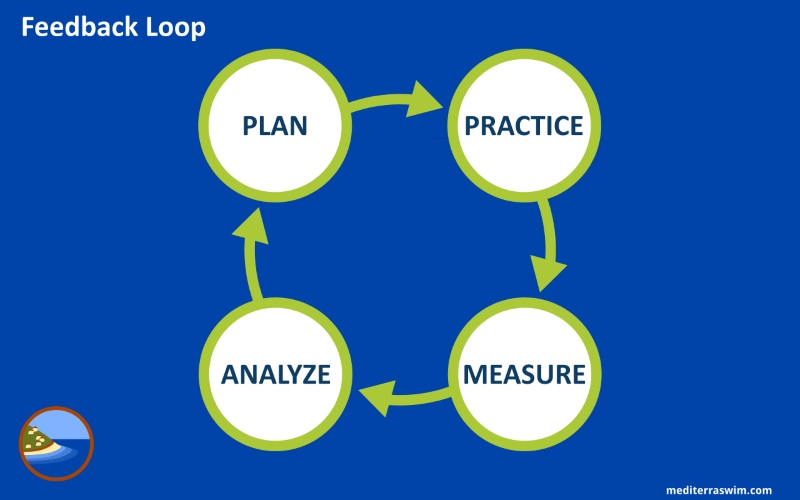
You have two main kinds of feedback which are equally important, and are used together:
- External feedback – anything that can be measured by an external device or observer, like time, stroke count, tempo, speed, heart rate, duration of rest, etc.
- Internal feedback – anything that is measured by your own senses and intuition, internal sensations, like physical ease, breathing ease, precision, relaxation, effort, smoothness, flow, enjoyment, etc.
As we discussed earlier in this course, for every practice set, including warm up and cool down you have indicated the quantities (those things which correspond to external feedback) and qualities (those things which correspond to internal feedback) to work with in that set.
When you have clearly indicated these quantities and qualities you are in position then to measure these and compare to previous results. By this comparison you are able to identify strengths and weaknesses, and get an overall sense of progress.
Pick Just A Few
As a reminder, although there are many quantities and qualities you could possibly measure, in each set use only a few. Your brain has capacity for only so many things to monitor and process.
So, as a rule-of-thumb, choose just two or three to design the set around, and always have at least one of them be a quality to measure.
The Ability To Change
In every practice set there are two levels of skill you are working on – the first is obvious and the second is not.
- A specific swim skill – some feature of your body position, movement pattern, or attention you are working to improve.
- The ability to change something about yourself.
Even if you are not sure the change you are making is the best idea or good enough, you are still practicing the ability to make something change in yourself. The more you practice accepting new insight and making a change accordingly, the better you get at changing yourself.
This should be very good news to you because over the course of your swimming life you will likely be making hundreds of modifications to your stroke due to new information, changing goals, age-related adaptations, etc. So, becoming adept at making changes is more important that the actual change you make! You may periodically change your mind about what to change, but you can count on the fact that you will be making a lot of changes over your life time as a swimmer.
And in order to deal with a frustrating level of perfectionism in your attitude about getting things correct the first time you may read Stroke-Change Skill and Correction Vs. Over-Correction.
What Is Failure?
The presence of failure in practice is an important part of the feedback system. A well-designed practice set should take you into a level of challenge where failure is possible, even likely.
Failure is when you do not achieve the quantities and/or qualities that you have assigned for that practice set. This is why you clearly state what the quantities and qualities for the practice are so that you can measure them.
Objective failures – failures in quantities
- You did not achieve the time
- You did not hold steady SPL
- You could not hold steady tempo
- You could not finish the distance
- You had to add time to your rest moments
Subjective failures – failures in qualities
- Effort went up dramatically
- You lost relaxation in a part of the body
- You lost concentration on a focal point
- Your control over a body part fell apart
- You lost precision
- You lost synchronization of propulsion parts
- You lost rhythm
- You lost ease of movement
- You lost smooth transfer of power
- You lost enjoyment
We not only accept feedback about failure in our practices, we seek it out. We have a positive relationship with it.
To understand more about our positive relationship with failure you may read Test For Progress And Weakness.
The whole point of practice is to seek out points of failure in our skill and fitness under controlled situations so that we can see where we are making progress and what needs more work. We have precious little practice time so this helps us keep it focused on what matters most to our progress. Practice is for strengthening weaknesses, not for hiding behind strengths.
When you encounter failures you need to interpret them in order to know what needs to be worked on. Failure may fall into one of these three categories:
- Metabolic failure – you fatigued (the whole body) too early
- Muscular failure – your muscle power dropped (a part of the body)
- Motor failure – your precision fell apart
All three are deeply intertwined but for training purposes it helps to divide them into these categories. #1 and #2 are mostly about physical fitness, while #3 is mostly about neurological fitness (= skill).
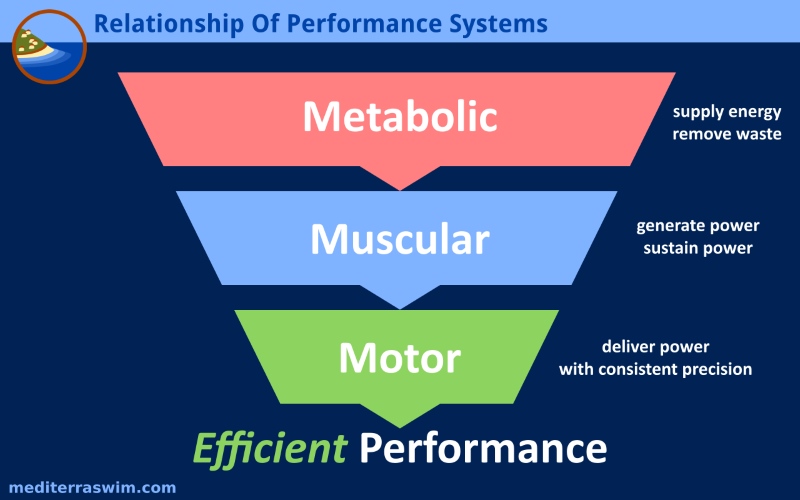
When failure comes in a practice set, you may experience a mixture of these. But if you examine carefully, you may notice that one of them came first and provoked failure in the others. That careful examination gives you clues where your primary weakness is for this set.
To understand more about how to recognize the differences in signals you may read Three Kinds Of Failure and Subdividing Your Performance System.
What Is Success?
There is a very simple answer for this.
Success is doing it better than you did yesterday. Success is getting out of the pool a bit better, a bit more aware, a bit more skillful, with a bit more understanding that you had when you got in.
And more specifically – success is doing better in this particular practice set, on this particular metric than you did yesterday. Success is a general feeling, but it is also a very specific measurement.
Your improvement is a long-term process and your understanding of what is ideal and your understanding of how to make progress toward that is going to evolve over time.
For more encouragement you may read:
How To Modify A Set
If you are in the middle of a swim and it is obvious to you that the challenge level is too much or too little for you today, you can adjust your assignment.
To adjust you may change something in the quantities slightly, or change something in the qualities that you have assigned. If the set seems close to what you need, then consider changing just one of those variables and keep the others the same. Make a very slight change. Then continue with the set and see if that brings in into the sweet spot of challenge.
You may read more about Mid-Swim Decisions.
If you have finished the set already, but feel it was not as productive as it could have been, then likewise, propose just a small change to the set in one variable to make the challenge more appropriate, and test out the set again in your next practice.
By this feedback process – testing and adjusting practice sets to get just the right amount of failure – you will become your own best coach on how to choose distances, rest intervals, focal points and metrics that keep you on the cutting edge of your personal improvement.
Responding To Failure
There are three general levels of failure you will encounter in a well-designed practice set.
- Too little failure
- Just the right amount of failure
- Too much failure
When you seek improvement in a practice set what you are looking for is a sweet spot of challenge – not too much and not too little, but just the right amount to keep your performance systems stimulated to grow.
Too Little Failure
Once you have decided upon the required quantities and qualities for the practice set, you know that success requires you to achieve both. Failure is when you do not achieve one or more of those requirements.
Failure < 10% = time to increase challenge
When you find that you are successfully achieving your requirements more than 90% of the time – failing less than 10% of the time – this may feel really good in terms of confidence, but it also means you may need to turn up the challenge next time so that you can keep provoking your systems to improve.
Practicing skills under easy conditions which provoke little failure can help build habits at that level of skill, but these quickly lose their value. When the demands are low the brain soon tunes out of the activity (the mind wanders!) and no new improvement will be stimulated. You have to set up a new puzzle to keep the mind engaged.
Too Much Failure
Failure > 50% of the time = time to decrease the challenge
When you are working through a set and somewhere in the middle you are experiencing failure in either quantities or qualities more than 50% of the time this may be a sign that the activity is too much of a challenge for your system today.
At this point you may either reduce the complexity of the activities to bring the challenge closer to a productive amount, or it may be a sign that your body needs rest and you should consider ending the set sooner.
Just The Right Amount
40% > Failure > 20% = the sweet spot of challenge
When you are in a set which you are able to succeed only when you maintain your best concentration, this is the sweet spot of challenge. If you waver in concentration, you’ll waver in precision, you’ll waver in performance – so success in this set requires you give your best at every moment.
Obviously, these percentages are fuzzy, and your assessment of failure in quantities and qualities is totally dependent on your perception and personal standards. You’re own sense of ‘too much’ or ‘not enough’ challenge will be quite subjective. But by putting a scale on it like this, you can begin to build a more reliable way to zero in on that sweet spot of challenge that is just right for you.
Examples Of Failure
Example A
Sergey tries this first set.
- 6 rounds
- Focal Points A, B, C – one focal point per repeat
- 3x 50 whole stroke
- Hold 19 SPL on every length
- Rest 15 seconds between repeats
Sergey finds that this set offered too little challenge. He was able to hold attention on the focal point, hold consistent SPL and do it over all 18 repeats. It was easy, but not very productive for provoking improvement.
Example B
In the next practice Sergey modified the set by increasing distances to make it more difficult…
- 1 round
- Focal Points A, B, C – one focal point per repeat
- 2x 75, 3x 100, 2x 150
- Hold 19 SPL on every length
- Rest 15 seconds between repeats
Sergey finds that it was getting hard to hold concentration, and thereby hard to hold 19 SPL on the 3x 100. By the time he got to the second 150 his SPL rose to 22 on most lengths. He was too tired.
Example C
So, in the next practice Sergey modified the set by decreasing the distances slightly and arranging it so that challenge was spread out over the set.
- 3 rounds
- Focal Points A, B, C – one focal point per repeat
- 50 + 75 + 100
- Hold 19 SPL on every length
- Rest 15 seconds between repeats
On this practice Sergey felt challenged to hold 19 SPL when he got to the 100 repeat, but with his best attention he was able to. When he got to the final 100 he was holding going up to 20 SPL about 50% of the time, but it was just on the edge of his ability and strength.
Choose The Best Challenge
Steps Of Challenge
To further improve the design of your practice sets to find your sweet spot of challenge each time, consider this approach…
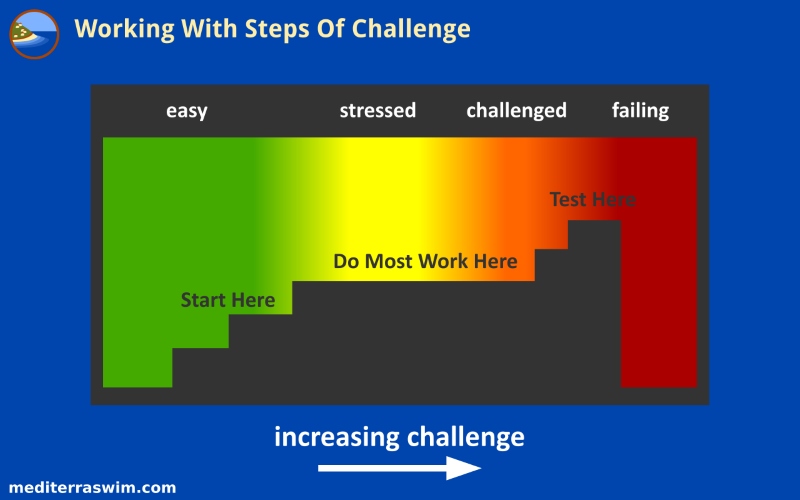
Start the set at a lower level of challenge – so that your weakest system is not immediately provoked to fail. Let that be a form of ‘warm-up’ for your body and mind for the particular challenges this set will present.
Then either choose a distance or an increase in your intensity or an increase in your standards that will take your body into a challenging zone where your best concentration is required, where you start to fail when you let down your attention just a bit.
Toward the end of the set, either because of fatigue or because of increasing the intensity, you are challenged up to the point of failure that you cannot avoid even with your best attention. Work up to that limit and just over a bit.
Over a series of practices like this you will notice that your capabilities are increasing because you can start at a higher level of challenge, yet it feels as easy as it did previously, at a lower level of starting challenge. And you’ll notice that you can do most of the work in the set at a higher level of challenge than before. And you’ll notice that your failure point is higher as well.
Test Swims For Success And Failure
You can set up a test swim to either test your strengths or test your weaknesses. It is important to choose the right kind of test swim for the purpose.
To test your strengths you are setting up a challenge swim that you expect to be able to achieve both the quantities and the qualities you have assigned to yourself. This could be a good test to do close to a big race or a big swim in order to assure yourself you’ve got the skills and conditioning you need to perform as you intend. Then you will have more confidence to face the other challenges of that event that training has not been able to address as well.
If, before the actual event, you prove to yourself that you can handle the distance and intensity, then in the event you can more freely divert your attention to higher order thoughts like navigation, competition, scenery, etc.
To test your weaknesses you would set up a challenge swim that will assign quantities or qualities that you know you can achieve up to a point, but not sure if you can do them further. The test swim takes you past that uncertain point to expose what will happen. This test swim is meant to reveal weaknesses – to rejoice when you find them! This shows you where your weaknesses are in terms of quantities and qualities – and that is where you focus your efforts in practice.
When To Use Auto-Pilot
Auto-Pilot Mode
First, there is a time for swimming without focusing on improvement – to just enjoy the skill and fitness you have already. This is really what most people train for, whether to race or swim for recreation.
Thorough training will get your ready for swimming on ‘auto-pilot’, where all your imprinted skills work as habits that you can rely on while paying attention to other things.
When you have developed your skills to the point of being a habit then you can rely upon them to work for you, even under stress (according to the kind of stress you have trained under), when you are not concentrating on them.
You may read more about Time For Auto-Pilot.
So it is important to make the distinction between swimming for recreation and training for improvement. Practice, by definition, is about stimulating growth. This requires attention and challenge for your weaknesses. That doesn’t happen when your attention is elsewhere and you are not intentionally provoking some failures.
Section 6: Working Through A Series Of Practices
Section 6 Intro
By this time in the course your completed assignments so far should include a plan with several practice types arranged into a weekly pattern, and spread out over several weeks, with slight increases in challenge planned for each subsequent practice.
But what if you don’t perform according to your plan? What if you don’t succeed at the challenge level set in this practice but the plan has the challenge increasing on the next practice?
Like every plan, it rarely survives contact with reality. Actually, this is expected, and the plan is still very important despite this confrontation. The plan shows you the necessary steps of development ahead of you, but your performance in those steps determine the pace you go along in that plan.
When your results urge you to adjust – to increase challenge or lower it – you have a much better idea about where you can make changes in practice sets and have an idea of the impact of those changes. The fact is, if you are creating a genuine skill-building practice plan that you will run into some challenges that will require more time to work through and other challenges that you pass through quickly. When you are working in new territory (in terms of skill and fitness) you are not sure what time your body will need to work through the growth challenges it encounters – the only way to know is to go forward with your intelligent plan and adjust along the way.
When To Repeat A Practice Part 1
Like anyone, you may want to see continual signs of progress. You may expect to be able to increase the level of challenge, practice after practice, week after week until you reach your goal. But this is not how your skills and fitness will develop.
Just like the seasons of the year, your development process will have seasons. And, just like the variability in weather and other forces acting on the natural environment, you will have variability in your personal conditions from day to day, week to week, and throughout the year.
There will be periods of time where you can regularly increase the level of challenge. Then there will be times when progress requires that you keep the same challenge level – your body needs more time to work on the this level to develop hidden internal features that will make increases possible.
Just as you may use repeats in a practice set to work on the exact same challenge repetitively, you may also repeat practices a few times, without modification, in order to work on the exact same package of challenges to give your body more time to adapt to them.
Influence of Personal Conditions
When you encounter some results in practice that were not as good as you expected them to be you should consider the conditions you find yourself performing in. The practice set must be appropriate to the condition you find yourself in on this day, and you may need to adjust your expectations accordingly. You could do the exact same practice two days in a row, but have a difference in performance because of a difference in the personal condition you were in when doing the second practice.
Sometimes you need to keep practice sets the same in order to see the impact of your life outside the pool. When sleep, stress and nutrition vary in your daily life, you will notice the limiting effects in your practice.
The more routine you keep certain parts of your practice (such as the warm up) the more apparent those variations in your condition will be to you.
If a practice was starting to feel easy right before an illness struck, you might repeat that exact same practice after the illness to test how quickly your body is recovering. After a short illness your performance may experience a little set back, so you would do well to keep your expectations for the first practices at the same level as before, or even a little less. You may need to repeat a few practices that you did prior to your illness, so you can revive your body to that previous level of performance.
If you experience a major illness that takes you away from training for more than a couple weeks, you may need to go further back in your training plan to repeat practices at a lower challenge level. You may not need to repeat all of it in order to regain your former capabilities, but you will need to have some days or weeks of careful rebuilding. The number of practices and the pace of increase depends on your personal condition after the illness.
When To Repeat A Practice Part 2
Need For More Adaptation
When you are working through a practice and it seems to be in your sweet spot, but when you try to increase the challenge level and there is too much failure right away, then you may need to stay at this current level of challenge for one or more practices. Your body and brain may be telling you that you need more time to work at this level in order to develop all the unseen systems that make visible improvement possible.

This may be likened to the work a tree is doing in the winter. No outward growth is visible but below the surface the roots are doing their job to get ready for the next spring, to support the outward growth of branches and leaves and flower and fruit.
This winter work may be identified as the plateau which is a necessary part of the training season.
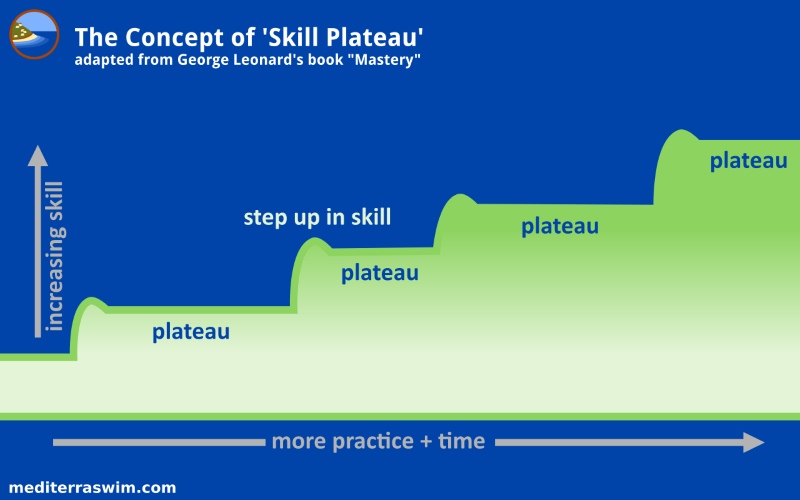
Even when you have an intelligent plan, and practice persistently, there will be these natural plateaus in your visible performance while your body and brain do deep, hidden work to prepare for the next step up in skill. This requires patience with the process. The simple solution for that patience is to just fall in love with the process of practicing mindfully.
You may read more about working in the plateau in George Leonard’s classic book called ‘Mastery’. It is a must-read for mindful swimmers.
Observing Flaws In The Foundation
It is likely that you will also notice weaknesses or failures in foundation skills while you are working on advanced skills.
Should you stop the practice set and change focus to work on those foundation skills? Aren’t they higher priority?
It is possible, but you need to consider how critical is it that you improve that foundation skill right away? Is it good enough for the moment, allowing you to work on other parts of the stroke and fitness?
You may read more about this in When To Keep Or When To Change A Set.
Progressing By Weakest Member
The pace of your progress is determined mostly by the pace at which your weakest areas can develop safely.
You may feel really strong in one or two of these areas, from swimming or perhaps from another sport. You should not judge what you can do in the water based on your strongest members, but on your weakest ones. What will be the consequence to that member or the whole system if it is forced to do its part in the work that it is not ready for?
Your weakest member is what will limit your performance and increase your injury potential.
So, pay attention to failure and look for which system is failing and the specific way it is failing.
The increase of challenge in your practice set, and the increase of challenge from practice to practice should be set by the pace at which your weakest member is developing, not your strongest.
Once that weakest member is brought up to a level of ability proportional to the other members, then you can challenge them all together, and safely handle a lot more work load than you were before.
Here are some ways to identify members or systems that need to be developed in your training. Any one or some of these can be your weakest member.
Metabolic System
This system supplies energy to your muscles and brain so those parts can work. Part of this is having the cardiovascular fitness to handle the intensity and volume of work you are doing.
Muscular System
This system is about strength – it generates the power to do the work – both strength to get across the pool and strength to work for an hour or so.
General Conditioning
This refers to your body parts having full range of motion, flexibility, and strength through the full range of motion so you can load the joints safely and move them in safe/strong patterns required in good swimming technique.
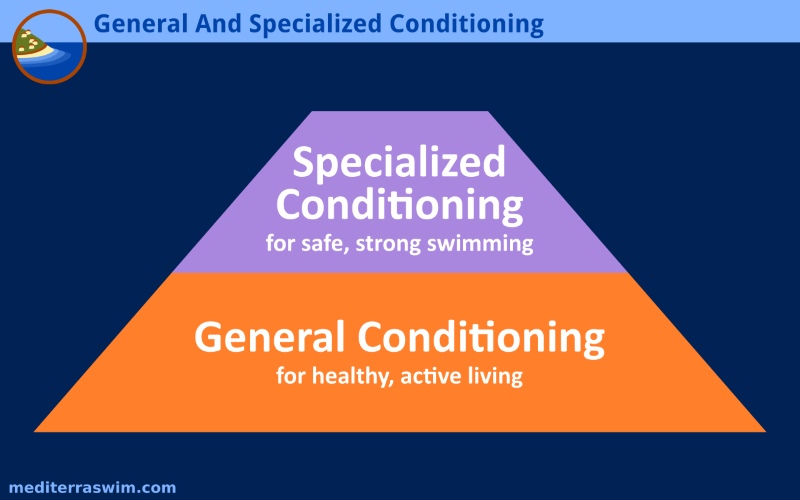
The strength and movement patterns of proper swimming puts very specialized demands on the muscles and the joints. You need to be prepared with General Conditioning before you participate in much Specialized Conditioning of serious swim training.
Motor System
This is also known as the neuro-muscular system or sometimes just called the neural system. This refers to your brain’s ability to send and receive signals to those parts of the body which control your swimming, and make them hold or move in the ways intended.
Mental System
This is your ability to be aware of signals coming from your body (physical and emotional), to direct your attention to a chosen part and to hold attention on that part. It also involves your ability to interpret and frame these events in a positive way and decide upon productive responses.
Listen To Fatigue
Fatigue is a necessary and good part of the training experience. Training is essentially a carefully crafted process for fatiguing your performance systems just enough to provoke their adaptation and growth to gradually increasing work loads.
The two essential ingredients in growth are stress and recovery. You control both of those.
If you do not stress your performance systems enough they will not grow. If you stress them too much they will break down more than you can recover from.
If you do not rest enough, your body will not recover from that stress. If you rest too much you will lose the gains you have made with training.
Those are the two extremes you had to avoid – too much and too little. It will take some practice to learn how to keep between those.
There is no magic number that works for everyone, though experience and an experienced coach may put you in a good starting point. You must eventually learn to listen to your body and trust what it is saying, to know when to work through it and when to rest, and when to take extra rest.
Fatigue In Practice
When you have designed sets appropriate to your level of skill and fitness, you should experience fatigue in your weaker systems toward the end of that set, up to the point that you experience some failure. This is a good thing.
A good, growth-oriented practice set should leave you nicely tired in some way – that good feeling of good work accomplished. Then it’s time to give the brain and body some rest in some form.
Fatigue In A Series Of Practices
When you have designed an appropriate series of practices you should experience some general fatigue over the course of that series – you will be working on gradually more challenging practice and the fatigue from this accumulate. Three or four weeks into your cycle you may notice your body wants to sleep more and you are more hungry. These are good signs of deep development in your body.
You may start a practice and notice that it takes a bit longer to warm up, and that your muscles are not quite as powerful immediately in a challenging set. But if you stick with it, you get into the challenge and can muster the strength. This is provoking your systems to dig deeper and become more resourceful in meeting the demands.
Too Much Fatigue
But these are the signs that you are getting close to going over the line into over-training:
- You do not look forward to your practice time.
- You are more irritable (others may notice this).
- You have chronic aches or pains related to your training (caused by something in your training, not merely irritated by it).
- You are not sleeping well.
- You cannot get into your optimal stroke length when swimming gently, even after a sufficient warm up.
- You lack power in your stroke, even after sufficient warm up.
- Your heart rate is higher than normal even when swimming gently.
- Your joints or muscles seem stiff, less mobile or less agile than normal, even after sufficient warm up.
There could be many more symptoms on this list, but these give you an idea that over-training will cause symptoms which you will experience in your body, your thinking, your emotions, and your social life.
Response To Fatigue
You will need to use your judgment about which kind of rest is suitable to the kind of fatigue you are experiencing. The deeper the fatigue, the greater your response needs to be.
If you experience signs of over-training before your scheduled rest, then you may insert some additional rest. Here are some ways you could do that:
- Stop your practice early – just finish up with a gentle cool-down.
- Stop the growth-oriented practice and just do a ‘Pure Pleasure’ swim.
- Be sure to get a super-quality night of sleep.
- Be sure to get super-nutritious meal and adequate water.
- Cut the practice volume (distances) in half (of a set, or of a single practice).
- Insert an extra rest day (no swim practice) into the week.
- Rest three consecutive days with alternative activities (active, but not swimming).
- Rest three consecutive days with very light alternative activities (like walking, stretching, yoga).
- Rest an entire week with a mixture of moderate and light alternative activities, and pleasure swimming.
To review what was discussed earlier in this course, you should plan to provide a rest week about every 4th, 5th or 6th week in a series of practices, if you are practicing four or more times per week.
Section 7: Mastery Of Pool Skills
Section 7 Intro
This course anticipates that most Level 1 swimmers are practicing primarily in a pool.
The pool is filled with water to swim through just like in the sea or lake. But unlike open water it is also blocked in by walls, and usually filled with other people swimming very close to you. There are skills that you need for working within these walls, and swimming around others – especially if they are not swimming as nicely as you are.
So some of your practice time each week should be devoted to improving your pool skills until they become reliable habits for you. The better your pool skills are, the more adaptable and peaceful you may be, even under less-than-ideal pool conditions.
The Purpose Of Pool Skills
Etiquette
Since you often have to share lane space with other swimmers, most pools have some sort of rules or etiquette (and some seem to have none!).
Even if the others are behaving badly, you are still going to have a better chance of having a peaceful swim if you yourself are courteous to others as much as is reasonable.
Be friendly from the beginning. Ask the name of your lane mate.
Take initiative to ask an incoming swimmer to share the lane with you.
If there are lane lines you may ask your single lane mate if you can split the lane where each person takes one side of the lane, or if there are more than one person sharing ask to share in a circle swim where everyone swims on the right or left side, going in both directions.
Pass a slow swimmer very carefully, so that you do not run into someone coming from the opposite direction, or bump the person you are passing, or try to pass them too close to the wall where they may turn into you.
If you plan to do a turn, aim for the center of the lane wall. If you plan to stop at the wall aim for the corner on the side you are swimming on (don’t cross the turning zone in case someone is turning), and leave the middle open for the swimmer behind you to do a turn at the center.
If possible, modify your rest intervals, allow them to fluctuate, in order to fit within the pattern of the dominating swimmer.
Move to another lane to do work that is much faster or much slower than the speed your lane mates are working at.
Consistency
Just as you want your stroke length and tempo to be consistent in order to conserve energy, you also need your performance at the walls to be consistent so that your measurements for each length make sense.
The push-off. The distance that you glide. The break-out as you emerge from underwater. Your first breath. How you reach the far wall. How you make the turn. Variation in your position, your precision, your timing, your effort at each of these will affect the speed you start and the distance you have to stroke through on each length.
These skills will be described below.
For Pool Swimmers
Obviously, those who swim in pools most of the time need these pool skills. This is the environment where you swim and the walls and the other people are going to be a regular part of the activity of swimming. The better your skills are for handling lanes, walls and people the more enjoyable practice time will be.
For Open Water Swimmers
Because most open water swimmers spend some part of their swim practice in the pool, they also need these pool skills.
Just as with pool swimmers, the open water swimmer should train to be consistent in their pool skills, but there could be different value for certain techniques. Some of those will be mentioned in below.
The Push Off
Starting from the in-water start, the push-off from the wall should be consistent – the position of the feet, the position of the body, the push off angle, depth and force.
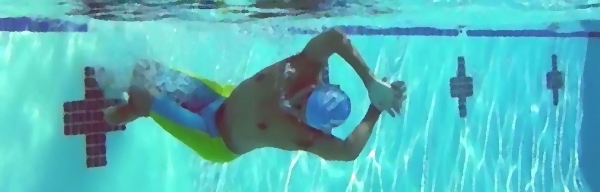
Before pushing, the feet are placed in the same orientation, and at the same depth each time. This requires the whole body to be positioned the same way, holding the wall in the same way each time.
Just before pushing the body lays down underwater, the arms extend, the hands overlap to create an arrowhead shape pointed in the direction of travel, parallel to the surface.
Then the legs push powerfully to send this streamlined body forward in a course parallel to the surface – not aimed upward nor downward.
And press with the same amount of force each time so that your path and breakout point may be the same.
The Glide
The glide is from the moment of push-off to the moment the body is about to break the surface of the water.
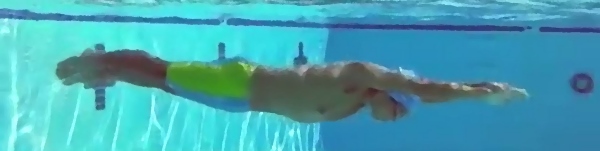
The body is as long, straight, and pointed as it can be.
The first half of the glide is motionless. At the second half, just as peak velocity seems to wane, some swimmers may start to flutter kick and others may do a dolphin kick, while some may just keep their legs stiff and toes pointed until the first underwater stroke.
The Break Out
Eventually, the pressure of water will start to push the body upward toward the surface. You should keep your body parallel to the surface, pointed in the direction of travel. Let the body come up evenly, parallel to the surface.
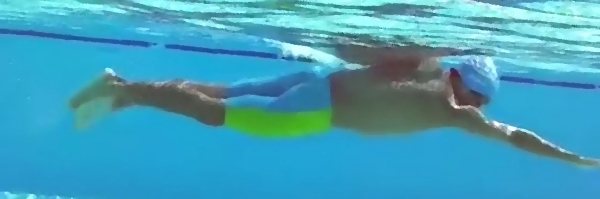
Just as the body is about to break the surface you begin the catch and underwater stroke with one arm, while the other slides into Skate Position to deliver the force of that stroke force forward.
The head should come up to the weightless head (neutral) position, just as it would be on any other stroke, and this puts the torso in position where the stroking arm can now come out of the water and begin the first recovery swing.
The First Breath
With training and discipline it is possible to resist taking a breath on that first moment that your body breaks the surface.
Why resist? You have held breath extra long during the turn and so there is a strong chance that you will tilt the head or even lift the head to breath sooner than your body position allows causing extra drag and a break of your streamline on your very first stroke – it will slow the whole body and break momentum, which you will then need to use the next several strokes to restore that momentum.
Try to wait for the second stroke, when you’ve established normal body position and normal stroke rhythm and can insert the breathe with less disruption.
If you cannot wait for that second stroke, then work extra hard on keeping a superior head position as you turn for that first breath. Be a bit more patient for the body to come completely to the surface before touching the air with your mouth. If you have timed your break out just right you will have more velocity, more lift at that moment and can take a breath more easily.
Approach The Wall
After you’ve take a series of strokes to get across the pool you approach the wall.
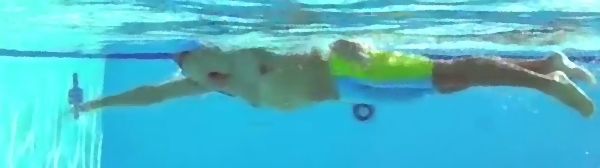
A good turn requires coming into the wall at full velocity – you don’t want to slow down, you want to use that momentum to power your flip or turn. The faster you come the easier the turn.
So, as you approach the wall and your stroke count does not coincide perfectly with the wall, what do you do? Glide the rest of the way, or take an extra stroke?
In general, it may be better to take that extra stroke to preserve velocity and then use that entering arm to initiate your turn. The rest of your body can follow that lead arm as it dives down and around to point in the opposite direction.
Stroke Counting
Stroke counting is a unique measuring tool for the pool. It is not a common practice outside of TI but it is a powerful feedback tool for helping you see the effects of your stroke while you are swimming. Some people complain of the initial difficulty of keeping part of attention on counting, but like with so many valuable skills, this doesn’t come naturally – you do have to practice it until it becomes fairly routine and easy to turn on or turn off, according to your needs. But you must train for this skill so that it is available to you and not an extra stress on your brain to do it.
If you need help to be motivated to practice counting strokes you may read Why Count Strokes?.
And for instructions on how to count stroke you may read How To Count Strokes and Tips To Improve Stroke Counting In The Pool.
Final Encouragements
Final Encouragements Intro
After working through this course we hope you will feel more confident about designing your own practices in a way that takes you toward your performance goals.
But it is possible this all still seems quite complicated. We would like to offer some additional comments to help you get started and get more comfortable with this process.
Take Three Months
It is likely that you still don’t feel totally confident on how to do this. Just like when starting to learn a new way to swim with TI, you need to go through the process a few times until it starts to feel familiar. Then you start to notice how parts work together and you notice other details you didn’t previously. It all starts to make more sense.
That may be similar to what you experience when first trying to create your own series of practices using principles that take you way beyond the one-dimensional kind of training we experience in conventional practices. To work with more powerful practice principles you need to take the time to get acquainted with them.
If you really want to grasp this, we urge you to go through this process of designing your own plan and then using it – do it three times over the next three months.
Pick one modest achievement goal, one for which you already know the drills to use and skills you need to improve.
Then make a practice plan for 4 weeks, with a half week of rest at the end (to fill out the whole month, or end on a weekend, for convenient scheduling).
Select three practice types – we recommend Attention, Distance and Tempo to start with, to fill 3 practices per week. If that still seems like too much, then choose just Attention and Distance.
Then design your sets for each practice type, for the first two full practices. That will get you started. Once you experience those two practices you can begin adjusting the quantities and qualities in those practice sets to get them closer to what really fits your current skill and fitness level. Then you can continue to follow the recommendations in this course for making slight increases in challenge over the rest of the month.
Once you have gone through this for one month, you’ll have some experience with it. You will be in much better position to design a series of practices for the second month. You will know what you know and you will know what you need to ask us questions about. That is when you can send us an email to ask those questions – either the answers are in the course, or we need to improve those answers, or we will know from you we need to add them to the material.
Leave Us Feedback
Just as you are learning to swim better, and learning to coach yourself, we are learning to improve how we design and deliver these online courses. Your feedback is essential in helping us see what we are doing well and what we need to work on. After all, the course is meant to serve the needs of swimmers just like you – so if we can make it better for you we can make it better for others.
Please take a moment in the course forum to leave some comments for us. We would appreciate both compliments that would encourage others to take this course, whom you think would benefit from it. And we would appreciate feedback on ways the course could be improved.
What are 2 or 3 features that you really like about this course?
What are 2 or 3 features of this course that need improvement, or were lacking?
In a couple sentences, how would you encourage someone else like you to take this course and why should they? How will they benefit from it?
Thank you!
Self Coaching at Level 2
The basics of designing a series of practices apply to training on every level. But once you start working with metrics in your practices and once you start preparing for bigger achievements, practice planning may get a bit more complicated. There are more principles and concepts to apply.
We have the Self Coaching 201 version of this course already mapped out. We are just waiting for a number of swimmers to go through this course to give us design improvements, so we can incorporate that into the next level from the start.
So, please keep in touch to tell us how you are making progress with the ideas you’ve gained in Self Coaching 101. This will encourage us to produce Self Coaching 201 sooner than later!
Swim mindfully. Swim Marvelously.
~ The Mediterra Swim Dojo Team