Course Instructions
Overview
This course is designed to support those who are participating in a Level 1 freestyle workshop or series of lessons. It is a self-guided course, meaning that you will use the materials in this course, your notes from your live training experience, and the Total Immersion videos to work through this course. Practices are outlined for you, but there is no schedule or time limit for how you will work through each lesson. You will work at your own pace.
This course will take you through 6 stages of building the fundamental skills for the freestyle stroke.
These order of these lessons:
- Balance The Body
- Alignment Of Body Parts
- Stability And Rotation
- Recovery
- Entry And Extension
- Breathing
Each stage has a series of skills to master, and a test to measure how well you have integrated those skills. You may move on to following stages before you master the first, but the following skills are dependent on the preceding ones. The stronger the foundation, the easier it is to build skill on top of it.
How To Work Through This Course
We have created a series of 24 assignments that will have you work through the fundamental skills of the freestyle stroke in the sequence they are best developed. You’ll notice how skills learned in the beginning of this sequence must support the skills learned later in the sequence. Therefore, we recommend approaching each section in the order they are provided.
These assignments are best organized into 6 sections which will cover the main skill sets. In each skill set are specific skills you will work on.
- Balance
- Alignment
- Stability – Rotation
- Recovery
- Entry And Extension
- Breathing
There is a recommended Test Swim you may do at the end of each section. We give a recommendation on what that test swim may look like, yet you select the distance and conditions that fit you. You will take certain measurements during that swim so that you can compare results as you progress through the course. See the section on Test Swim for instructions on how to do those.
In Section 1, we will discuss the elements needed for making the most out of the Freestyle Fundamentals. This includes what you need to start your practice, how to start and end a session smoothly, mindsets to carry during your practice, how to incorporate complexity, how to examine your progress and additional resources to further your study.
You will need to study, practice and internalize the skills so that they become habits for you. For certain skills it may take one practice to do this, or several. Please be patient with your body and with the training process. It will work with your mindful attention.
And, be dedicated to learn these fundamental skills well. These are truly the foundation upon which all the advanced skills, efficiency and speed – not to mention, pleasure – are dependent on. So they will indeed need to become habitual programs in your neuromuscular system. Strong movement patterns are formed into resilient habits through frequent, mindful repetition, under a variety of conditions and intensities.
Each person following this course will have a unique personal Improvement goal – in terms of ease, distance and pace – and each person will have their own budget of training time and pace of learning. Each person will have a unique starting position for learning these skills – you may have more or less initial fitness – you may need more or less time on each practice – you may need more or less complexity in each practice. Therefore, you are permitted to repeat practices as much as you feel you need to. This course is presented in such a way that you must choose and adjust the complexity level of the practice in order to match the challenge and pace your brain needs to go.
Read These First
Here are some instructions that will help you along as you set up your personal practices:
- Level 1 Practice Objectives
- Level 1 Practice Structure
- Level 1 Warm Up and Cool Down
- Freestyle Fundamentals – Personalizing Your Practices
- Level 1 Activities and Complexity
- Freestyle Fundamentals – Test Swims
- Freestyle Fundamentals – Prerequisites For The Course
- Level 1 How To Measure Progress
- Freestyle Fundamentals – How To Finish The Course
Read More
This information is here to support you. Do not feel obligated to read all of this at the start. But, as you go along in the training plan and run into questions about what to do, you may come back here to look for an article that may answer your questions.
In our Knowledge Base:
- Measurements In A Practice Set
- Rating System For Qualities
- Test Your Progress
- Choosing Drills
- Choosing Focal Points
- Mid-Swim Decisions
- Adjusting The Challenge Level
- Choosing Warm Up And Cool Down
- Choosing The Amount Of Rest
- Three Core TI Principles
- How To Design A Task
- Task Grouping
- How To Organize A Practice
- Practice Components
- Focal Point Complexity
- Challenge Multipliers
- Tempo Trainer Basics
- Focal Point Complexity
- Sections of the Freestyle Stroke
- Glossary of Practice Terms
- How To Count Strokes
- Rate of Perceived Effort Scale
- How Distance Intervals Work
- Work:Rest Ratio
In our Training FAQs:
- How often should I practice?
- How do I use drills?
- How much rest should I take?
- What is a failure point?
You will also find many articles describing different aspects of training in our Knowledge Base and in the Training FAQ.
Practice Examples
Level A Practice Example
If you are new to swimming, or new to swimming freestyle, here is an example for how you may structure your practice.
Level A Practice
Do 3 rounds of the following set.
Choose 3 focal points, one focal point for each round.
On each round, do 2 cycles, (one cycle for each side of the body, if that applies):
- 1x standing rehearsal (if applicable)
- 2x drill (for about 6 seconds)
- 2x (drill 2 seconds + 6 strokes), no breathing
- 4x (8 strokes), no breathing
Allow 10 seconds passive rest between activities. While resting, you get bonus benefit for doing diaphragmatic breathing, and double the benefit if you do nasal breathing also.
Total distance: ~200 meters
Main Set #2
Do 3 rounds of the following set.
Use the same 3 focal points, one focal point for each round.
- 4x 25 whole stroke, with Interrupted Breathing
- Count strokes
Allow 15 seconds active rest with drill between repeats
Total distance: 300 meters
Level B Practice Example
If you are can swim freestyle already, but are making significant changes to your movement patterns, here is an example for how you may structure your practice.
Level B Practice
Main Set #1
Do 3 rounds of the following set.
Choose 3 focal points, one focal point for each round.
On each round, do 2 cycles, (one cycle for each side of the body, if that applies):
- 1x standing rehearsal (if applicable)
- 2x (drill 2 seconds + 6 strokes), no breathing
- 2x (8 strokes), no breathing
- 2x 25 whole stroke, with Interrupted Breathing
Allow 10 seconds passive rest between activities. While resting, you get bonus benefit for doing diaphragmatic breathing, and double the benefit if you do nasal breathing also.
Total distance: ~400 meters
Main Set #2
Do 3 rounds of the following set.
Use the same 3 focal points, one focal point for each round.
- 4x 50 whole stroke, with Interrupted Breathing
- Count strokes
Allow 15 seconds active rest with drill between repeats
Total distance: 600 meters
Level C Practice Example
If you are already familiar with swimming freestyle and can breathe comfortably in whole stroke, here is an example for how you may structure your practice.
Level C Practice
Main Set #1
Do 3 rounds of the following set.
Choose 3 focal points, one focal point for each round.
On each round, do 2 cycles, (one cycle for each side of the body, if that applies):
- 1x standing rehearsal (if applicable)
- 2x (8 strokes), no breathing
- 2x 25 + 1x 50 whole stroke, with Interrupted Breathing
Allow 10 seconds passive rest between activities. While resting, you get bonus benefit for doing diaphragmatic breathing, and double the benefit if you do nasal breathing also.
Total distance: ~600 meters
Main Set #2
Do 3 rounds of the following set.
Use the same 3 focal points, one focal point for each round.
- 4x 75 whole stroke, with Interrupted Breathing*
- Count strokes
* You may use Rhythmic Breathing if you are comfortable with it.
Allow 15 seconds active rest with drill between repeats
Total distance: 900 meters
Periodic Test Swim
For Level A, B, and C we recommend that you conduct a Test Swim periodically.
Read these instructions for Freestyle Fundamentals – Test Swim.
As an alternative, you may also consider doing an Exploratory Swim.
Step 1- Balance
Balance Objectives
What does success look like in Balance skills?
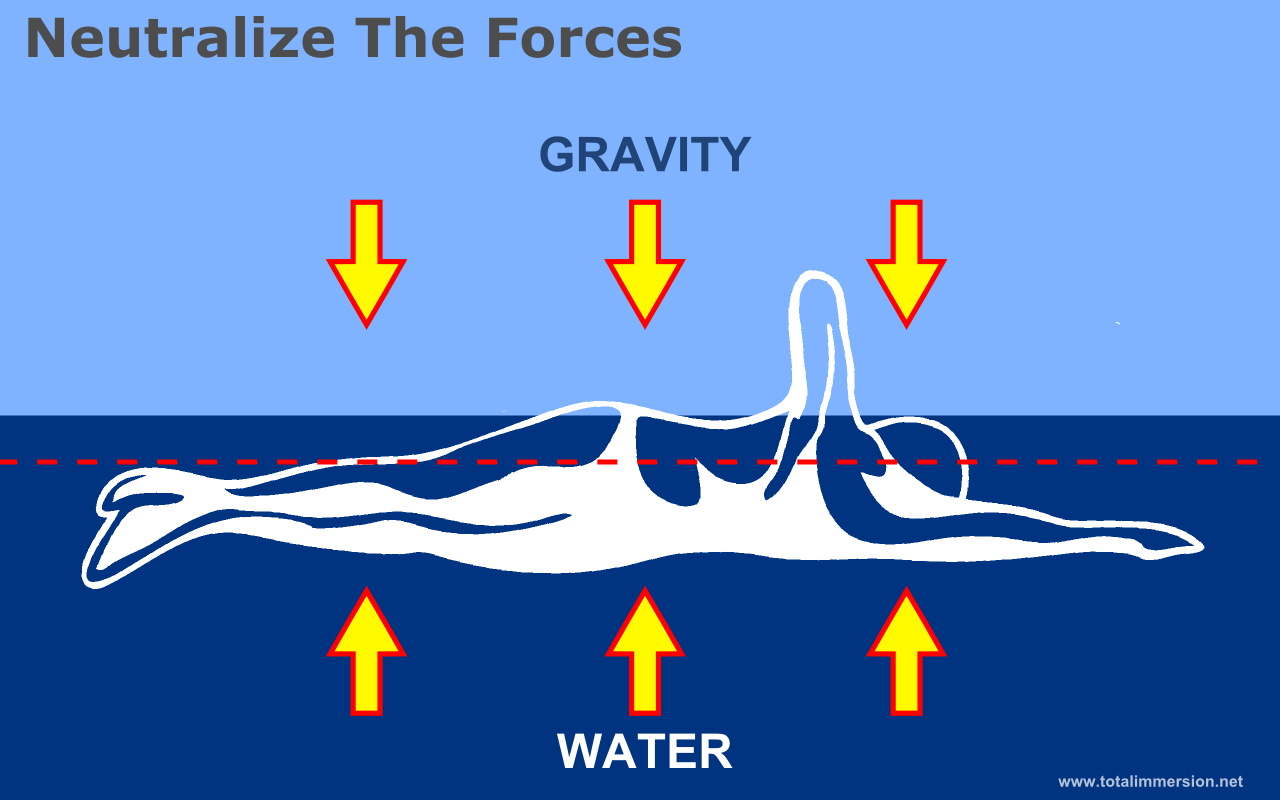
Balance means having your body parallel to the surface of the water, resting on the ‘neutral line’. This neutral line is just below the surface where the force of gravity pushing down and the force of water pressure pushing up meet and support your body entirely. Everyone will have a neutral line that is a bit higher or lower than others because of each person’s unique body composition. Even if you think you are a ‘sinker’ you still have a neutral line in the water somewhere, and you still need to learn how to ‘sink evenly’ keeping your body parallel to the surface.
In normal whole stroke swimming your stroke cycle will last 2 or 3 seconds at most. So, the balance skill you need to develop needs only to last 3 or 4 seconds. Going on in a balance drill for more than 4 seconds could be helpful to examining details, but not necessary for building actual swimming skill. So, you will develop faster by working with very short repeats – within the time you can hold your breath. You need to aim to get into position immediately, in that first second and hold it for just 3 or 4 seconds, paying very close attention to your focal point in those first seconds. How you start the drill (the push-off) is important so you don’t waste time under water or splashing down and then sinking for a while.
Drill Success = when you can hold your body line parallel to the surface in a gliding Superman and Skate Position for up to 4 seconds.
Balance happens when the body line is long, straight and braced in the core around the hips – this builds an internal frame which allows you to shift weight and forces through the body. Then the weight of the head, shoulders and arms are allowed to rest fully in the water which shifts mass forward (because you’ve got the core muscles connecting the hips and legs to the torso as a whole unit). And then a pressure zone of water is allowed to flow under the aligned hips and legs to give them natural lift for that first 3 seconds. It all works together to create a body the slides up at the surface and parallel to it. Leave out one of those parts and it won’t work so well.
To see photos of what this should look like in drill position, view Superman Glide on the Freestyle Drill Resources page.
Whole Stroke Success = when you can hold your body line parallel to the surface for 6 to 8 whole strokes, within the time you can hold your breath.
Now to begin, starting with the first test swim to set the baseline.
Assignment 1.1 - Test Swim
You are likely eager to get into the assignments which will build your skill. To be able to measure progress in your abilities from this training course, you need starting measurements to compare with as you go along.
Before you start these assignments please schedule a time to conduct a test swim. We suggest working with 100, 200, 400, or 800 (meters or yards) distance as conventional distances to test your abilities on. Choose a (non-stop) distance that you feel is within your capabilities if you are swimming at your current best.
And, with the combination of your own mind, a watch, and possibly a friend, it would be most helpful to take these kind of measurements during the test swim:
External measurements (with a watch or by an observer):
- Total time
- Split time (for each 50 or 100 you swim)
- Stroke count per length
Internal measurements (you sense these through your nervous system):
- Sense of ease (and at what point that changes noticeably)
- Strength of attention (on a certain focal point)
If, at the start of this course, you feel you can do only single lengths or 50s, with rest between, then do several of those, and record the amount of rest you take – this is your starting point and don’t feel self-conscious about it. Whatever you can do, just measure it so you can compare it with later test swims.
For more guidance, you can read the Test Swims article.
Assignment 1.2 - Head Position
Description
The head makes up almost 10% of your body mass. It’s heavy under gravity… but when laying in the water it can be weightless, and that is what you want.
By fully releasing your head in the water, this heavy and influential part of your body rests between the natural forces of gravity pushing down and water pushing up, so that you don’t have to fight either of them.
Where the head goes, the rest of the body follows – so placing the head in this neutral position sets the direction in which the rest of your spine lines up, and where it will direct its force.
And, the weightless head is just that: weightless. Your neck muscles should be mostly relaxed and activate only enough to keep the head aimed straight forward.
Recommended Drills
- Torpedo (UEF)
- Laser Lead Flutter (PMF)
- Superman Glide (PMF, UEF)
- Superman To Skate (PMF, UEF)
- Laser Lead Rotation To Skate (PMF)
What To Aim For
Have the head fully supported by the pressure of water pushing upward. You should feel some water pressure pushing against your face, as if laying face-down on a massage table.
Image you are standing at attention on land. How would you head be positioned on your shoulders? Where would your eyes be directed? Maintain this same head position, while laying down.
The neck muscles should be mostly loose. If a coach or friend were to stand beside you in the water and press on your head, they should be able to wiggle it freely. Your head should easily yield to the hand pressing on it. You can actually test this yourself – while laying face-down in the water, reach up with one hand and wiggle your own head!
Your eyes should be looking straight down.
The ears should be under water.
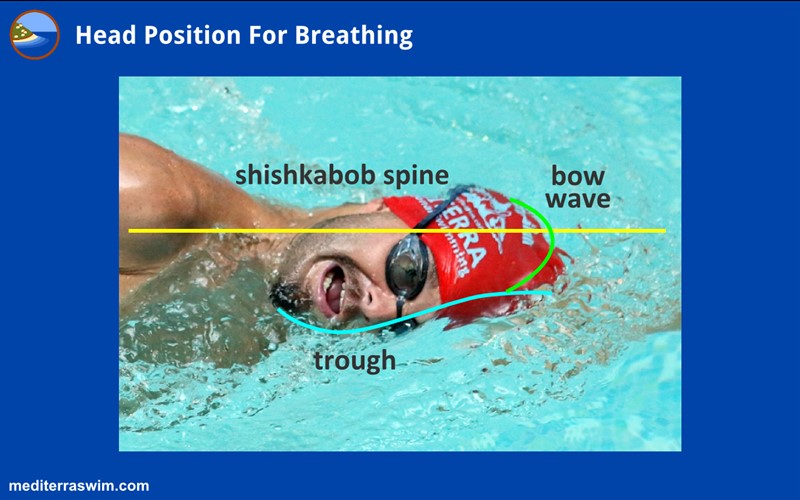
The crown of your head – where a ‘shish-kabob’ would extend from your spine and come out of your skull – this should be pointed straight ahead down the lane of the pool. I think of it as the ‘tip of my torpedo’ and I aim it at my target.
There should be a consistent bow-wave breaking over the back of your head (swim cap, if you wear one). I think of the torpedo plowing its way through the water with a bow wave – there is no deviation in that head, no zig-zag, no up/down bobbing. Just steady movement forward.
What To Avoid
- Don’t push the head deeper.
- Don’t lift the head above the neutral line.
- Don’t tilt the head upward.
- Don’t try to look forward (that’s what the lane lines and T at the end of it are for!). If you do look, do it quickly and the put the head back down immediately.
- Don’t let the head be pulled to the left and to the right with each arm stroke.
Assignment 1.3 - Set The Frame
Description
The frame of a vessel like a boat or airplane is there to support the mass and transfer forces. This keeps the vessel in one piece and allows it to move forward.
You are going to build a ‘frame’ out of your entire torso, just as a wooden sea kayak has a light, sturdy frame inside, which holds everything in a perfect shape. This frame gives the water something to support, which lifts your entire body and allows it to slide through the water with less resistance. This frame also allows you to transfer force through the body, from where it is generated to where it is applied to separate water molecules in front of you so you can fill that space.
The frame is also the foundation for the action of arms, legs and breathing. The better the frame the easier it will be to perform the propulsive actions and breathing action.
You can immediately rehearse making this frame in your body, by standing up right now. Imagine you are standing at the kitchen counter. You want to reach up to a very high shelf above to touch a delicate tea cup that it just beyond your finger tips. To extend a little further you stand up onto your tippy-toes. Notice how the space between your ribs and hips stretches out and tightens up. The deep abdominal muscles engage to support your outstretched body. This long, firm feeling is what you want to recreate while laying down in the water.
Recommended Drills
- Torpedo (UEF)
- Laser Lead Flutter (PMF)
- Superman Glide (PMF, UEF)
- Superman To Skate (PMF, UEF)
- Laser Lead Rotation To Skate (PMF)
What To Aim For
This frame is built by 1) putting the head-spine-hips-legs in alignment, then 2) lengthening the body – stretching – making yourself feel long, and 3) activating the deep internal muscles of the ‘core’ (the abdomen from ribs, to hips, and down the thighs. Imagine being in plank position and how all those muscles work from shoulders to knees – that is very similar to how they will work together in swimming position.
Those deep muscles are activated by lengthening the body, by stretching it out. The body will automatically respond by tightening the core in order to stabilize your torso. Stretch to activate those muscles, rather than pull inward (as when doing a sit-up).
Head is weightless and straight.
Spine is tall and aligned, like standing at military attention.
Lengthen the body from ribs to knees, like you are standing on Tippy Toes and reaching for something on a very high shelf above you.
Make sure your pelvis is ‘level’ – where the small curve of your back is flatter (less curved), and your belly button is pulled up, toward your sternum. (Generally, stand as if on tippy-toes’ and this will put your pelvis in level position).
Make sure your thighs are straight behind you, lined up with the spine, just like when you are standing at military attention.
What To Avoid
- Don’t exaggerate the tall and straight feeling – don’t arch (extend) your back backwards like a banana.
- Don’t reach with the forehead which may cause it to tilt up or down.
- Don’t angle your thighs downward in anticipation of starting to kick to push your hips up to the surface – remain loyal to the straight body line and let the back end sink (at this stage in your training) if it will.
Assignment 1.4 - Fully Supported
Once the frame is built, you bring the entire body line onto the neutral line under water – the line where the force of gravity pushing down meets the pressure of water pushing up. Your entire body line should rest on that line, parallel to the surface. When some part of your body pushes up above that line or pushes down below that line you will then need to work against those natural forces.
You will use the flow of water under the frame of the long, straight body to bring it up near the surface and onto that neutral line. The better your frame, the easier it will be for the body to be fully-supported on that neutral line.
Recommended Drills
- Superman Glide (PMF, UEF)
- Superman To Skate (PMF, UEF)
- Laser Lead Rotation To Skate (PMF)
- Slot To Skate (UEF)
What To Aim For
Water flows under your body on each stroke. Notice it flowing under your hips and legs to support them. Your lower body -if the frame is built – will ride up on top of this pressure zone of water.
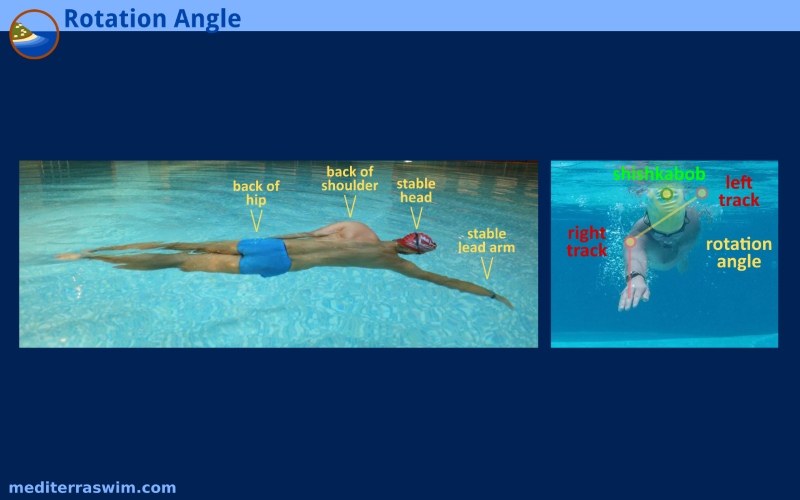
Look for these markers – the back of your head (swim cap) brushes the surface.
The back of your shoulder touches the air.
Your hip (on each rotation) brushes the air.
Your legs feel very close to the surface (but not touching the air).
What To Avoid
- Don’t bend at the hips in order to push them up to the surface.
- Don’t bend the knees to form a kick which will push your hips up to the surface.
- Don’t do excessively slow strokes because this will allow too much deceleration between each stroke.
- Don’t worry about doing gliding drills (like Superman or Skate) for more than 4 or 5 seconds, because the flow of water dissipates and you receive too little support after that. Those who have heavy legs will get little benefit out of these drills past that point.
Assignment 1.5 - Counter-Balance
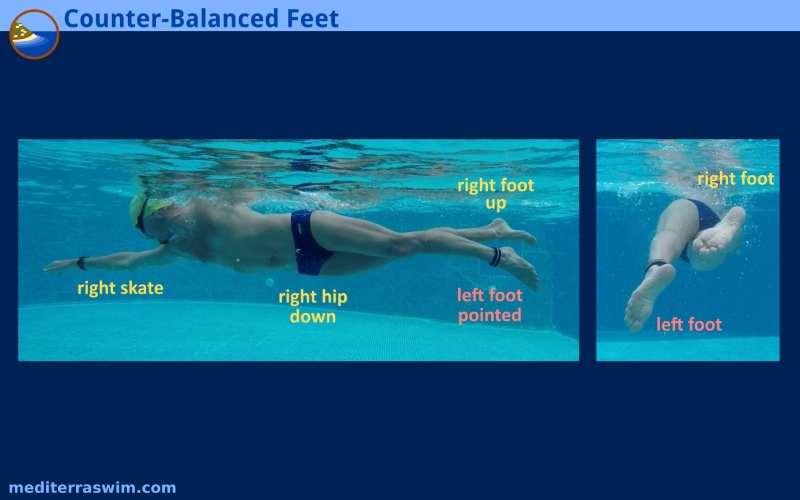
The first step for the legs was putting them in alignment with the rest of the body, to remove the extra drag they often create (even while kicking). Now, you give them a role to play which helps your balance. When shifting into Skate Position (in drill or in whole stroke) the feet slide immediately into a position which is counter-balanced to your torso rotation.
Recommended Drills
- Superman To Skate (PMF, UEF)
- Skate (PMF)
- Slot To Skate (UEF)
- Spear Skate and Spear Switch (PMF)
- Use 2BK rehearsals (view tutorial videos on the Freestyle Drill Resource page)
What To Aim For
Stretch out your Skate side, from wrist to ankle. You will feel a stretch over your hip flexor muscles – like an elastic band tied between those two extremities and pulled tight.
The Skate side heel reaches up near the surface, but does not touch it. Rotate the heel outward to the side to make room for the stretch, not upward to break the surface.
The other leg is pointing the toes and the body pivots around this leg (as you rotate into Skate Position).
The knees stay very close together, nearly touching.
The feet feel ‘stacked’ one in front of the other (relative to each other – see rear view). They are more vertical, and less horizontal.
What To Avoid
- Don’t bend the knees, just rotate the ankles.
- Don’t spread the legs wider. Stack the feet (see rear view).
- At this stage, don’t ‘kick’ with each switch, just shift the legs to counter-balance the body rotation. This foot position also happens to be the starting position for the 2-Beat Kick, but first you should master the first role for the feet.
Assignment 1.6 - Test Swim
At the end of this section, you may conduct a test swim. Compare results to your starting test swim to see where you have made progress and what weak spots are revealed.
Remember, that you are looking foremost for improvements in the qualities inside your body – look for how it is getting easier to control your body in the ways you intend, and for how much less effort it may take to hold position or move through some stroke patterns.
Refer to the topic above on Test Swims for instructions on how to do those.
Step 2- Alignment
Alignment Objectives
Alignment Objectives
What does success look like in Alignment skills?
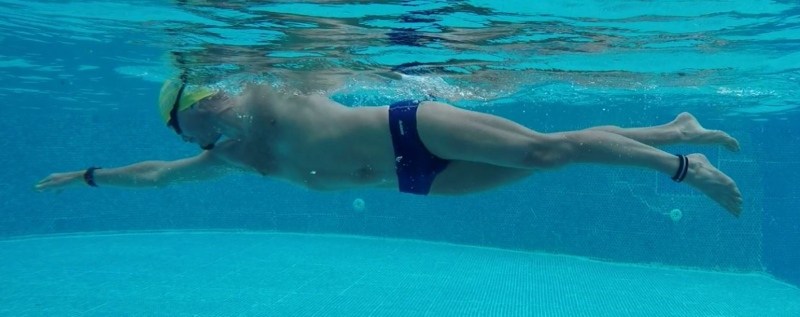
Your head is down (eyes looking down), lined up with the spine.
Your spine line is straight, from tip of your head to an imaginary line between your ankles.
Your legs are straight behind your torso, not flinging out to the sides.
Your arm stays on its tracks in front of the shoulder.
Drill Success = Sliding from Superman to Skate Position in drill mode for 4 or 5 seconds, with spine and legs straight (with the most minimal vertical flutter kick) and the lead arm holding its position on track, at its target depth. As you rotate from Superman to Skate, the head should stay fixed – no turning, no pull to either side.
To see photos of what this stability and rotation should look like in drill positions, view Skate, Spear Switch and Swing Switch on the Freestyle Drill Resources page.
Whole Stroke Success = Being able to take 6 to 8 whole strokes with feeling that the spine stays straight, with neither the arm motion or leg motion pulling or pushing the spine out of alignment. Each arm finds its track when entering in front.
Assignment 2.1 - Head Alignment
Description
This focal point is called ‘Laser Lead Head’ in the PMF video – or we might call it “Shish kabob Head’ in Mediterra lingo.
The head is heavy and when you take it off the neutral line and you will have to start working against gravity or water pressure unnecessarily.
The head leads the way forward in the water. When the head veers off course it takes the whole body with it, or causes a lot of conflict inside.
The head is the start of the spine – when it is aligned it allows the rest of the spine to get into its most stable position. When the head is tilted (looking forward) even a little, it compromises the stability of the spine and reduces its ability to transfer force.
And, the head turning on the shish kabob to breath will get to the air easiest, quickest, use the least amount of effort, and disrupt the stroke the least.
So, keeping the head in best position is one of the most important things you can do to reduce water resistance and wasted effort.

Recommended Drills
- Torpedo (UEF)
- Laser Lead Flutter (PMF)
- Superman Glide (PMF, UEF)
- Superman To Skate (PMF, UEF)
- Laser Lead Rotation To Skate (PMF)
- Spear Skate and Switch (PMF)
- Swing Skate and Switch (PMF)
What To Aim For
You feel like the torso is driving the head forward.The tip of your head is like a torpedo driving steady towards its target.
In Skate Position there should be a gap between your cheek and your shoulder. The head is on one track and the shoulder+arm are on a parallel track.
Your head feels steady and fixed, eyes aimed down, while rotating around it – imagine a glass of juice sitting on the back of your head while swimming, don’t spill it!
Learn to use your peripheral vision (as much as your goggles permit) to make you feel more secure about not looking forward. Only glance forward occasionally if you are approaching some object in the pool.
Tune in to the feeling of water flowing over this leading point of the head and imagine you have a sensor there which is looking ahead for you.
What To Avoid
- Don’t let each arm stroke (especially during entry and extension) pull the head to the side.
- Don’t let the head bob up or down on each arm stroke. No ‘gallop’.
- Don’t let the rotation of the torso swing the head with it (unless breathing).
Assignment 2.2 - Arm Alignment
Description
There are three lines in your body that you need to align with. The main line is your spine. This is the most important one because all other body parts are arranged around this. The other two lines correspond to each arm – each is parallel to the spine.
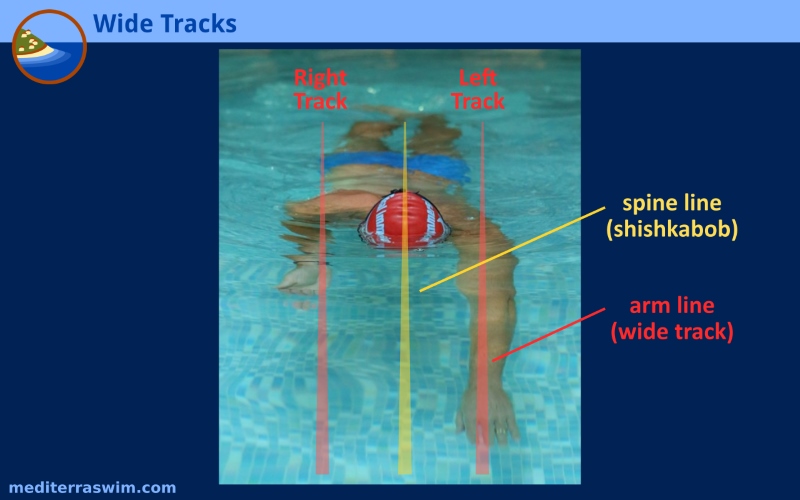
Each arm is connected at the shoulder and pivots around that point, and the shoulders are positioned some distance from the spine. So we don’t want to see the arms coming near the spine line. They need to stay in line with the shoulder.
To transfer force in the direction of travel the arms need to extend directly in front of the shoulders. It seem intuitive to drive the arms inward toward the center line to make the body more streamline shape, but this ends up creating more problems than benefits. When the effects are added up, it is better for streamline, efficiency and force-transfer to keep the arm on its wide track when entering and extending forward.
Recommended Drills
- Superman Glide (PMF, UEF)
- Superman To Skate (PMF, UEF)
- Spear Skate and Switch (PMF)
- Swing Skate and Switch (PMF)
What To Aim For
The arm should be fully extended.
The arms should be reach straight forward, in front of the shoulders.
The elbow rotated to point upward and outward (rather than downward).
The axilla (armpit) should be opened up – reach a bit further with the shoulders.
The hands should be lined up with the wrist. Reach with the wrist. Aim the arm with the big knuckle of your ring finger.
The arm should be shaped, but still flexible – like a young tree branch.
What To Avoid
- Don’t allow the elbow to bend downward.
- Don’t pull your scapula bones (shoulder blades) inward toward the spine. Let them slide outward and forward.
- Don’t tense up your neck because you are trying to reach too far.
- Don’t reach with your thumb.
Assignment 2.3 - Hand Alignment
Description
The wide tracks focal point set the lateral position of the arms. Now you need to consider the optimal angle of the arms and depth of the hand.
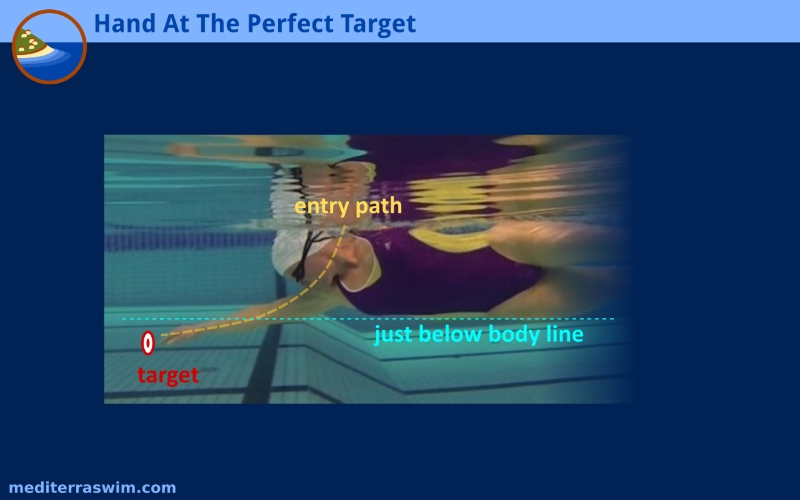
Upon entry the hand is going to be driven down to a certain spot called the target. This target is just lower than the lowest point of your body – and, according to your wide track, it is directly in front of the shoulder.
There are several reasons for this particular location, but for now realize that this is the point you need to bring the hand to immediately on entry to protect your balance, to preserve streamline, and to avoid wasting time and effort sending the hand along any other pathway.This target is where you will set the catch at the right moment.
Recommended Drills
- Superman Glide (PMF, UEF)
- Hop And Slot (UEF)
- Superman To Skate (PMF, UEF)
- Slot To Skate (UEF)
- Spear Skate and Switch (PMF)
- Swing Skate and Switch (PMF)
What To Aim For
The shoulder is above the elbow. The elbow is above the wrist, the wrist is above the fingers.
The hand should be aligned with the wrist, the palm facing downward, ready to slide into the catch.
The fingers should be soft.
You should feel a flow of water evenly on both sides of the arm.
You should feel some water pressure pushing against the leading (upper) edge of the arm – it will be used to slide your arm into catch position effortlessly in a moment.
Keep the hand shaped but relaxed so that you can more easily feel the flow of water on the surface nerve cells.
What To Avoid
- Don’t hold the fingers tense.
- Don’t squeeze the fingers together – let the spread a little in a natural way.
- Don’t reach with the thumb – reach with the big knuckle of the ring finger.
- Don’t scoop upward while extending. Go straight on the angled path to the target.
Assignment 2.4 - Leg Alignment
Description
The legs will be given a propulsion role later, but for now they need to be taught to stay out of trouble behind the torso. The legs are heavy for most people, and the land-mammal brain is wired to push us around with them. But in the water, they are the least effective means of propulsion. Even with the best kicking technique they propel just a little at an enormous cost in energy. All that movement outside of the slipstream of the body creates drag.
So, first you will learn to reduce their liability by hiding them behind the body. Later, in advanced lessons, you will learn how to compose an effective kick within that small hidden space.
Upon rotation, there may be a very strong urge to spread the legs to help stabilize the torso – you need to override this and make the legs hold position while the torso learns to stabilize itself with core muscles. And, there may be a very strong urge to bend the knees and kick downward to push the hips up – you need to override this and train the stroke to support legs with the flow of water under your long, straight body frame.
Recommended Drills
- Torpedo (UEF)
- Laser Lead Flutter (PMF)
- Superman Glide (PMF, UEF)
- Superman To Skate (PMF, UEF)
- Spear Skate and Switch (PMF)
What To Aim For
The legs should remain parallel to the shish kabob.
The knees may be very close together, or even touching sometime.
The knees are allowed to only flex a little, but not bend. Flex like a fish, not like a robot.
Keep the toes pointed as much as is comfortable.
The thighs should remain in line with the torso – as if you were standing at military attention.
Upon rotation – the legs stay parallel, but they twist and overlap a bit into counter-balanced position (see Assignment 1.4)
What To Avoid
- Don’t arch (extend) the back to reach the feet up toward the surface.
- Don’t scissor the legs wide to make a kick.
- Don’t bend the thighs downward and break the frame at your hips.
- Don’t bend the knees to kick downward.
- Don’t point the toes so severely that you develop a foot cramp.
Assignment 2.5 - Test Swim
You may have done a test swim at the end of the previous section. So, you may do another test swim at the end of this section.
Look for improvements in the quality of your shape and how well you slide through the water on each stroke.
For this test swim use the same design that you used last time, or make it slightly more difficult. This way you can compare and more easily see in what ways you have improved.
Refer to the topic above on Test Swims for instructions on how to remind yourself how to do it.
Step 3- Stability and Rotation
Stability and Rotation Objectives
Stability and Rotation Objectives
What does success look like in Stability and Rotation skills?
You’ve been learning how to place your body in its most streamline base position in Skate Position. You’ve noticed that this is a rotated, asymmetrical position. In whole stroke you only need to hold this position for maybe at most 1.5 seconds (at the slowest tempo stroke), then transition to the same position on the other side. But in this position and during the switch you need to be totally stable, able to hold that rotated position with confident balance.
At the completion of each stroke cycle you come immediately into your best Skate Position, and you are able to hold it as you swing the recovery. A great test of this stability is that you can hold your Skate Position while taking strokes at an extremely slow tempo. If you find that you feel rushed to get the arm forward before you ‘fall flat’, or if you notice your lead arm pulling too early, or your legs spreading wide or just wiggling around while you swing the recovery arm, you are probably not very stable yet. This stability will come from learning to build that rotated position from deep core muscles (rather than holding it with arms and legs wiggling about) and to empower the rotation from the weight-shift of the torso. And then it will take some time to condition these muscles for their new choreography and work load.

Drill Success = Holding Skate Position in drill mode for 4 or 5 seconds, with narrow legs (with the most minimal vertical flutter kick) is a good test of static stability. Then be able to do it with a slow-motion recovery swing (no switch) without legs spreading, without feeling a rush to finish the recovery swing before falling flat.
To see photos of what this stability and rotation should look like in drill positions, view Skate, Spear Switch and Swing Switch on the Freestyle Drill Resources page.
Whole Stroke Success = Being able to take 6 to 8 whole strokes with slow motion recovery swings, while legs are narrow and aligned, and your lead arm remains on target and totally patient during that recovery swing.
Assignment 3.1 - Straight Spine
Description
We like to call this focal point the “Shish Kabob” in Mediterra lingo. In Coach Terry’s PMF video it is referred to as the ‘Laser Lead Spine’.
The spine is the axis on which the entire stroke moves. The spine keeps every body part aligned and the forces channeled forward, in the direction you want to travel. The propulsive movements of the body are meant to work in parallel to the spine, and around it – but never pushing or pulling it out of alignment (i.e. deforming it like a wet noodle).
So, you need to practice torso rotation, arm movements, leg movements, and turning to breath around this firmly-controlled axis.
Recommended Drills
- Torpedo with rotation (UEF)
- Laser Lead Flutter (PMF)
- Superman To Skate (PMF, UEF)
- Laser Lead Rotation To Skate (PMF)
- Spear Skate and Switch (PMF)
- Swing Skate and Switch (PMF)
What To Aim For
The head remains fixed in its weightless position as the torso rotates.
The hips and shoulders rotate together, as a firm (but flexible) unit.
You feel the hips actually initiate the shoulder rotation (sometimes referred to as the ‘hip-drive’).
Let the shoulder blade slide up/down, parallel to the spine, during the stroke cycle. Keep arm entry and extension on track.
Lead arm should stay fixed on its track as other arm is coming forward (on recovery) – this will keep spine stable too.
The legs rotate in the opposite direction as you rotate the torso (see Step 1 – Counter-Balance) in order to keep the hips straight (rather than sway side to side on each stroke).
What To Avoid
- Don’t turn the head with the torso rotation (unless turning to breathe).
- Don’t tilt the head up as your rotate, or the hips will possibly swing out of alignment too. Especially during breathing a head-tilt is destructive to the spine alignment.
- Don’t hold the legs stiffly together, or the legs will likely swing side-to-side with each rotation. Twist the legs around the axis in counter-balance position.
Assignment 3.2 - Rotation Angle
Description
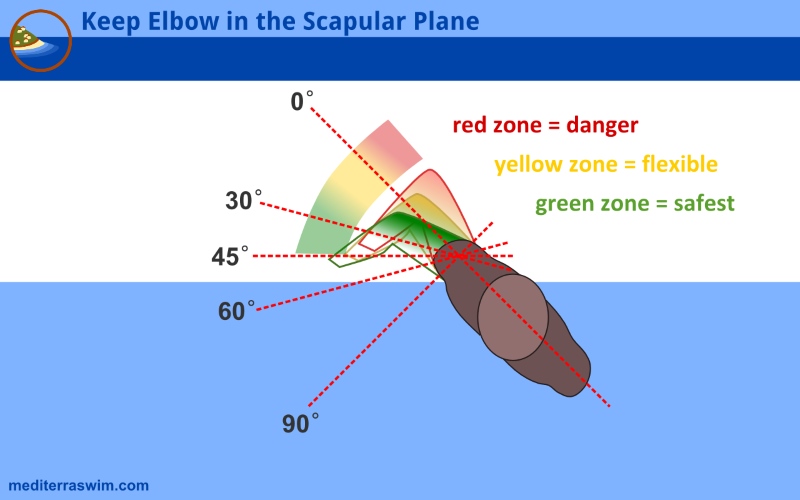
Previously, it was thought that a high angle (nearly vertical) was more streamline. Perhaps it was, but that position caused more problems than it solved. A low angle is sufficient for generating the rotational force needed, and allows for faster tempos. Rotation should be 30 to 45 degrees, and no higher, or it will promote other problems in the stroke.
But, you cannot really feel this ’45 degree’ angle – you need to use other markers to feel the best rotation angle and remain loyal to it.
The tendency for humans is to move the arms to propel, and then more the rest of the body to serve their motion. But you need to do the opposite – set the spine, set a low range of rotation angle and then learn to move your arms and legs within that alignment and rotational parameter. Remain loyal to rotation angle, and adjust arms (in recovery and entry-extension phase) in respect to the rotation angle. That is why you are developing the spine and rotation skills before you develop the arm motions.
Recommended Drills
- Torpedo with rotation (UEF)
- Laser Lead Flutter (PMF)
- Superman To Skate (PMF, UEF)
- Laser Lead Rotation To Skate (PMF)
- Spear Skate and Switch (PMF)
- Swing Skate and Switch (PMF)
What To Aim For
The head remains fixed (unless turning to breathe).
You feel air on the back of the shoulder blade.
You feel the back of your hips (the cheek) brushing the surface of the water.
Your belly-button turns ‘just-off center (if down was 6 o-clock on a watch, you would rotate no more than 5 and 7 o-clock).
Aim for minimal (but not flat) rotation and generate force in that smaller arc of rotation. (Later on the 2-Beat Kick will help with this).
Keep your lead arm on its track, even a hand-width wider than the shoulder – this will help resist over-rotation.
Reach the extending arm 1 inch (2 centimeters) further – reach ahead at target depth to lengthen the body on that Skate side.
When the arm finished the underwater stroke, as the elbow comes to the hip send it ‘wide-to-the-side’ of the body to clear the water.
What To Avoid
- Don’t turn so far that you feel air on the side of your shoulder.
- Don’t turn so far that you feel the side of your hip brush the surface.
- Don’t turn so far that your chest faces sideways.
- Don’t let your entry-extending lead arm leave its wide track – don’t let it cross toward the center line.
- Don’t let the extending hand go deeper than the ideal target – slide it forward as if sliding on ice – not deeper, not inward. This will help resist over-rotation.
- When the arm finished the underwater stroke, as the elbow comes to the hip do not pull the elbow up high or back over the spine to clear the water – send it ‘wide-to-the-side’ to clear the water. An elbow pulled high or back will encourage over-rotation.
Assignment 3.3 - Stable Lead Arm
Description
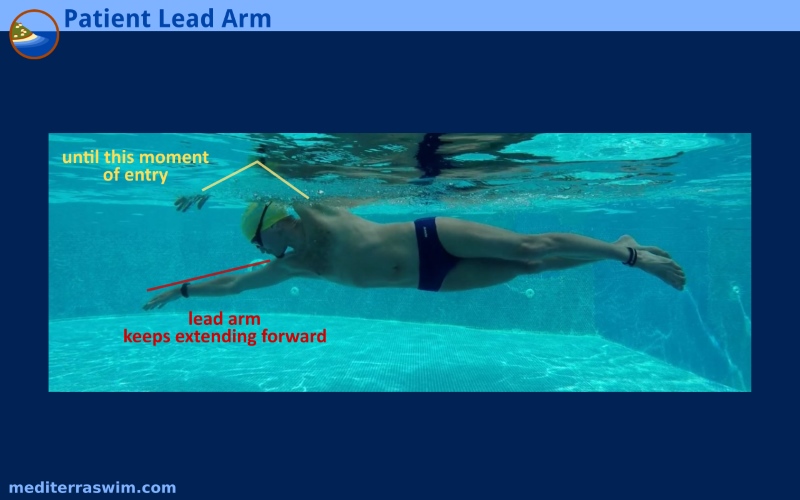
This lead arm position and motion has many important features, but the one to focus on right now is its role in keeping your body stable, long and aligned – this allows momentum to keep channeling forward through the body until the other arm is in position to take its place and a new propulsive cycle starts. Because of a patient lead arm you will be able to experience a surge of acceleration in each stroke.
You are training your two arms to work independently of each other, to work asymmetrically, but in a carefully cooperative pattern. Instead of two arms moving continuously opposite of each other (in the old ‘windmill’ style stroke), view this as one arm transferring force-forward until the other arm comes to take its place.
You may train this lead arm in passive position drills (like Skate) and then in active motion drills like Recovery, Spear and Swing. You may focus on the lead arm, then you may focus on the recovery arm – the brain will gradually learn to control each in a separate but cooperative pattern.
Recommended Drills
- Recovery Rehearsal (UEF)
- Recovery with Elbow Swing (UEF)
- Spear Skate and Switch (PMF)
- Swing Skate and Switch (PMF)
What To Aim For
The lead arm should feel anchored, and patiently holding position.
The elbow of the lead arm should be pointed up and outward (putting the hand in position to slide down and inward to start the catch).
You should feel long and firm, like a skate blade on the Skate side of your body. The should be even a muscular stretching sensation over your hip and down your leg on Skate side.
You should feel like you are actually continuing to get longer on the Skate side of your body even while the recovery arm is swinging forward.
The recovery swing should feel relaxed, as if there is no rush to bring it forward (because of a feeling of instability).
The feeling of extending should continue on your Skate side until the moment of the entry of the other hand. That is the trigger for the switch.
What To Avoid
- Don’t let the lead hand waver from its track and target during the recovery swing. Resist the urge to start pushing down. Keep reaching forward.
- Don’t reach with the fingers – keep them soft – reach with the wrist instead.
- Don’t start your catch (on the Skate side) until the fingers of the recovery arm is pierce the water on entry.
- Don’t partially complete your extension on the Skate side – extend fully, and open the armpit.
Assignment 3.4 - Counter-Balance Arms
Description
Keep arm on ‘Wide Track’ refers to the position of the lead arm projecting straight ahead of the shoulder, with hand on the target below the lowest point of the body line.
The arms have weight – the weight of the lead arm is down below the neutral line of the body, on one side of the axis, and below the center of mass. This position provides counter-balance to the other arm which is swinging above the surface and on the other side of the axis.
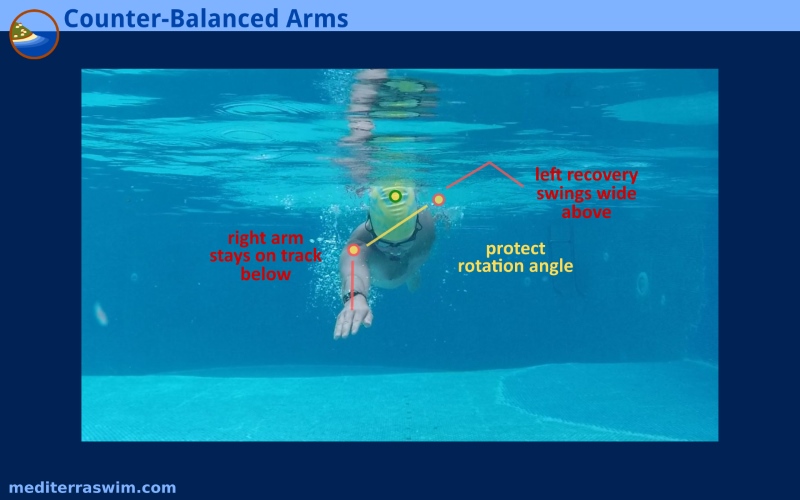
The key to this is to keep that lower lead arm on its track while swinging the recovery arm wide. If it comes inward toward the center line it will reduce the leverage and increase the instability of your torso in rotated position. Once the torso feels unstable the brain will force arms and legs to divert action away from forward propulsion and to stabilizing action.
This is all related to the ideal rotation angle. The arms should be positioned in this way to protect that ideal rotation angle, rather than change the rotation to serve arm position. The torso is the main power-generating motor – protect it’s alignment, angle and rotation at all costs.
Recommended Drills
- Recovery Rehearsal (UEF)
- Recovery with Elbow Swing (UEF)
- Spear Skate and Switch (PMF)
- Swing Skate and Switch (PMF)
What To Aim For
The lead arm should feel anchored, and patiently holding position. For additional stability you might even position it slightly wider than the shoulder, about one hand-width
You should feel long and fixed, like a skate blade on the Skate side of your body.
Feel how the arms are spread away from the spine, each on their track parallel to the spine.
The recovery swing should feel relaxed, as if there is no rush to bring it forward (because of a feeling of instability).
The recovery swing should be wide, out to the side, away from the body.
What To Avoid
- Don’t let the lead hand waver from its target during the recovery swing.
- Don’t start your catch (on the Skate side) until the recovery arm is entering the water.
- Don’t partially complete your extension on the Skate side – extend fully, and open the armpit.
- Don’t pull the arms inward toward the center-line (Shish Kabob spine).
- Don’t let the recovery swing go high above the surface or high above the body.
Assignment 3.5 - Test Swim
You have been working on holding your torso more stable at rotated position and as you rotate. Look for a reduction in the amount of extra work your arms and legs need to do because the muscles in your torso are learning to do the work of stabilization.
For this test swim use the same design that you used last time, or make it slightly more difficult. This way you can compare and more easily see in what ways you have improved.
Refer to the topic above on Test Swims for instructions on how to remind yourself how to do it.
Step 4 – Recovery Arm
Recovery Arm Objectives
Recovery Arm Objectives
What does success look like in Recovery skills?
The recovery needs to have a certain shape, follow a certain path, and have a certain feel to it. All this adds up to a motion that allows you to your transfer rotational force forward, into the water where it will move through the extending lead arm to cut a path for the rest of your body to follow.
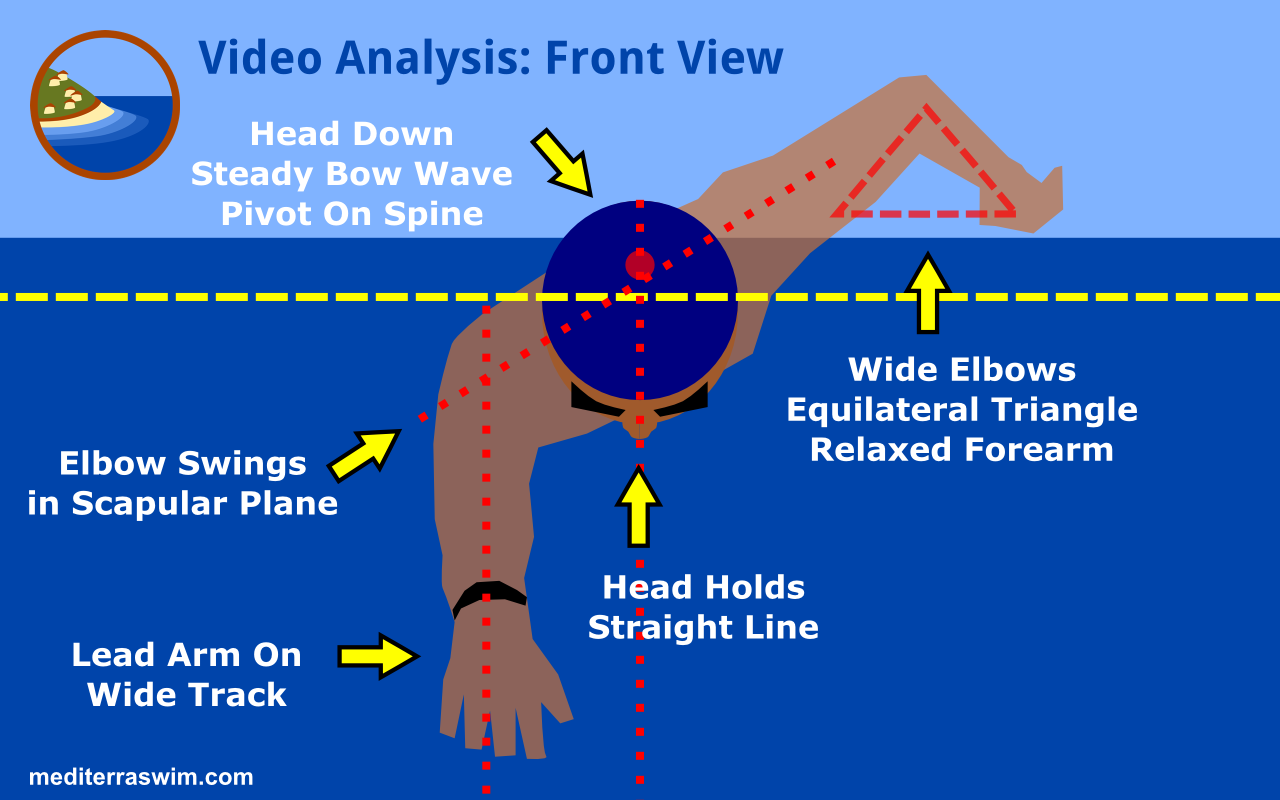
Shape: The elbow should swing out wide from the body, not upward. The hand should stay near the surface, fingernails brushing the water. The hand is dragging BEHIND the elbow, as the elbow swings forward. All of these together should create the equilateral triangle shape of the arm over the water to the side of your body (see image above).
Path: The shoulder bones (scapula and clavicle) are sliding forward. The elbow is swinging all the way forward, to a position stretched forward above your ear. The forearm will drag behind until the last moment.
Feel: The forearm, hand and fingers should remain totally relaxed like a ‘ragdoll’ as Coach Terry describes. The weight of the relaxed forearm and hand are like a plastic sack of heavy fruit that you are swinging forward and will release at the right moment to fall forward into the water in front of your shoulder.
Remember, this is to be a fluid, organic motion, not mechanical or robotic. It is called a ‘swing’ because just as a person on a swing, you cannot restrain a swing without stopping the swing – you can only launch it and guide it on the path. At first, you may move very slow and robotic-like as you are first learning to put the arm into the right shape and path, but eventually you must let it speed up to a more natural swing where you can feel the moving weight of the arm gain momentum. The feeling you seek comes from relaxation and motion. You want to use that momentum and then combine it with the rotation upon entry to create that smooth and powerful drive-forward.
Drill Success = In Recovery or SwingSkate/SwingSwitch drills you should be able to swing each arm with your best shape, on the best path, and with that ‘ragdoll’ feeling all the way.
Note: in drill mode you should allow most, if not all of your forearm to remain underwater. Recall in Section 3 how you have been instructed to protect ideal rotation angle and set arm position relative to that. In drill mode you will lay deeper in the water and at proper rotation angle your full arm will not be able to clear the water without you turning your body farther or stretching your arm out of ideal angle relative to the torso. To avoid this, just allow the hand and forearm to remain underwater and the elbow and upper arm will be just above the surface. The resistance of water pulling against your forearm will act as the perfect reminder to keep those muscles relaxed and let the hand drag behind the elbow most of the way to the ear.
To see photos of what this recovery shape and path should look like in drill positions, view Swing Switch on the Freestyle Drill Resources page.
Whole Stroke Success = Being able to take 6 to 8 whole strokes with slow motion recovery swings, with your best recovery shape and path, and those feelings of relaxed arm and momentum. Your lead arm must remain patient.
Assignment 4.1 - Wide Recovery
Description
Some problems in the shape and path of the recovery start right from the way the arm exits the water. And, the undeveloped instinct for humans is to try to get the hand out and forward as quickly as possible – the elbow comes up, then pauses while the hand swings forward, then the arm (with hand in front) pushes the hand up to the entry point. This approach destroys the momentum of the recovery.
Instead, focus on moving the elbow forward continuously, and train the hand to drag behind until the last moment. The moment the elbow touches the air (at the end of the catch/hold phase) it should swing outward from the side of the body, not upward and behind the back. Like in a pinball machine there is a bumper on the hip and the moment the elbow touches the hip, the bumper shoots the elbow directly out from the side of the body, launching it wide and upward. This will put your shoulder on a path that is much safer and stronger for the shoulder joint.(Note: in the image below, notice the position of the green arm and its angle relative to the torso).
This wide elbow may even be wider than you think it should be. And, send your hand even wider to create that equilateral triangle shape.
Another helpful image: pretend there is a very light, very wide surfboard strapped to your back. When you finish the underwater phase of the stroke and the elbow touches the surface of the water, the surfboard is blocking the elbow from continuing back, behind the plane of your back. Therefore, the only path forward for the elbow is to go out wide from the side of the body. You may also stand with your back to a wall and rehearse your swing with the wall blocking the elbow from going behind your back.
Recommended Drills
- Rehearsal of Recovery Swing (UEF)
- Recovery Elbow Swing (UEF)
- Swing Skate and Switch (PMF)
What To Aim For
The elbow should move out from the side of the body, not behind the back.
The elbow is making an arc (pivoting from the shoulder). The arc is rising higher as it approach the head.
The elbow should move continuously from exit to ear.
What To Avoid
- Don’t allow the elbow to go past the plane of your back.
- Don’t pause the motion of the elbow.
- Don’t swing the hand in front of the elbow (until the last moment of the swing). Let it drag behind.
Assignment 4.2 - Surface Contact
Description
This assignment will involve two focal points.
The main reason for keeping the hand near the surface is to reduce unnecessary effort. The higher you lift your hand the harder you have to work against gravity – the higher the hand goes, the harder gravity will push down on some other part of your body to balance the equation.
So, you want to keep the arm just high enough to swing it forward on the shortest path, and to use the least amount of energy to do it. In a single stroke, the difference in effort of a hand at the surface and a hand a few inches above is very small. But over the course of a swim, with thousands of strokes, that extra wasted effort adds up to a lot. Ultimate economy in swimming comes from small savings in hundreds of points like this.
And, combine that hand-at-the-surface with a relaxed forearm and hand, when it is bumped by a wave or another swimmer, the limp, flexible arm simply absorbs the force without transferring it into your body – the recovery arm continues forward without a hesitation.
Recommended Drills
- Rehearsal with Recovery (UEF)
- Recovery with Paint A Line (UEF)
- Swing Skate and Switch (PMF)
What To Aim For
The hand is relaxed so that your fingers feel like bristles on a brush, or strands on a mop head.
The hand is dragging behind the elbow – as if the elbow were the end of the handle, and the hand and fingers were the brush or mop head.
The fingernails may brush the surface in the slightest manner, leaving a little line.
You may imagine painting a line on the surface of the water, straight the point where the hand exited the water to the point it will enter (at Mailslot). (Note: this straight line may seem contradictory to the arcing swing of the arm, but these two are shaping two different sides of this section of the body. Just try it – it will correct a certain problem, if you have one).
The palm should always remain pointed rear-ward.
What To Avoid
- Don’t tense the fingers. Let them be soft.
- Don’t worry about keeping the hand above any errant waves. Just let the hand gently splash through.
- Don’t lift the elbow higher to make the hand get higher – just send the hand wider to get it higher.
- Don’t let the palm rotate away from facing rear-ward on this recovery swing. Keep that rear orientation.
Assignment 4.3 - Elbow Lead
Description
This skill can be worked on with a focal point from either viewpoint – ‘elbow lead’ (the hand), or ‘drag the hand’ (behind the elbow).
To create the momentum that can then be directed downward into the water, the arm needs to build up that momentum during the swing. Consider how you would swing a plastic bag of oranges, then as it reached a certain point in the swing forward, you would release the bag and the momentum of the weighty oranges would fly forward then down. Consider how the load is behind the point of carry, then it swings in front at the last moment before release. That is what you do with your arm too. If you were to push the oranges in front then release them, they would simple fall straight down, because there is no momentum from a swing motion.
So, we may add another focal point ‘swing the bag’ to help create the feeling you should get from the swinging arm.
Also, consider what direction you are swinging your arm and what direction you want it to go when you release that force into the water – straight forward.
In these focal points you have the shape, the path, and then the feeling you are trying to create in the recovery swing.
Recommended Drills
- Recovery Rehearsal (UEF)
- Recovery with Elbow Swing (UEF)
- Swing Skate and Switch (PMF)
What To Aim For
The forearm and hand should feel totally relaxed.
Your object is to get the elbow to move continuously, as far forward as comfortable, up to the ear – the design of the shoulder joint will direct the hand into the forward position at the last moment (as it passes the shoulder). Focus on the elbow trajectory.
The hand should drag behind the shoulder until the last moment (as it passes your shoulder). This hand-behind-elbow will turn your shoulder joint in a way likely different than what you have felt before – move slowly at first to get acquainted with this new joint orientation. The soft tissues will eventually get comfortable with it.
There is a minimum speed of motion required to get the sensation of momentum. Start practicing slowly to get the shape, but eventually you’ll need to speed up the recovery swing in order to feel this momentum in the swing of the forearm.
The general feeling is that the arm+shoulder unit is sliding forward parallel to the spine. Just let gravity take it back down into the water at the entry point.
What To Avoid
- Don’t pause the elbow until it reaches the ear.
- Don’t tense up the forearm and hand, because this will cause tension in the shoulder joint.
- Don’t worry if the hand gets bumped by a wave or another swimmer. Let it softly absorb the bump.
- (After initially practicing the motion) don’t move like a robot. Let the arm swing freely.
- Don’t try to force the elbow to lead past any point where soreness or pain emerge – your joint mobility may be less-than-adequate at first, but doing these exercises gently and regularly will increase your joint mobility over time. Done correctly, these exercises are therapeutic for under-developed shoulders.
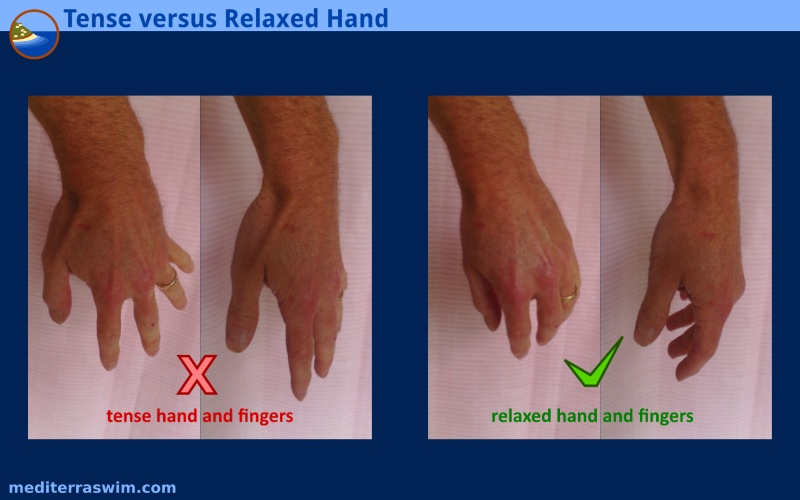
Assignment 4.4 - Relaxed Hand
Description
This can be developed with the focal point ‘relaxed hand’, or as Coach Terry calls it, ‘ragdoll arm’.
Although you want both relaxed forearm, hand and fingers, I point to the hand specifically, because to relax the hand, you must relax the muscles in the forearm. The fingers come along too. Tense the hand and it is hard to keep from tensing the forearm and fingers too.
There are several reasons for keeping the lower part of the arm relaxed
- it uses less energy
- it allows more momentum to build up in the recovery swing
- it allows the arm to softly absorb any bumps or splashes without disrupting the stroke or body
- it allows this part of the body to rest between work moments, which reduces the rate of waste build up in your overall performance system. Remember, little things all over add up to big things.
Recommended Drills
- Recovery Rehearsal (UEF)
- Recovery with Elbow Swing (UEF)
- Swing Skate and Switch (PMF)
What To Aim For
The forearm and hand should feel totally relaxed.
However, because it is hanging down should stay somewhat aligned with the wrist, but still flexible – like a young tree branch.
The moment the elbow begins the recovery, the forearm and hand should release all tension (while still underwater). Just ‘let go’ of the water and let those parts be carried forward.
What To Avoid
- Don’t bend the wrist back to clear the water. Let the fingers drag in the water, if needed, or send the hand a bit wider.
- Don’t worry if the hand gets bumped by a wave or another swimmer. Let it softly absorb the bump.
Assignment 4.5 - Test Swim
The recovery swing is what will help you transfer more force-forward. Look for improvements in the quality of your control, to create that sensation of swinging momentum on each stroke.
For this test swim use the same design that you used last time, or make it slightly more difficult. This way you can compare and more easily see in what ways you have improved.
Refer to the topic above on Test Swims for instructions on how to remind yourself how to do it.
Step 5 – Entry and Extension
Entry and Extension Objectives
Entry and Extension Objectives
What does success look like in Entry And Extension skills?
When you extend fully into Skate position that is the finale of the stroke, the moment when you finish sending force-forward through your body to cut the path through water ahead. We cannot overemphasize your need to come to your absolute best Skate Position at the end of every single stroke because this is what the whole stroke cycle is aiming for.
Entry and Extension are the final section of movement that brings you into that Skate Position. There is the timing of the entry, the shape of the entry and the path of the entry and extension, then you slide into your best Skate Position, and immediately go through the cycle again on the other side. And, it should feel a certain way – quite thrilling actually.
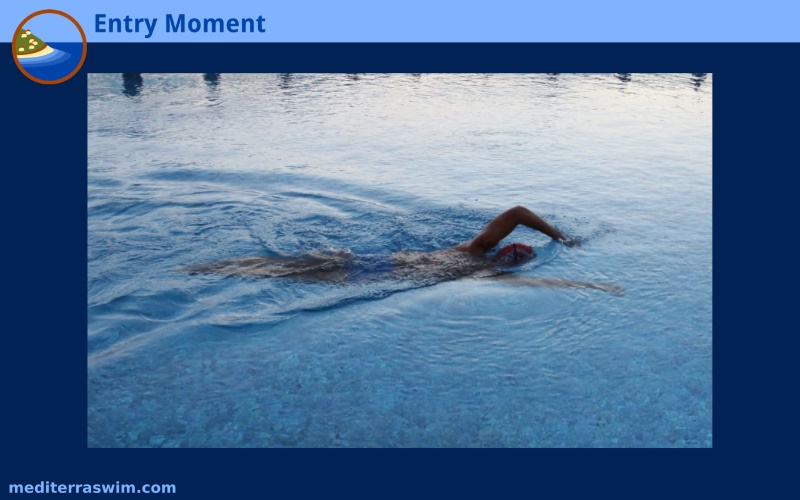
Timing: You practiced this in the Recovery skills, to hold the patient lead arm until the fingers of the recovery hand pierce that water. That is the moment you should start the catch on the other side, and begin sliding into Skate on this side.
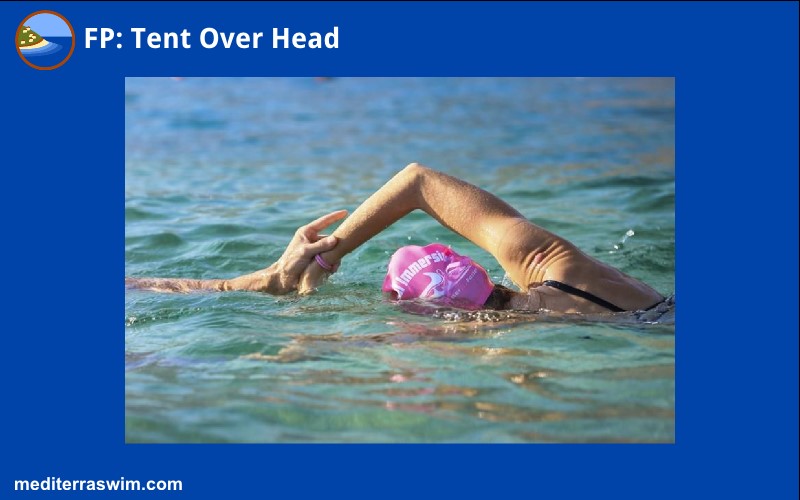
Shape: There is a distinct shape to the entry moment. The entry arm is shaped like a tent over the head. The forearm is angled downward into the water at about 45 degrees. The hand and wrist are aligned, the fingers are soft. The forearm is aimed directly forward, in front of the shoulder.
Path: The entry starts at this steep angle and then drives down toward the target depth, then slides forward at that depth. The path may look and feel like an Olympic ski jump – starting steep, then leveling out.
Feel: There is no pause from the recovery to entry to extension. It is one fluid motion. The arm is shapely, but the forearm and hand remain relaxed even during extension. The work comes from the torso and shoulder.
Remember, this is to be a fluid, organic motion, not mechanical or robotic. You are combining the momentum of the arm with the force of your rotation, and releasing those into the water and extending forward. You must let it flow and just guide this motion to your target, coming into your best Skate Position at the end.
Drill Success = In drills that involve entry and extension you should be able to slide into your best Skate Position immediately, and hold it with stability for 3 to 4 seconds. Do it on both sides. It is the quality of the pathway and finish that determine success in this skill set.
The following assignments will give you 4 main skills to work on. You may work on many more by looking at those listed in the Entry And Extension section of our 101 Focal Points page.
Whole Stroke Success = Being able to take 6 to 8 whole strokes where you hit your best Skate Position immediately on both sides. For extra credit you may practice this at slow-motion, normal, and brisk tempo strokes. Slow-motion will test your stability, and brisk motion will test your timing and precision.
Assignment 5.1 - Entry Shape
Description
There is a distinct shape to the entry arm.
The Mail Slot image refers to the slender mail slot opening which could be found on many old front doors. Imagine how the slot shape requires your fingers, then hand, then forearm, elbow and upper arm to all slide through that same opening. In the water, your fingers will cut that slot in the surface of the water and then you slide your entire arm through that small opening. If done well there will be virtually no splash.
Recommended Drills
- Entry Rehearsals in a video tutorial found on our Freestyle Drill Resources page.
- Hop And Slot (UEF)
- Slot To Skate (UEF)
- Skate Plus Strokes (UEF)
- Swing Switch (PMF)
- Single-Arm Practice in Chapter 9 (PMF)
What To Aim For
The entry arm is shaped like a tent over the head.
The elbow should be high over the ear.
Stretch the elbow as far forward (in front of shoulder) and high (above the ear) as is comfortable. You should feel a stretch on your back of the shoulder and mid-back as you do this.You would not want to hold in this position and that is the point – you’ve wound up the elastic tissues in your body and you release them in a fluid motion into the entry.
The forearm is angled downward into the water at about 45 degrees. The forearm is aimed directly forward, in front of the shoulder.
The hand and wrist are aligned, the fingers are soft, as if you were going to slide your hand into the sleeve of a leather jacket.
The hand follows the fingers through the Mail Slot. The wrist follows the hand. The elbow follows the wrist. The shoulder follows the elbow.
What To Avoid
- Don’t allow the hand to swing in front of the elbow until the last moment of setting up the entry.
- Don’t bend the wrist at entry – keep in line with the forearm
- Don’t tense the fingers.
- Don’t drop the elbow at this moment – keep it as high as you comfortably can.
Assignment 5.2 - Entry Path
Description
The hand and forearm enter the water at about 45 degrees. They drive at that angle down to the depth of your target – which should be just lower than the lowest point of your body line. Then the hand slides forward to the target, like sliding the hand on a glass table top, and this side of your body keeps extending all the way into your best Skate Position.
This all depends on how you start – having your arm in ideal entry position.
This focal point combines the target for your lead hand in Skate Position, and the pathway to get to it.
There are several reasons for taking this path and for choosing this target – without taking the space to break down the physics explanation, the pathway reduces drag on the front of the head/body, it reduces disruption to your balance (hips dropping), and delivers your hand directly to the spot of the next action – the catch – without wasting time or effort doing something non-productive.
Recommended Drills
- Entry Rehearsals in a video tutorial found on our Freestyle Drill Resources page.
- Hop And Slot (UEF)
- Slot To Skate (UEF)
- Skate Plus Strokes (UEF)
- Swing Switch (PMF)
- Single-Arm Practice in Chapter 9 (PMF)
What To Aim For
Start the entry with a steep angle arm. It may feel close to your head (versus farther in front of the body) than you think.
You should feel your torso rotation pushing your arm forward – it is like a corkscrew action.
You should feel water pressure pressing on the upper surface of your arm and evenly along the sides of the arm… if you are sliding the arm straight forward.
You should feel you arm straighten out completely toward the end of the extension. Keep extending forward.
You should reach with the wrist, or with the big knuckle of your ring finger. Imagine you have a superhero’s energy beam flowing out of your wrist.
Your hand and fingers should remain soft and resting, until the set of the catch.
What To Avoid
- Don’t tense the fingers. Let them be soft as you slide to the target.
- Don’t press downward as you come to the target – the only arm motion should be extending forward, until the catch moment.
- Don’t scoop the hand upward as you come to the target. Keep the fingers soft, draping downward, ready to slide into catch.
Assignment 5.3 - Lengthen 1
Description
The ‘axilla’ is the more technical name for the armpit.
Often the swimmer will straighten the lead arm, but not really extend the body as far as it is meant to go. Recall that the type of core muscle engagement that you need comes from stretching the body into a long vessel. After straightening the arm, the next piece of this lengthening process is to open the axilla and extend the body a little further.
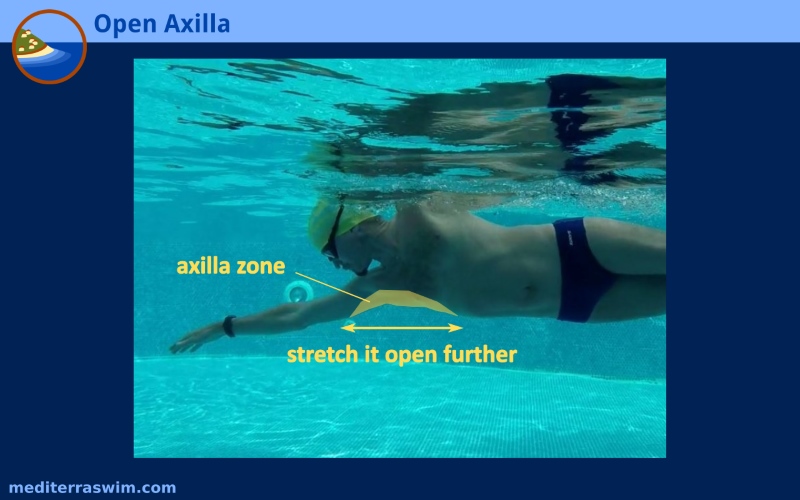
You are going to lengthen the Skate side of your body farther, so that it feels long and taut like a stretched elastic band on that side.
Imagine standing at the counter in your kitchen. Lift your arm to reach something on the shelf above you. Now reach a little higher by raising your shoulder. That is how you will lengthen this side of the body without twisting (or over-rotating).
Recommended Drills
- Slot To Skate (UEF)
- Skate Plus Strokes (UEF)
- Swing Switch (PMF)
- Single-Arm Practice in Chapter 9 (PMF)
What To Aim For
The bones on both sides of the shoulder (the clavicle in front and scapula in back) should slide freely forward, as far as comfortable.
Your reach with the shoulder, without increasing rotation angle.
The elbow should remain pointed outward and slightly upward – so that the arm is ready to fold inward and downward at the catch moment.
The palm remains facing down, sliding forward as if on the surface of thin ice
Feel as if you are resting this side of the torso on a pillow of water. The larger the opening in the axilla the more you can rest on that pillow.
Rely upon this extended position COMPLETELY as you turn to breathe. Practice turning to breath while extending forward – never push down (or start the catch) until head is turned back from breathing.
What To Avoid
- Don’t twist torso to increase reach.
- Don’t pull your head toward you arm – this will pull your spine out of alignment. Leave each on their track.
- Don’t press down with the hand as you extend farther – slide it farther forward without breaking the ice!
Assignment 5.4 - Lengthen 2
Description
You are going to lengthen the Skate side of your body even further, so that it feels long and taut on that side, from wrist to hip to ankle. The more long and firm this finish position is, the more force you can transfer through it.
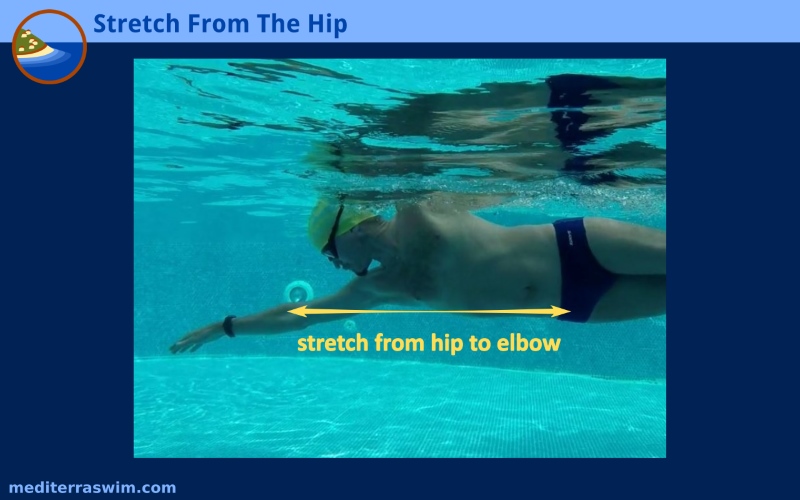
Imagine again that you are standing at the counter in your kitchen. Lift your arm to reach something on the shelf above you. Now reach a little higher by raising your shoulder. Now reach a little higher by turning your hip slightly, feeling the space between ribs and pelvis get a bit longer. Then notice how you feel the stretch down into your thigh. You will feel a stretch from wrist to pelvis and into the thigh on that side of the body. That is the feeling you should feel when fully extended in Skate Position.
If you were to get into this position, and then we froze that side of your body in this position, you would have a long, streamline frame on which to slide your way through the water. Imagine the other arm finishing the underwater stroke and sending force into this blade-like Skate side of your body and how that would more easily transfer that force forward through your body.
The stretch at the hip actually resists over-rotation in the torso. Now the body is stretching forward on that line, the tissues of the torso will not want to elongate in the lateral direction by rotating further. So this manner of extending the Skate side of the body goes together very well with the low rotation aim.
Every stroke should finish with this long, taut Skate frame, a deliver the remainder of your force forward.
Recommended Drills
- Slot To Skate (UEF)
- Skate Plus Strokes (UEF)
- Swing Switch (PMF)
- Single-Arm Practice in Chapter 9 (PMF)
What To Aim For
You should feel a stretch of tissues between your ribs and your pelvis on the Skate side.
You should feel the abdomen pulling in, getting narrower in the waist.
You should feel a stretch over the front of the hip and down the thigh.
There should be a distinct moment at the finish of the stroke where you feel this Skate side of the body feeling long, straight and stable, like a Skate blade sliding on the ice.
What To Avoid
- Don’t try to twist the shoulders to reach further.
- Don’t try to twist the hips further to reach further.
- Don’t turn the palm inward as you reach. Keep it facing downward.
- Don’t pull the arm toward the center line as you reach. Keep it locked on its track, directly in front of the shoulder.
Assignment 5.5 - Test Swim
When the Entry and Extension of your stroke are improved this is where you should start to see your stroke get longer, your stroke count go will go down. The propulsive pieces are starting to come together. You may even notice more acceleration – sliding forward easier – in each stroke finish, as you enter Skate Position.
For this test swim use the same design that you used last time, or make it slightly more difficult. This way you can compare and more easily see in what ways you have improved.
Refer to the topic above on Test Swims for instructions on how to remind yourself how to do it.
Step 6 – Breathing
Breathing Objectives
Breathing Objectives
What does success look like in Breathing skills?
Respiration is necessary, of course. And every swimmer is going to find some way to get enough air, pretty or not. The fact is, the more a swimmer struggles to get to air the more respiration he requires because of that struggle. It is important to not merely get to air, but to do it in an economical way which reduces stress and heart rate. A brain that is convinced it has enough air is going to be relaxed and able to focus on other things.
So, you want to have a breathing pattern that fits smoothly into the stroke cycle and works on top of your foundation rather than disrupt it at each breath. To do that your head and lead arm have to remain in its best position, then turn at the right timing and turn back, and to make sufficient air exchange.
Head Position: The head must remain on the shishkabob, in line with the rest of the spine.
Lead Arm Position: The lead arm must remain extending the entire time your head is turning and returning from air.
Timing: The timing of the breath comes as early as possible in the stroke on that side of the body, with a quick sip of air, and a quick return to face-down position before the next stroke starts.
Air Exchange: This involves a steady exhale underwater from the nose, a quick and partial inhale of air, and a breathing pattern that comes frequently enough in a series of strokes.
The big challenge of learning this smooth, rhythmic breathing is to deny our land-mammal instincts which demands that push down with the lead arm in order to push the head up and out of the water to breathe. Instead, the lead arm must remain extending in front, the head must remain almost totally submerged, with just the side of the face and mouth touching the air, just enough to pull in a quick sip of air and return underwater. This does not come naturally, but it is by far the most economical way to breathe. Any tilt of the head upward to bring the forehead and eyes higher is a waste of time, effort, it increases drag in front of the body and causes gravity to push down on the hips. In contrast a head that stays on the shishkabob, turns with the torso rotation, and turns back to face-down quickly will cause minimal disruption to your length and streamline shape and allow your stroke and velocity to continue without hesitation.
Breathing easy is an all-or-nothing trust in this ideal position and timing. But once you got it, you are breathing so much easier than you every imagined you could.
Drill Success = The drills will help you learn to hold Skate Position while turning and returning from the breathing action. You first practice turning without actually breathing. Once that feels more comfortable, then you can attempt to take a quick sip of air. You should be able to hold your best Skate Position while turning and returning from the breath, without actual breaths and then with breaths. Then you are ready to move to continuous strokes with a breathing stroke inserted between. Work on turning to breathe on both sides separately.
Keep this in mind – be patient with the drills. If you do it well in the drills you will be able to do it well in whole stroke soon after. The drills simplify that action. But while you are still figuring out how to do it in the drills, you will find it to be even more difficult in whole stroke.
Whole Stroke Success = Being able to take 3 smooth, rhythmic breathes with 2 or 3 strokes between. You get extra credit for breathing every three strokes and additional extra credit if you work hard on your weak side to make it feel more like your strong side.
Assignment 6.1 - Interrupted Breathing
Description
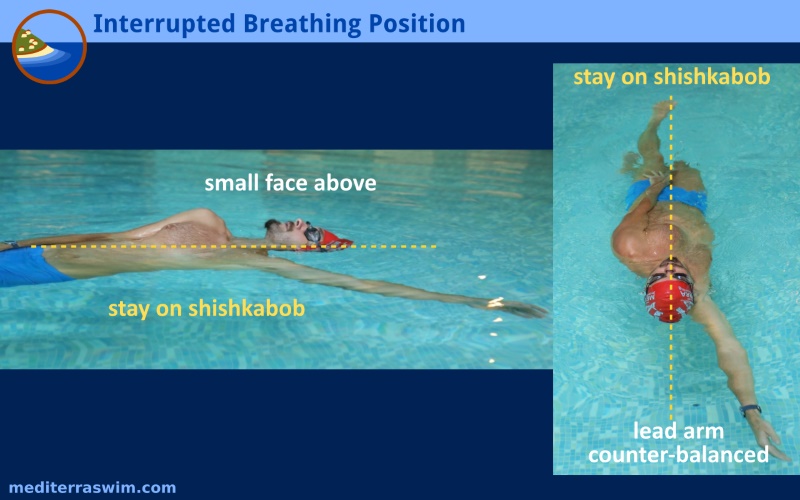
You will practice a breathing position that requires you to stay on your Shish Kabob to turn to it. Interrupted Breathing is useful to you during drill work and it trains your body to rotate on the Shish Kabob and keep the head in alignment while you do. This is essential for Rhythmic Breathing skill.
You start in Skate Position, check that your head is weightless on the neutral line, then slowly rotate your torso-and-head as a unit away from your lead arm. Gently blow bubbles from your nose and continue blowing bubbles until your nose and mouth emerge from the water, face-up (as seen in the image above).
The key to this is to keep your head completely submerged until the last moment. DO NOT LIFT YOUR HEAD UP out of the water to reach the air. Wait for water to lift your torso-and-head unit to the surface.
You may use your legs to help rotate the body.
When finished breathing, rotate back in the direction you came from. Come back into your best Skate Position before resuming any strokes. The other hand should be remain in the pocket until then.
Recommended Drills
- Simple Roll To Air (UEF)
- Breathing In Skate (UEF)
- Interrupted Breathing (PMF)
What To Aim For
Maintain complete loyalty to head position. Keep it on the Shish Kabob while turning, and while in Interrupted Breathing Position.
Turn into a slightly rotated position on your back. One breast will be touching the air. This is the backstroke Skate Position.
After turning face-up, realize it may take a half-second more for the torso-and-head unit to rise to the surface.
Keep the smallest face above the surface. Most of the head should be underwater.
Keep chin up and forehead down. The water should touch the top of your goggles.
The lead arm should reach out and down deep as far as comfortable. The arm counter-balances your rotated position.
Breath deeply in this position to recovery.
What To Avoid
- Don’t tilt the head before, during or after you turn to face-up position.
- Don’t turn the head faster than the torso rotation. Turn them as a unit.
- Don’t let the lead arm come up to the surface all the way. It needs to stay deep to anchor your body in rotated position.
- Don’t forget to keep bubbling out of the nose, or water will go up it!
- Don’t forget to start bubbling from the nose as you start to turn back to Skate Position.
Assignment 6.2 - Head Position
Description
This official TI sequence of steps is called ‘Nod’, ‘Whale Eye’, and ‘Popeye’ in the UEF videos series. I tend to call them ‘Nod’, ‘Split The Face’, and ‘Hooked Fish’ for easier translation into other languages.
This three-step sequence will set the priority of keeping your head on the Shishkabob while turning to the side.The first time through this sequence you will not take any breaths. Just practice head position while bubbling gently from the nose, and take a short rest to breathe, then resume.
Recommended Drills
- Nod, Whale Eye, Popeye (UEF)
- Continuous Breathing in Chapter 5 (PMF)
What To Aim For
Begin the turn of the torso-and-head as a unit. At the end of the torso rotation, the head continues to turn a bit more, like being stretched on a rubber band.
‘Nod’ start you with an easy position to feel alignment in, with the head completely submerged.
Look straight sideways at the wall of the pool, then turn the head face-down immediately.
Next, in ‘Split The Face’, you allow the torso-and-head unit to slide up at the surface, where one goggle above, one goggle below. Be sure to split the mouth as well. (One could have the head tilted while still splitting the goggled.)
Next, in ‘Hooked Fish’, raise the chin and open the side of the mouth to touch the air, as if you would breathe – just to see that you can get the mouth there before actually trying to take a breath in this position.
Next time through, after getting to Hooked Fish, try taking a quick sip, if you feel you can touch the air OK.
The turn should be brief and turn back to face-down immediately.
Keep your lead arm steady, on the target the entire time you are turning to the side, and until the head returns face-down.
What To Avoid
- Do not pause looking sideways.Turn to the side, then turn back like a rubber band.
- Do not turn the torso sideways to turn the head farther – stop rotation at ideal angle then let head continue a bit further, as if on a rubber band.
- Do not press down on the water with the lead arm.
- Do not start the catch with that lead arm (if making switches) until the head has returned to face-down position.
- Don’t scoop the hand upward as you come to the target. Keep the fingers soft, draping downward, ready to slide into catch.
- Do not raise the forehead to get the head higher. Lift the chin.
Assignment 6.3 - Lead Arm Position
Description
It is a VERY strong habit for land-mammals to push down with the lead arm while turning to breathe. This must be resisted. The dropping arm disrupts streamline, causing a great increase in drag, and it breaks the rhythm of the arm switch timing, that you have been working on in your non-breathing strokes.
To maintain streamline and stability, that lead arm must remain extending in front – essentially, holding Skate Position – while the head turns toward air and while it returns from air.
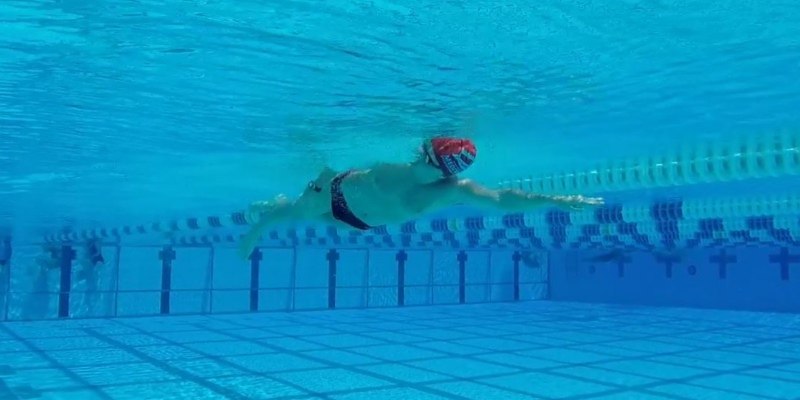
Your head should be back in face-down position before that lead arm begins the catch. While you are creating a new habit for this, your sense of arm switch timing may be confused. You may pause the recovery arm swing for a moment to allow your head enough time to get back into face-down position before it continues the swing forward. Once it is familiar and consistent for you to hold the lead arm position in drill mode and in ‘paused-stroke’ mode, then you can remove the pause and smooth out the stroke rhythm while maintaining that lead arm position.
Recommended Drills
- Superman To Skate (UEF)
- 4 strokes and then Skate
- Swing Switch (PMF)
What To Aim For
Turn the head toward air as soon as possible, turning faster than the torso is turning.
The lead arm keeps reaching forward while turning the face toward air. The lengthening of the body line keeps it long and stable.
The lead arm keeps reaching forward while the returning the head to face-down position.
The return of the head is independent of the recovery arm swing – your head turns back toward air even before the recovery swing starts. The head turns back much faster than the recovery swing moves forward.
You should be able to do this in Superman to Skate and Strokes To Skate – testing that you can hold Skate Position for the entire breathing action – before moving to continuous whole stroke swimming with breathing strokes inserted.
Notice differences between your stronger (easier) breathing side and your weaker breathing side. Use the individual focal points for the weak side to make it more like the strong side.
What To Avoid
- Do no turn the head toward air at the same slow speed as the torso turn.
- Do not linger with the face turned to the air. Return immediately.
- Do not press down with the arm as you extend farther.
Assignment 6.4 - Breath Timing
Description
So many factors in the situation are urging you to time the breath later in the window of the stroke cycle. But the ideal moment is at the very beginning of that window. You will have the most velocity, your body will ride the highest at the moment, and it will be least disruptive to the rest of your body to get it done sooner than later.
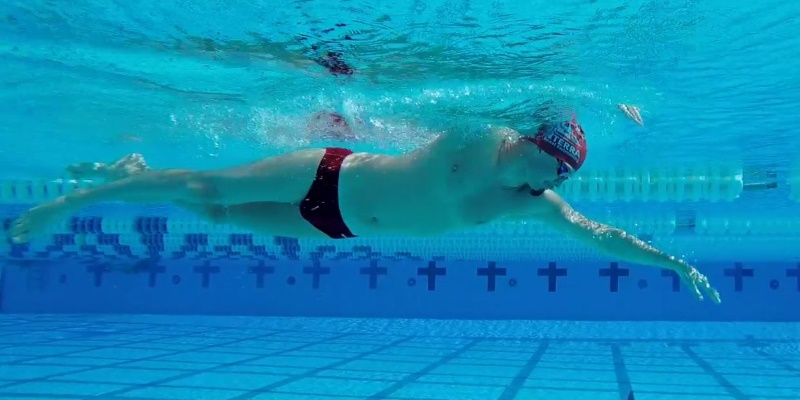
Start turning the head at this moment, right when the hand enters and you are starting to set the catch. At this moment you will have the most acceleration and lift to touch the air most easily. The longer you delay and the longer you linger at the air, the more problems you will encounter.
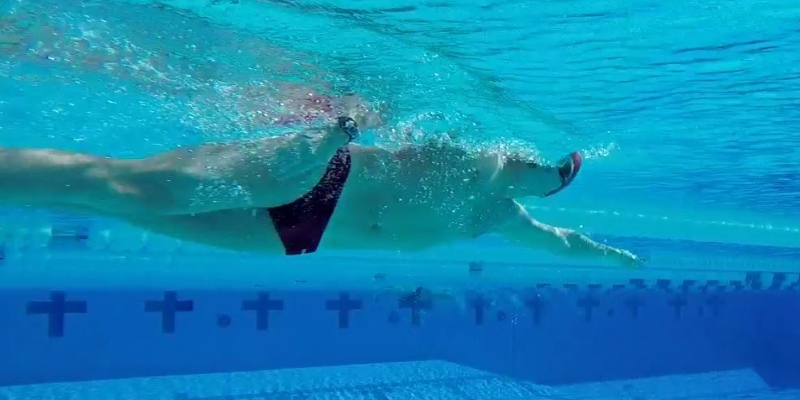
You should be taking your quick sip – as seen in this photo above – and then starting the return of the head toward face-down position well ahead of the recovery swing.
Recommended Drills
- Nod, Whale Eye, Popeye (UEF)
- Continuous Breathing in Chapter 5 (PMF)
- Swing Switch (PMF)
- Whole Stroke in slow-motion and normal tempo
What To Aim For
Right at the moment you set the catch, you will begin turning the torso-and-head unit.
You should feel the torso rotation empowering the turn toward the breath.
You may also feel like there is a lever, as your catch hand presses the lever it causes your torso-and-head unit to turn.
When the torso reaches its normal low rotation angle, you just turn your neck a little farther to touch the air.
You should feel the air on your cheek and the side of your mouth.
You should see the underside of the water’s surface with one goggle, and the above surface side with the other goggle.
You stretch your lips sideways to sip with the side of your mouth. It is normal to have some water in the side of your mouth while breathing.
Your turn to air should feel like the head is on a rubber band. It reaches the breathing point with just a moment to sip some air, then the rubber band pulls it back down to face-down position.
What To Avoid
- Don’t pause in breathing position for a giant, extended breath (unless you also put a pause in your stroke).
- You should not see your recovery arm with your own eyes. This means you’ve turned too late or waited too long in breathing position.
- Don’t tilt your head up to get the head higher (in case of waves). Just turn the chin, and perhaps the torso, a bit further.
Assignment 6.5 - Partial Air Exchange
Description
Once you have your body in good position for breathing, and you have more confidence that you will get to air as needed, you will feel more calm and in fact, you will use less energy while breathing, which means you need less air exchange. Combine that with a breathing pattern that allows you more than enough breathing moments over the length of the pool you now can make it even easier on your cardio-vascular system and brain to take smaller, partial air exchanges. Deep massive, infrequent breaths will put more stress on the body and mind. Smaller, frequent breaths will be more relaxing and will allow you to feel more comfortable skipping a breath occasionally when a wave prevents it.
Imagine your lungs as a big sack of air. Think of expelling just the top third of that air and then filling it up again on each inhale. Just exchanging the top third is what we mean by ‘partial air exchange’. Avoid making massive exhales which then require massive inhale on the next breathing stroke. Massive air exchanges will actually be more stressful on the body and make you feel more desperate for the next breath. As happens occasionally in pools and in quite often in open water, an unexpected wave of water will prevent that breath and then you would feel very desperate and tempted to disrupt the whole stroke to stop and get some air.
The amount of exhale underwater needs to match the amount of inhale, obviously. So, at lower intensity swimming, your bubbles from the nose can be gentle and the inhale can be a small sip of air, like sipping hot tea. At higher intensity, the exhale underwater may be from both the nose and mouth – but try to avoid pushing most of the air out. The corresponding inhale will be a bit deeper to match the exhale volume, but still very brief.
Recommended Drills
- Continuous Breathing in Chapter 5 (PMF)
- Swing Switch (PMF)
- Whole Stroke in slow-motion and normal tempo
What To Aim For
Control the intensity and rate of the exhale in order to control the volume of the inhale.
Bubble from the nose at low and moderate intensity. Bubble from the mouth at higher intensity swimming.
You should send a final burst of air out of the nose and mouth at the last moment before touching the air, to clear those airways, just like dolphins do to clear their blowhole before breaching the surface.
Take only the quick sip at the surface and turn the head back down immediately.
Like sipping a cup of very hot tea, if the air is there take a quick sip. If not (blocked by a wave), skip it and turn the head back down and wait for the next stroke. If you’ve taken only a partial exhale your body won’t feel too desperate to skip this breath and wait for the next clear window.
What To Avoid
- Don’t exhale above the surface. Finish it underwater.
- Don’t expect to keep all water out of your mouth. It is normal to have some water in the lower corner of the mouth when you inhale. Spit it out when you turn back down.
Assignment 6.6 - Final Test Swim
For this test swim use the same design that you used last time, or make it slightly more difficult.
When you have completed this test swim, go back to the recorded results of your first test swim and see the differences in the data.
- Did you swim a longer continuous distance?
- Did you swim longer total distance?
- Did you use less total rest?
- Did you use fewer (longer) strokes per length?
- Did it feel like it took less effort?
- Did your breathing feel easier?
- Did you enjoy those moments of swimming more?
Have You Worked Through Everything?
Completion
Congratulations! If you are viewing this section we hope this means you feel you have done the work, done the test swims, and confirmed that you’ve integrated the fundamental skills to some useful level. Just as the master and professional performers know, there is always room to improve the fundamentals further. And, the stronger your fundamental skills are, the easier it is to develop advanced skills that are dependent on that foundation.
So, we hope you will both appreciate the great progress you’ve made, and appreciate the need everyone has to keep working on these skills from time to time.
Comparing Before and After
By chance, do you have a video file of your stroke before your time of training in this course? Could you find a way to take a video of yourself now?
If you could take a video of yourself now and compare to your previous video, you will likely see not just a lot of improvement, you will be so much more aware of all the details that one could notice in a swimmer’s stroke.
Assignment #1: If you have the opportunity to do this, please do.
Awareness Gap
You should be encouraged in many ways because your skill has truly improved from your dedicated effort in this systematic process of skill building. However, some people can feel discouraged – as if they don’t even notice the improvement! Why? I call it the Awareness Gap – when you have truly improved in physical skill, but your understanding and awareness of what is possible has grown even further, making your (falsely) feel like you’ve gone back instead of forward. (please read that article).
Your training has not only worked on your body, it has worked on your attitude and your understanding of How Swimming Works. Now you know so much more about the features of a skillful stroke, what are relatively easy to develop and what are more difficult.
You have made great progress in some ways. You should pause to appreciate and enjoy this new level of skill.
Pleasure In Process, Not Destination
And, when you consider how much more there is to learn and improve – we urge you to view this as fuel for your pleasure in practice, rather than a discouragement from being so far away from your destination – as if you only receive reward then. In this case, there is no finish line, actually – ‘Perfection’ in this sense of reward does not exist. But if you shift your viewpoint, you can find satisfaction in the process of training, you can derive pleasure and motivational reward in the little points of progress that come when you set small improvement goals in each practice.
Assignment #2: Consider where you were at when you started this course. Make a list of at least 20 things that have improved in your mind and body from your time training in this course.
What Next?
Your time in this course may be finished for now, but your swim improvement journey will continue.
We may recommend three options for how to proceed from here:
1 –Swim For Pleasure
Spend some days swimming freely with your new level of skill, just for the pleasure of it. No training agenda.
This is good to do every once in a while, but to keep in Flow State, to keep pleasure in the training, you need to be working toward some objective. Satisfaction in skilled activities comes from movement toward a goal. If you sit still you lose that reward after a while.
2 –Set A New Achievement Goal
Set an achievement goal and start training for it.
That objective can be about some external achievement – like swimming a certain distance farther than you have gone before, or swimming faster – or it can be about improving certain qualities in your skill or sensations – like swimming with more ease over a long or short distance, feeling the thrill of acceleration on each stroke when your skill and timing is refined on a higher level.
We have various courses which can guide you in training for short, medium and longer distances. We have courses that will build your breathing skills, your full-body synchronization and your Level 2 training skills.
3 –Review This Course
Go back through this course – either as a member of our Dojo, or following your own notes – and practice the same skills, but at a deeper level and with much better understanding of how this process works.
One of the primary intentions behind the Mediterra Dojo is to help you learn to coach yourself. By experiencing the process, by studying and experiencing the practice assignments, we want you to absorb the principles and ideas on how training works. Then go and work on applying them by yourself!
You can always come back for guidance and review of what you’ve already studied, and we will certainly have more to teach you when you are ready for it.
Enjoy your new stroke, your new understanding, and your new perspective.

