New Video Tutorials
If you haven’t seen them yet, you may appreciate some new tutorials talking about…

If you haven’t seen them yet, you may appreciate some new tutorials talking about…
This is a practice I designed for a swimmer who is doing very well with technique but is having some challenges with training his exhale from nose and inhale from mouth, keeping the airways clear of water. In order to not let the breathing troubles restrict his fitness development we use a combination of snorkel and no-snorkel swimming, to start with no breathing challenge and gradually add complexity over the course of the practice.
4x 50 warm up with gentle movements
Swim 3 rounds of 4 cycles of (2x 25 and 1x 50) with short rest between repeats
Each cycle use a different focal point:
Each round increase the complexity:
This is a practice I designed for a swimmer with excellent control over form up to cruising speeds, who is preparing for his upcoming Ironman. He has not done much work with tempo before so I have been introducing him to the Tempo Trainer and how to prepare the nervous system to memorize a suitable tempo and maintain a consistently.
300 silent swim FR
4x (25 FR easy + 25 FR brisk) with different synchronization focal point for each repeat
Estimate your tempo during the brisk swim to establish tempo TB
Swim 200 FR with tempo TB = 1.18
Then do 4 cycles of the following set with increasing tempo on each cycle:
3 rounds of 2x 50 for each cycle.
And, per cycle use tempo:
Maintain your standard of quality for each sync focal point at each increased tempo.
Then swim 300 at tempo TB with a 25 sprint within each 100 (for a total of 3x 25 sprint inside 300)
Since you are a member of the Dojo, you are certainly interested in doing the specialized training you need to become a better swimmer, in both skills and fitness.
But what about your general strength and conditioning that is the foundation for your specialized training?
Sometimes, when an adult athlete comes to a plateau, no longer seeing progress or starts feeling the threat of injury, the problem is not always with the swimming skills or the swim training itself. Sometimes the problem is in the foundation of her general strength and conditioning – the ways she needs to be mobile and strong on land, for just ordinary human activities.
We have a couple articles on our Dojo library that address this topic and give you some recommendations on what exercises to do:
Before you are strong and capable as a swimmer, you would do well to first be strong as a human on land. This will help you be able to more safely, more successfully handle more challenging fitness training in the water.
You may also appreciate this post Your Lifestyle Of Strength on the public Smooth Strokes Blog on our main Mediterra site.
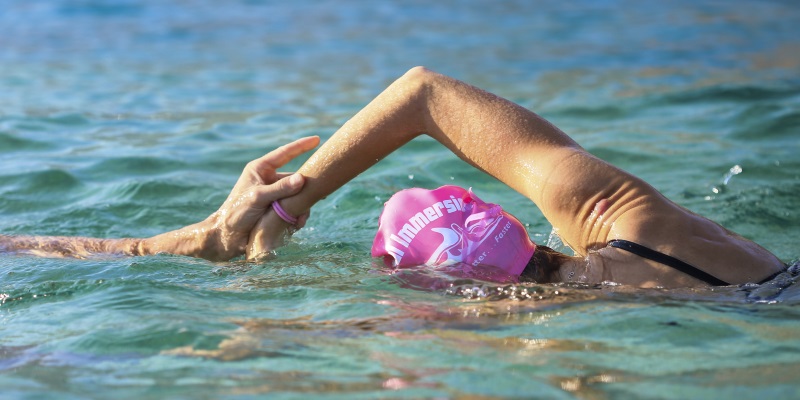
In traditional swimming lingo the underwater part of the freestyle stroke is called the pull, as in pulling back on the water, as in pulling the body forward, and this is regarded as the most important part of the whole stroke.
In Total Immersion we call this the catch-and-hold, because we understand the main purpose of this part of the stroke is to get a grip on the water at a certain point, hold that point, transfer that resistant force to the other side of the body and slide forward in streamline Skate Position.
In the traditional style stroke, the swimmer is urged to fling the arm forward in the recovery, splash a flat arm down into the water and immediately start pulling back. This usually results in the swimmer not reaching as far in front of the body as he might be able to. Because the pull, and especially the last half of the pull is believed to be the most valuable part – after all, one can feel the arm and shoulder muscles working hard to make that final push, with the hand traveling down the thigh.
In contrast, in the Total Immersion view, the entry and extension is the most important part of the whole stroke, where the body is channeling all the gathered force into that streamlined body and most easily sliding forward. Then the swimmer reaches and gets a grip on the water as far in front of the body as he comfortably can. The first half of the stroke is viewed as the most important part, starting as far in front as possible. The swimmer is urged to shape the forearm at the set of the catch in such a way to get that grip on the water as smoothly, as quickly as possible far in front, then hold that grip as the body rotates forward, around that grip point.
In the traditional style stroke, since the swimmer wants to push back as far as possible, he must pause his elbow at his waist while the forearm-hand continue to push back (using the tricep muscle), pivoting on that elbow. By pausing the elbow (not allowing it to exit and begin the recovery) the hand can keep pushing and feel resistance of the water. Observers can often see a big splash or ‘rooster tail’ of water shooting out behind the swimmer as his hand flings that final bit of water behind.
In the Total Immersion style stroke, the elbow never pauses, as it gets to its farthest point, but immediately ‘boomerangs’ out of the water and forward on an elliptical path. The hand continues to drift back behind the elbow, like a tail whipping behind. The elbow moving forward while the hand moving backward neutralizes the water pressure against the hand. The grip on the water fades away as the hand reaches the waist. There is not final push of the forearm and hand. Instead, as the elbow swings forward and the hand extends behind to its farthest point, the elbow pulls the hand forward, slipping it out of the water without splash or sound, like slipping an arm out of the sleeve of a jacket.
Can you see the difference?
In traditional swimming, the front end is not important, the back end is. So one must pause the elbow in order to keep pushing water past the waist and down the leg. The overlap of the arms before switch, the patient full extension into Skate, the reach to start the catch farther in front – these are less valuable and therefore quickly sacrificed in the eagerness to get back to the pull and push at the end.
In Total Immersion, the front end is most important. No pause at the back is allowed because the arm is eager to get back in front, to get back into streamline, to get to the next gripping point farther in front of the body. The absence of the elbow pause means the hand has nothing to lever against at the very end of the stroke and so pressure dissolves from the waist line back.
Especially in a fast tempo stroke, every swimmer has to cut down travel distance and time somewhere – there are options on where to cut the stroke down, and those options are not equal.
The default human solution is to sacrifice the front and keep the back end, because this is easiest on the muscles to do, especially when they are getting fatigued, but less effective for actually maintaining forward momentum. This results in a shorter and shorter stroke, with an increasing tempo as fatigue sets in.
But the superior solution, the one that does not come easy, but when trained is more effective and maintaining forward momentum, is to sacrifice the back end and keep priority on the front end. This results in a stroke that resists shortening at fatigue sets in, allowing the swimmer to protect pace better.
Once you come into the TI training world, you realize that stroke count (stroke length) is an important indicator your improvement in efficiency (but not the only).
You may wonder what stroke count you should be using.
You may wonder how to make your stroke count lower.
You may wonder why this is so important!
I’ve added this article to the library to give you an argument for working on A Longer Stronger Stroke.
If this raises any questions for you, I would be glad to answer those for you or point you to the articles or posts we already have on that topic.
Here is an article in our library that breaks down the basic steps to planning your own practice, when working on the fundamental stroke skills.
***
One of the main objectives of the Mediterra Swim Dojo is to pass on to you the principles and understanding of how to practice on your own in a TI way. Following one of the training plans exposes you to this.
And, if you really want to study how to do it directly, you may consider taking the Self Coaching 101 course offered here in the Dojo.
You’ve likely noticed in our Dojo courses that you’ve got to study a bit to get acquainted with this way of practicing. Any intelligent practice plan has to be customized to fit you and your needs. It also needs to adapt organically to the changes you experience and the fluctuations you experience from day to day, week to week. To make it customized to fit you, you need to understand the principles and then make certain decisions for yourself in each practice. The library has been set up, with certain links to articles in each course, to train you how to do that. That means you have to put in a bit more time and thought into your practice planning, at least on your first time through.
We realize this is not a quick-simple-easy approach to training. This is why this is not a popular way to practice, nor a popular way sell swim training books. Intelligent training requires too much attention from the swimmer, just as martial arts training requires full attention and commitment (hence, we call this the “Dojo”!). But this is a far more effective way to train, and will greatly benefit those who are willing to put in that time and thought to learn how to do it.
However, we keep striving to explain things in more simple ways, more bite-size pieces. And, the Dojo library is filled with articles demonstrating our attempt to do that for you.
Enjoy!
One of our Dojo swimmers received a video analysis report recently, and one of the improvement opportunities I gave him was to make his entry closer to the shoulder. He was ready to accept this but still wondered why this was more advantageous than extending a bit farther over the surface like he sees so many swimmers do, even TI swimmers like Coach Terry in some of the videos. After writing my response I realized more of you might appreciate an answer too so I will share it here..
Good question, and I am glad you don’t accept the correction without understanding why.
There is a tendency for all of us to extend over the surface too far, and the faster the tempo, the more momentum and the farther that arm wants to extend before entering.
But the purpose for the arm entering sooner is that we want to deliver rotational force into the water through the extending arm as soon as streamline permits (as soon as we can shape the body into streamline to get more distance per stroke), because we need all that power to help part water molecules ahead, where our body needs to go. We have no need of parting air molecules since the body travels under water, not above.
As you observed in some videos, you will see this entry point creeping forward in any of us. But rather than a trait to imitate, it is a trait we want to resist.
It is a similar situation in breathing: we must discipline ourselves to turn the head to air and return as soon as possible, because the tendency is for us to get lazy (especially when feeling fatigued) and turn later, stay longer which ends up causing more problems. Though we see faces just beginning to touch air as the recovery arm comes out, and then see their arm go over their own goggles, this is something we want to avoid, not imitate.
In the entry, letting the arm extend above the surface is a ‘lazy’ action. When the body starts to feel fatigue the brain wants to shift its priority to energy conservation and it will pull resources away from actions that make more effective forward propulsion – in this case, it would rather extend in the air where it is easy on the arm, but extending in the water is the work that must continue if we want to make forward motion easier. Extending through air is easy… and ineffective at cutting that low-pressure path through the water for the rest of the body to slide through. This is one of the points in the stroke cycle where we must exercise great discipline to maintain optimal form, before and especially during fatigue.
At faster and faster tempos that arm will want to swing farther and farther forward – it has more momentum – but we should aim to resist and minimize this forward creep of the entry location.
Just as a musician may use a metronome to practice playing a song at a consistent speed, or a dancer may practice the moves to the beat of music, in our swimming too, we want to practice moving with precision through the stroke cycle over and over again and perfect tempo.
In the Dojo Knowledge Base you may find many articles about using tempo and the Tempo Trainer.
When we are viewing swimmers who are suppose to be examples for how we are to swim, we need to make sure we understand the context in which that person is swimming. Among the features that we may imitate, some features of the stroke might be suitable only for that context, some are suitable only for that person and some might be errors.
If you watch Coach Terry swim this way on a training video, Coach Shinji swim that way on Youtube, Michael Phelps swim another way on a World Record race, and then watch any other swimmer in a different situation, you start to notice differences in shape and differences in how they move. With all these variations becoming apparent, how do you know which example to follow?
It all takes some careful thinking, but your assessment is made easier when you follow a system that provides a structure and pathway set by orderly principles and logic. Such a system will necessarily lead to you toward a distinct way of shaping the stroke in certain situations. But even within such a system, and among those model swimmers and coaches, among those who are suppose to demonstrate the ideal, you will notice variations in how these principles are applied. What do you do with those variations? Who’s example do you follow?
In this 15 minute video I share my approach to this dilemma.
And below I will write out the essence of that talk…
First, there are principles in physics in water and physiology for all standard-equipped human bodies that all humans need to conform to. These principles will channel all humans swimmers (for each stroke style) to acquire certain similar body position and movement patterns.
In TI we have these three general principles to start with: Balance, Streamline and Synchronized Propulsion.
Is your stroke model conforming to these principles?
Second, humans are not natural swimmers. Water is extremely unstable environment. These ideal body positions and all the details of the movement patterns are impossible to perfect even for the best swimmers in the world but every swimmer is rewarded for inching closer to that ideal. No one is perfect, but it makes much more sense in terms of physics and physiology to put effort into perfecting technique than into increasing strength to make up for inferior technique.
So, do not assume everything you see in your favorite swimmer is ‘correct’ or even superior to another. You should use a principle to evaluate whether what you see if closer or farther away from the ideal. Even the best swimmers in the world are displaying obvious inefficiencies. It just goes to show that even the best have room to improve. They are limited in time and energy too. They can’t do it all.
Is your stroke model putting effort into solving his improvement gap with more power or more technical excellence? Does that match how you want to go about it?
Third, ‘the ideal stroke’ is not a single, one-size-fits-all situation thing – in each stroke style there is a variation of the ideal at different velocities – the swimmer needs to make slight adjustments as velocity increases or decreases. And, to adhere to the principles, the stroke needs to be adjusted further when swimming in different kinds of water situations – pool or open water, fresh or salt, flat or wavy, still or current, etc.
What is the context of that stroke demonstration? Does that match your context? Do the features of this person’s stroke apply to your situation?
Lastly, what are the individual circumstances that might give advantage or disadvantage to this stroke model? Age is a factor. Male or female is a factor. Athletic history is a factor. Personal physical or medical limitations are a factor.
The goal or values for swimming are a factor. What is this person willing to pay to swim that way?
The young people swimming in the Olympics and World Championships are paying a price in time, in effort, in risk with extreme technique, in wear-and-tear on the body to get the to top that virtually no older adult is likely willing to pay. And, the competitive system they have grown up in has filtered out the bodies and minds of thousands of very hard working people who could not survive the grind. Only the luckiest few make it onto the videos we now watch and admire. This is not to rule out all their examples, but only to recommend that they be evaluated with a healthy amount of critical thinking.
It would be best to look for role models among those who match your situation and aspirations in as many ways as possible.
~ ~ ~
There is a basic training principle you need to keep in mind:
The better your warm up, the better your swim will be – a practice, a race, or a long recreational cruise.
It does not fail – when I am disciplined to swim gently and quietly for a certain number of minutes, so much of my tension and tightness drops away and I feel free to work with more attention, more freedom, more energy, more intensity than when I don’t.
For me there is one critical marker – I need about 12 minutes of gentle, ‘silent swimming’ to get the systems of my body and my mind online and in tune to the first necessary degree. My next marker seems to be at around 25 miunutes. My warm ups are always longer than 25 minutes for this reason.
And, at about 45 minutes, I can feel my best strength and attention emerge, ready to work much longer.
With mindful experience you get to learn how your body responds to exercise. It may vary a bit for different people, but the basic principle of warm up applies to all humans. The longer you’ve been a consistent active athlete, it may be possible to have a shorter warm up than others, but considering my 30 year record of training, I suspect you may need at least as much warm up as I do to really step into your best working state.
I realize that many people have such a short time for practice and 25 minutes might consume most of that. But consider that for longevity sake, it is better to perform small portions of high quality activity and do it more frequently, than trying to fit more volume or intensity into a short and infrequent practice. The less frequently you practice, the less your body is prepared for that activity and the more you need that warm up.
If nothing else, aim for Silent Swimming – even in a variety of stroke styles if you like – for your first 15 minutes and let your body pull you into more intensity when it feels ready for it.
~ ~ ~
By the end of a series of live lessons in Level 1 I hope to have a chance to introduce you to the synchronization of the propulsive pieces of your stroke. Up to that point you have worked on shaping the individual sections of body position and movement patterns, and this is where you connect a few of them together to feel their combined effect. It is usually a surprising and thrilling experience because you can feel how force flows through your body more smoothly and with much better effect on how fast and far you travel on each stroke.
Here are the four main points of the body we look at for synchronization:
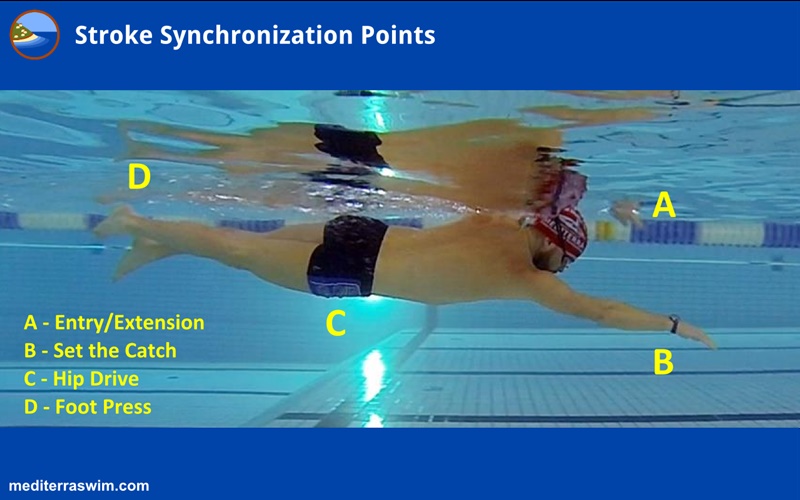
A is at that moment right when the finger tips pierce the water to begin the entry.
B is at that moment that your hand and forearm curve to ‘touch the ball’, and set the catch, just before you actually start to put pressure on the catch.
C is at that moment the torso starts to turn.
D is at that moment the upper (Skate side) foot begins to press down.
Synchronization practice involves a combination of any two of these points, to examine how they work together and then to fine tune their synchronized timing. You can work at combining AB, AC, AD, BC, BD, and CD.
All four points are doing something at about the same moment, but it is nearly impossible to concentrate on all four of them at once. So it is better to work on just two of them at a time, and circulate through the combinations.
AB is usually the first combination I teach you because these two are what you’ve already been focused upon in the lesson series.
Combining C with A or B is the next step because you’ve been working on hip rotation the whole time without necessarily focusing upon it in terms of propulsion – yet that rotating torso is what will make your swimming feel the most effortless – it is the key to everything! Thinking about the hip is the same thing as thinking about the torso – the hips and shoulders should be one solid torso unit, but it is easier to think of one specific point on the torso when examining the connection to the arms or legs, so we just use the hip as that point.
Using D will not really make sense until you have had some instruction on how to form a 2 Beat Kick. And trying to time the press of your foot does not work until you have first have the timing of AB worked out. So until you’ve got the timing of the arm-switch worked out and you’ve had some instruction on 2BK don’t worry about D.
Synchronization is what makes the ‘magic’ happen – the torso rotation produces the best force, and your appendages need to work in careful timing with that rotation in order to tap into and enhance that force.
There is not one precise timing that works best at all tempos. At different tempos, there will be slightly different timing between each part. In one tempo range two of these points might create the best effect when they happen simultaneously, while in a different tempo range one should happen a micro-second before the other in order to get the best effect.
For example, let’s look at AB.
When moving at slow and moderate tempos the fingers and wrist of your entry arm (A) may pierce the water before you set the catch (B). B happens just a micro-second after A. When moving at fast and sprint tempos, the fingertips of your entry arm may just cut into the surface as you set the catch. A and B will feel like they happen simultaneously.
Why did I put ‘slow’ in quotes? Because you currently have a range of comfortable tempo and what feels slow and fast to you may not be the same for someone else. If you have been using a Tempo Trainer and have some idea where your current comfortable range is, you may look at this scale to get an idea where your tempo range fits within the way tempo is used by a consensus of swimmers.
I could give you some idea of what the fine timing should be between two points at various tempos, but I would need to ask a dozen questions to get the context of your stroke. You will do well to experiment and discover for yourself what timing works better.
Using the AB combination, start with exaggerated mis-timing on a series of 2x 25. For the first 2x 25 have A clearly happen before B. Then on the next 2x 25 reverse that, have B clearly happen before A. Then do 2x 25 where you try to make A and B happen at the exact same moment – right between those two extremes you just experienced.
Take measurements inside and outside your body to evaluate the effect of each timing arrangement. Ask yourself:
From your current comfortable tempo range you may pick three tempos – one on the fast end of comfortable, one on the slow end, and one right in the middle. And run this experiment at each of those tempos, in order to see how you might fine tune the timing of those two points differently at different tempos.
Swim 3 Rounds of:
For each round:
Run this experiment with different combinations:
I like to train for part of the year on each extreme – a few months working on 100y sprint distance and the other months on longer distance 5km+. These two extremes involve the use of a totally different range of tempos: 0.75 to 0.85 for sprints and 0.90 to 1.00 for distance. And I modify the tempo range a bit more if the water will be cooler or warmer. Each tempo range requires me to calibrate the synchronization of the stroke to what feels the best and produces the best results. Probably 90% of more of my training involves synchronization focal points, and I find it to be the most thrilling because better synchronization produces better ‘magic’.
If you would like more practice at this you may check out this practice in the library for some ideas.